
0x00 中断
根据手册,RP2040 的每一个核上有一个 NVIC(ARM nested vectored interrupt controller)。共有 32 个中断号(即 0 到 31),其中 0~25 是硬件中断。分配如下:
| IRQ | Interrupt Source | IRQ | Interrupt Source | IRQ | Interrupt Source |
|---|---|---|---|---|---|
| 1 | TIMER_IRQ_1 | 9 | PIO1_IRQ_0 | 17 | CLOCKS_IRQ |
| 2 | TIMER_IRQ_2 | 10 | PIO1_IRQ_1 | 18 | SPI0_IRQ |
| 3 | TIMER_IRQ_3 | 11 | DMA_IRQ_0 | 19 | SPI1_IRQ |
| 4 | PWM_IRQ_WRAP | 12 | DMA_IRQ_1 | 20 | UART0_IRQ |
| 5 | USBCTRL_IRQ | 13 | IO_IRQ_BANK0 | 21 | UART1_IRQ |
| 6 | XIP_IRQ | 14 | IO_IRQ_QSPI | 22 | ADC0_IRQ_FIFO |
| 7 | PIO0_IRQ_0 | 15 | SIO_IRQ_PROC0 | 23 | I2C0_IRQ |
| 8 | PIO0_IRQ_1 | 16 | SIO_IRQ_PROC1 | 24 | I2C1_IRQ |
| 25 | RTC_IRQ |
想要设置 handler,有几种办法:
- 调用
irq_set_exclusive_handler(),为某个 irq 设置 handler。 - 调用
irq_add_shared_handler(),为某个 irq 添加 handler。这是用于多路复用的中断。 - 在源码中定义特殊的函数(例如
void isr_dma_0),但文档称此方法不会获得性能收益,所以不推荐使用。
现在,我们来设置一个中断:由 GPIO 15 的上升沿和下降沿触发,在串口输出一点东西。代码如下:
#include <stdio.h>
#include <iostream>
#include <bitset>
#include "pico/stdlib.h"
#include "hardware/gpio.h"

void say_hello(uint gpio, uint32_t event) {
    std::cout   << time_us_64()
                << " IRQ: gpio "
                << gpio
                << " event "
                << std::bitset<32>(event)
                << std::endl;
}

int main() {
    stdio_init_all();

    const uint pin = 15;

    gpio_init(pin);
    gpio_set_dir(pin, GPIO_IN);

    gpio_pull_up(pin);

    printf("Start...\n");

    gpio_set_irq_enabled_with_callback(
            pin,
            GPIO_IRQ_EDGE_RISE | GPIO_IRQ_EDGE_FALL,
            true,
            &say_hello);

    while (1) {
        tight_loop_contents();
    }
}
这里我们设置了 GPIO_IRQ_EDGE_RISE 和 GPIO_IRQ_EDGE_FALL 两个触发条件。按照文档,除了可以使用上述两种边缘触发之外,还可以使用电平触发。上面代码的尾部有一个 tight_loop_contents() 的死循环,这个写法在上一篇文章中也出现过。它的作用是让程序保持运行(而不是直接退出),从而 debugger 可以暂停程序。pico-examples 中的代码也经常使用这个技巧。
用杜邦线将 GPIO15 接地几次,观察输出:
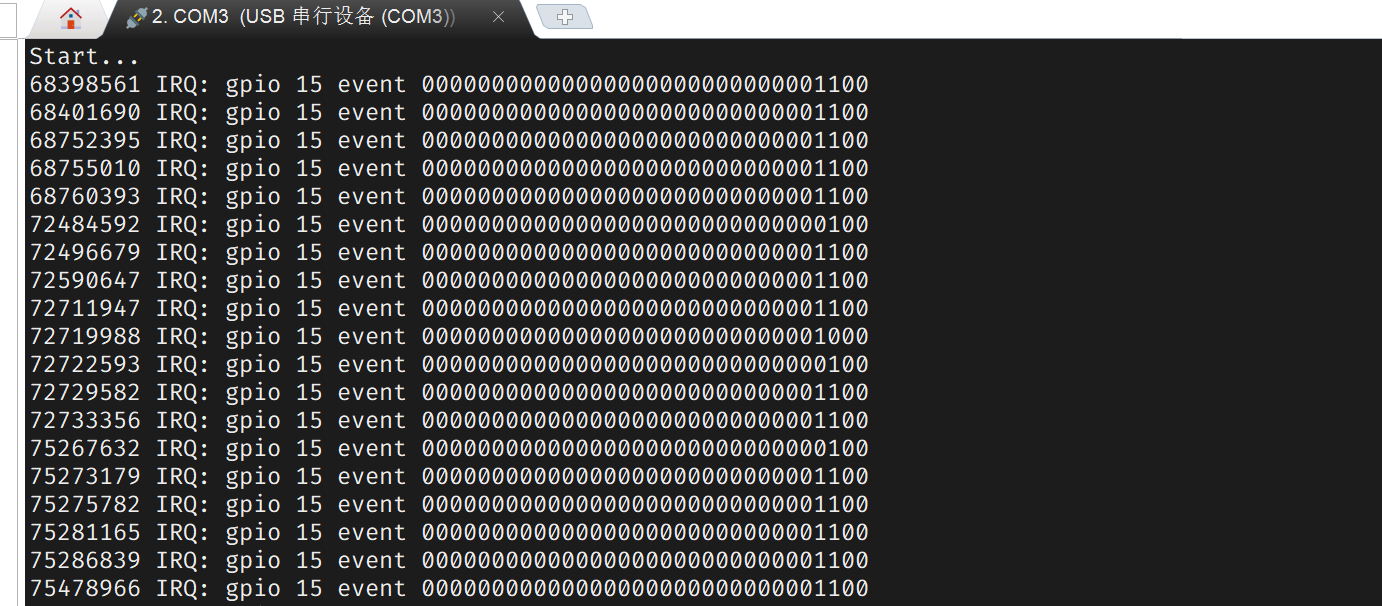
GPIO_IRQ_EDGE_FALL 的值是 4, GPIO_IRQ_EDGE_RISE 是 8。但从输出可以看到,有些 event 同时包含了这两个事件,说明在 handler 运行之前,gpio 经历了两次跳变。这些是毛刺。
我们的代码是使用高层次函数 gpio_set_irq_enabled_with_callback() 设置 handler,这显然并不在前文提到的三种设置 irq handler 的方法之中。现在来看看底层是如何实现的。跟进:
void gpio_set_irq_enabled_with_callback(uint gpio, uint32_t events, bool enabled, gpio_irq_callback_t callback) {
    gpio_set_irq_enabled(gpio, events, enabled);
    gpio_set_irq_callback(callback);
    if (enabled) irq_set_enabled(IO_IRQ_BANK0, true);
}
这三个函数的实现如下:
void gpio_set_irq_enabled(uint gpio, uint32_t events, bool enabled) {
    // Separate mask/force/status per-core, so check which core called, and
    // set the relevant IRQ controls.
    io_irq_ctrl_hw_t *irq_ctrl_base = get_core_num() ?
                                           &iobank0_hw->proc1_irq_ctrl : &iobank0_hw->proc0_irq_ctrl;
    _gpio_set_irq_enabled(gpio, events, enabled, irq_ctrl_base);
}

void gpio_set_irq_callback(gpio_irq_callback_t callback) {
    uint core = get_core_num();
    if (callbacks[core]) {
        if (!callback) {
            irq_remove_handler(IO_IRQ_BANK0, gpio_default_irq_handler);
        }
        callbacks[core] = callback;
    } else if (callback) {
        callbacks[core] = callback;
        irq_add_shared_handler(IO_IRQ_BANK0, gpio_default_irq_handler, GPIO_IRQ_CALLBACK_ORDER_PRIORITY);
    }
}

void irq_set_enabled(uint num, bool enabled) {
    check_irq_param(num);
    irq_set_mask_enabled(1u << num, enabled);
}
简而言之:
gpio_set_irq_enabled(gpio, events, enabled)的作用是写IO_BANK0_PROC0_INTE0寄存器,设置对应的触发条件位,让 GPIO 视时机产生中断。gpio_set_irq_callback(callback)的作用是将修改callbacks数组,然后调用irq_add_shared_handler()以设置gpio_default_irq_handler这个 handler。注意callbacks数组并不是系统的中断向量表,它只是gpio.c中定义的静态变量。从代码中我们也可以发现,如果想要响应两个 GPIO 的上升沿,则各自编写 handler 函数并调用gpio_set_irq_callback()是不行的,callbacks数组会被覆盖。应当使用gpio_add_raw_irq_handler_masked()。irq_set_enabled(IO_IRQ_BANK0, true)的作用是启动 core 的中断处理。
user_irq_claim_unused() 获得一个空闲的 irq 编号,用 irq_set_pending() 触发中断。0x01 定时器
RP2040 有一个 64-bit timer 外设,每 us 递增一次。另外,提供了 4 个闹钟,闹钟在匹配上 timer 的低 32 bit 时,可以产生中断。
现在通过定时器,实现「1s 之后输出一句 hello」。代码如下:
#include "pico/stdlib.h"
#include <stdio.h>

int64_t say_hello(alarm_id_t id, void *user_data) {
    printf("[%6lu] hello, world!\n", to_ms_since_boot(get_absolute_time()));

    return 0;
}

int main() {
    stdio_init_all();

    add_alarm_in_ms(1000, say_hello, nullptr, false);

    printf("[%6lu] sleep...\n", to_ms_since_boot(get_absolute_time()));

    while(true) {
        tight_loop_contents();
    }
}
跟进 add_alarm_in_ms 函数看一眼:
static inline alarm_id_t add_alarm_in_ms(uint32_t ms, alarm_callback_t callback, void *user_data, bool fire_if_past) {
    return alarm_pool_add_alarm_in_ms(alarm_pool_get_default(), ms, callback, user_data, fire_if_past);
}


static inline alarm_id_t alarm_pool_add_alarm_in_ms(alarm_pool_t *pool, uint32_t ms, alarm_callback_t callback, void *user_data, bool fire_if_past) {
    return alarm_pool_add_alarm_at(pool, delayed_by_ms(get_absolute_time(), ms), callback, user_data, fire_if_past);
}


alarm_id_t alarm_pool_add_alarm_at(alarm_pool_t *pool, absolute_time_t time, alarm_callback_t callback,
                                   void *user_data, bool fire_if_past) {
    bool missed = false;

    alarm_id_t public_id;
    do {
        uint8_t id_high = 0;
        uint32_t save = spin_lock_blocking(pool->lock);

        pheap_node_id_t id = add_alarm_under_lock(pool, time, callback, user_data, 0, false, &missed);
        if (id) id_high = *get_entry_id_high(pool, id);

        spin_unlock(pool->lock, save);

        if (!id) {
            // no space in pheap to allocate an alarm
            return -1;
        }

        // note that if missed was true, then the id was never added to the pheap (because we
        // passed false for create_if_past arg above)
        public_id = missed ? 0 : make_public_id(id_high, id);
        if (missed && fire_if_past) {
            // ... so if fire_if_past == true we call the callback
            int64_t repeat = callback(public_id, user_data);
            // if not repeated we have no id to return so set public_id to 0,
            // otherwise we need to repeat, but will assign a new id next time
            // todo arguably this does mean that the id passed to the first callback may differ from subsequent calls
            if (!repeat) {
                public_id = 0;
                break;
            } else if (repeat < 0) {
                time = delayed_by_us(time, (uint64_t)-repeat);
            } else {
                time = delayed_by_us(get_absolute_time(), (uint64_t)repeat);
            }
        } else {
            // either:
            // a) missed == false && public_id is > 0
            // b) missed == true && fire_if_past == false && public_id = 0
            // but we are done in either case
            break;
        }
    } while (true);
    return public_id;
}

static pheap_node_id_t add_alarm_under_lock(alarm_pool_t *pool, absolute_time_t time, alarm_callback_t callback,
                                       void *user_data, pheap_node_id_t reuse_id, bool create_if_past, bool *missed) {
    pheap_node_id_t id;
    if (reuse_id) {
        assert(!ph_contains_node(pool->heap, reuse_id));
        id = reuse_id;
    } else {
        id = ph_new_node(pool->heap);
    }
    if (id) {
        alarm_pool_entry_t *entry = get_entry(pool, id);
        entry->target = time;
        entry->callback = callback;
        entry->user_data = user_data;
        if (id == ph_insert_node(pool->heap, id)) {
            bool is_missed = hardware_alarm_set_target(pool->hardware_alarm_num, time);
            if (is_missed && !create_if_past) {
                ph_remove_and_free_node(pool->heap, id);
            }
            if (missed) *missed = is_missed;
        }
    }
    return id;
}
可见,当我们调用 add_alarm_in_ms 时,实际上发生了以下的事:
- 将当前时间加上延时时间,作为闹钟设定
- 从 pool 中找一个可用的 alarm(通过自旋锁做到并发安全)
- 若
fire_if_past=true且现在已经比计划要执行的时间还晚了,则立即执行一遍 callback
若要实现「每秒说一句 hello」,只需更改 say_hello 的返回值。代码如下:
int64_t say_hello(alarm_id_t id, void *user_data) {
    printf("[%6lu] hello, world!\n", to_ms_since_boot(get_absolute_time()));

    return 1000 * 1000;
}
查阅 alarm_callback_t 类型的文档可知:
- 若返回 0,则不重新安排闹钟
- 若返回正数,则在函数执行完成之后 $k$ us 再次触发函数
- 若返回负数,则在上次触发之后 $k$ us 再次触发函数
pico sdk 还提供了另一种方式来安排重复任务。代码如下:
#include "pico/stdlib.h"
#include <stdio.h>
bool say_hello(repeating_timer_t *rt) {
printf("[%6lu] hello, world!\n", to_ms_since_boot(get_absolute_time()));
return true;
}
int main() {
stdio_init_all();
repeating_timer_t rt;
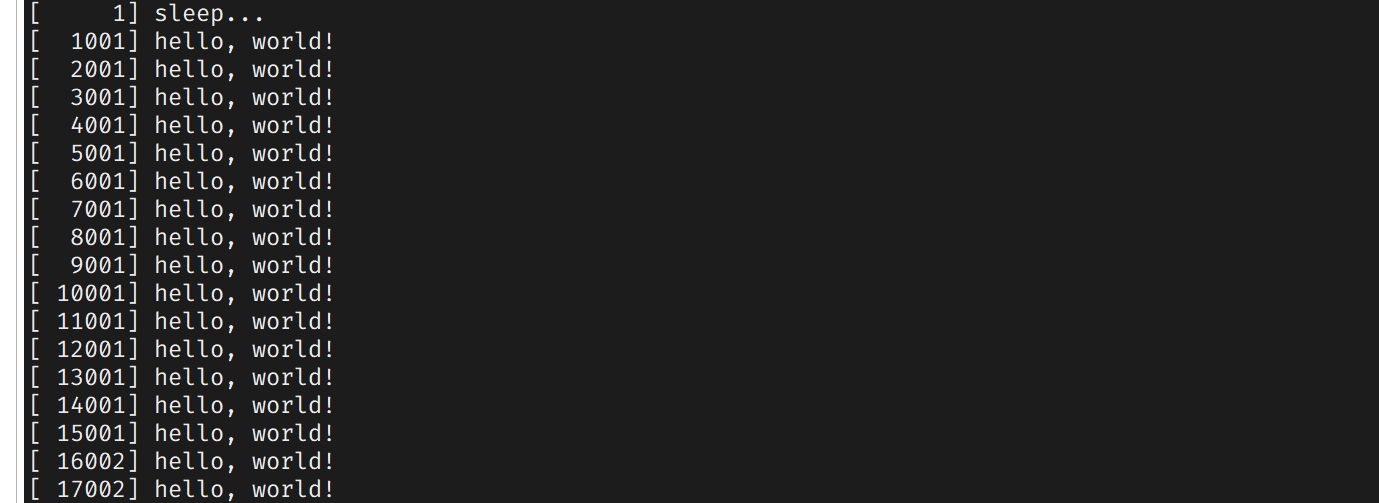
add_repeating_timer_ms(1000, say_hello, nullptr, &rt);
printf("[%6lu] sleep...\n", to_ms_since_boot(get_absolute_time()));
while(true) {
tight_loop_contents();
}
}add_repeating_timer_ms 这个 API 只要求 callback 函数返回 bool 值,true 表示下一次要继续执行,否则停止执行。
我们观察一下定时任务对程序控制流的影响。先让 main 函数定一个 10ms 执行一次的任务,然后 main 函数开始连续翻转 GPIO 6:
#include "pico/stdlib.h"
#include <stdio.h>

bool say_hello(repeating_timer_t *rt) {
    printf("[%6lu] hello, world!\n", to_ms_since_boot(get_absolute_time()));

    return true;
}

int main() {
    stdio_init_all();

    repeating_timer_t rt;
    add_repeating_timer_ms(10, say_hello, nullptr, &rt);

    printf("[%6lu] sleep...\n", to_ms_since_boot(get_absolute_time()));

    gpio_init(6);
    gpio_set_dir(6, GPIO_OUT);

    while(true) {
        gpio_put(6, true);
        gpio_put(6, false);
    }
}
可见,在处理 alarm 中断期间,cpu core 会离开原有的任务。这也是很多协议难以 bit banging(指用 cpu 操作 GPIO 以满足时序)的原因之一。
0x02 DMA 初级使用
DMA 是数据的搬运工。它可以将数据从某一片地址搬运到另一片地址,而不占用 cpu 时间。在每个时钟周期内,DMA 可以进行 32 bit 的读取和写入,通常有三种用法:内存到内存、内存到外设、外设到内存。
我们先利用 DMA 实现 memcpy 的功能。代码如下:
#include "pico/stdlib.h"
#include <cstdlib>
#include <cstdio>
#include "hardware/dma.h"


int main() {
    stdio_init_all();

    const char src[] = "Hello, world";
    printf("%p: %s\n", src, src);

    char *dst = static_cast<char *>(malloc(100));
    int chan = dma_claim_unused_channel(true);

    dma_channel_config c = dma_channel_get_default_config(chan);
    channel_config_set_transfer_data_size(&c, DMA_SIZE_8);
    channel_config_set_read_increment(&c, true);
    channel_config_set_write_increment(&c, true);

    dma_channel_configure(
            chan,
            &c,
            dst,
            src,
            sizeof(src),
            true
    );

    dma_channel_wait_for_finish_blocking(chan);

    printf("%p: %s\n", dst, dst);


    while(true) {
        tight_loop_contents();
    }
}

上述代码指定了每次传输 8 字节、传输后 src 地址自增、dst 地址自增、传输 sizeof(src) 次。
接下来,考虑利用 DMA 把数据运送到 uart 的 tx fifo。配置为 src 自增、dst 不变,代码如下:
#include "pico/stdlib.h"
#include <cstdlib>
#include <cstdio>
#include "hardware/dma.h"
#include "hardware/uart.h"


int main() {
    uart_init(uart0, 115200);

    gpio_set_function(0, GPIO_FUNC_UART);
    gpio_set_function(1, GPIO_FUNC_UART);

    uart_puts(uart0, "\r\n\r\nDMA begin:");

    int chan = dma_claim_unused_channel(true);

    dma_channel_config c = dma_channel_get_default_config(chan);
    channel_config_set_transfer_data_size(&c, DMA_SIZE_8);
    channel_config_set_read_increment(&c, true);
    channel_config_set_write_increment(&c, false);

    const static char src[] = "0123456789" "0123456789" "0123456789" "0123456789" "0123456789" "0123456789" "0123456789" "0123456789" "0123456789" "0123456789";

    dma_channel_configure(
            chan,
            &c,
            &uart0_hw->dr,
            src,
            sizeof(src),
            true
    );

    dma_channel_wait_for_finish_blocking(chan);

    while(true) {
        tight_loop_contents();
    }
}
为何发送的数据少于预期呢?我们注意到,uart 是低速设备,波特率仅为 115200,跟不上 DMA 的速度。但 DMA 会持续向 tx 寄存器写入,队列被塞满之后,新来的数据会被忽略。要解决此问题,我们需要限制 DMA 的传输速率。
事实上,可以通过 DREQ 信号控制 DMA 的传输,例如,采用 timer 来提供 DREQ 信号。代码如下:
int timer = dma_claim_unused_timer(true);
dma_timer_set_fraction(timer, 1, UINT16_MAX);
channel_config_set_dreq(&c, dma_get_timer_dreq(timer));
在代码中,我们将系统时钟进行 1/65535分频,由于 RP2040 默认系统频率是 125MHz,可以计算出分频后的时钟为 1907.378 Hz,即每 524.3 us 传输一次。实验结果如下:

这次数据被正确传输了。逻辑分析仪结果如下:

测量出的每次传输间隔为 524.596us,与计算结果十分一致。不过,采用时钟来强行控制每秒传输次数并不是最佳方案:因为我们可以直接使用 DREQ_UART0_TX。
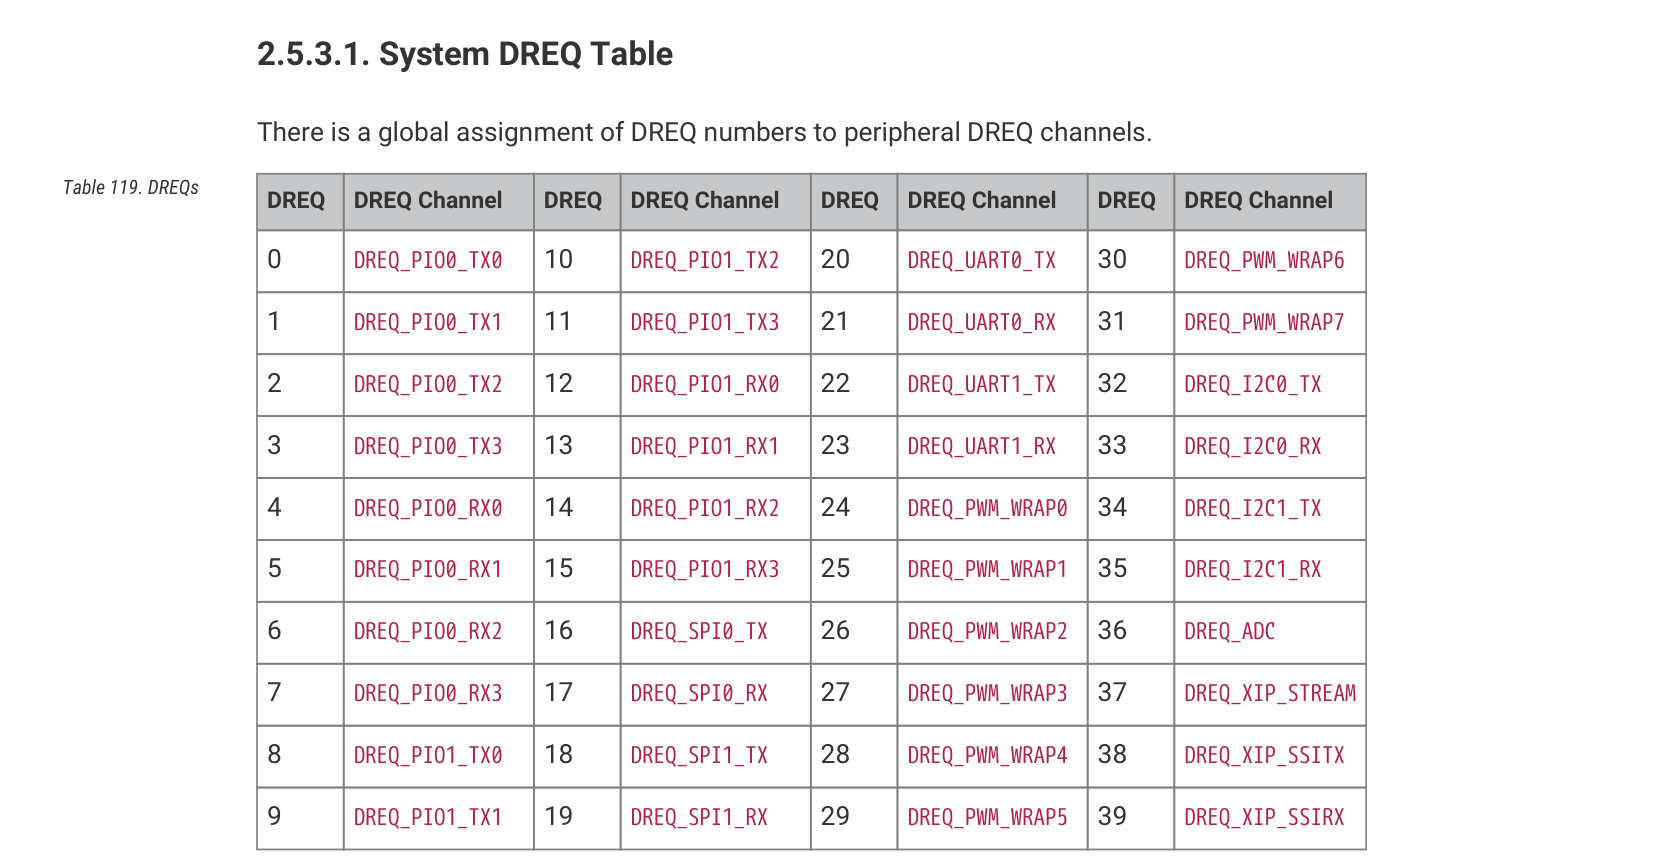
这样,我们只需要一行代码,即可使 DMA 适配串口的发送速率:
channel_config_set_dreq(&c, DREQ_UART0_TX);0x03 利用 DMA 实现串口回环
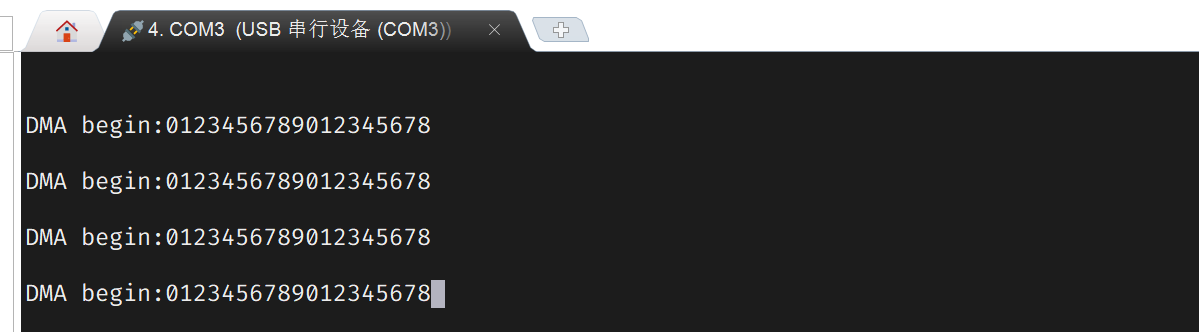
在测试 CH340 等 usb 转 uart 芯片时,我们会把 rx 和 tx 短接起来,看看能不能收到自己发出的信息。现在我们利用 DMA,来把 rx 收到的信息原样返回。在此场景下,DMA 的 src 和 dst 都是外设寄存器。代码如下:
#include "pico/stdlib.h"
#include <cstdio>
#include "hardware/dma.h"
#include "hardware/uart.h"


int main() {
    uart_init(uart0, 115200);

    gpio_set_function(0, GPIO_FUNC_UART);
    gpio_set_function(1, GPIO_FUNC_UART);

    uart_puts(uart0, "\r\n\r\nDMA begin:");

    int chan = dma_claim_unused_channel(true);

    dma_channel_config c = dma_channel_get_default_config(chan);
    channel_config_set_transfer_data_size(&c, DMA_SIZE_8);
    channel_config_set_read_increment(&c, false);
    channel_config_set_write_increment(&c, false);
    channel_config_set_dreq(&c, DREQ_UART0_RX);

    dma_channel_configure(
            chan,
            &c,
            &uart0_hw->dr,
            &uart0_hw->dr,
            UINT32_MAX,
            true
    );

    while(true) {
        tight_loop_contents();
    }
}
敲击键盘时,debug probe 的 tx 灯(黄色)与 rx 灯(绿色)同时闪烁,说明确实发回了数据。
0x04 访存效率讨论
我们应当更详细地讨论 DMA 传输数据的效率。回顾 bus fabric:
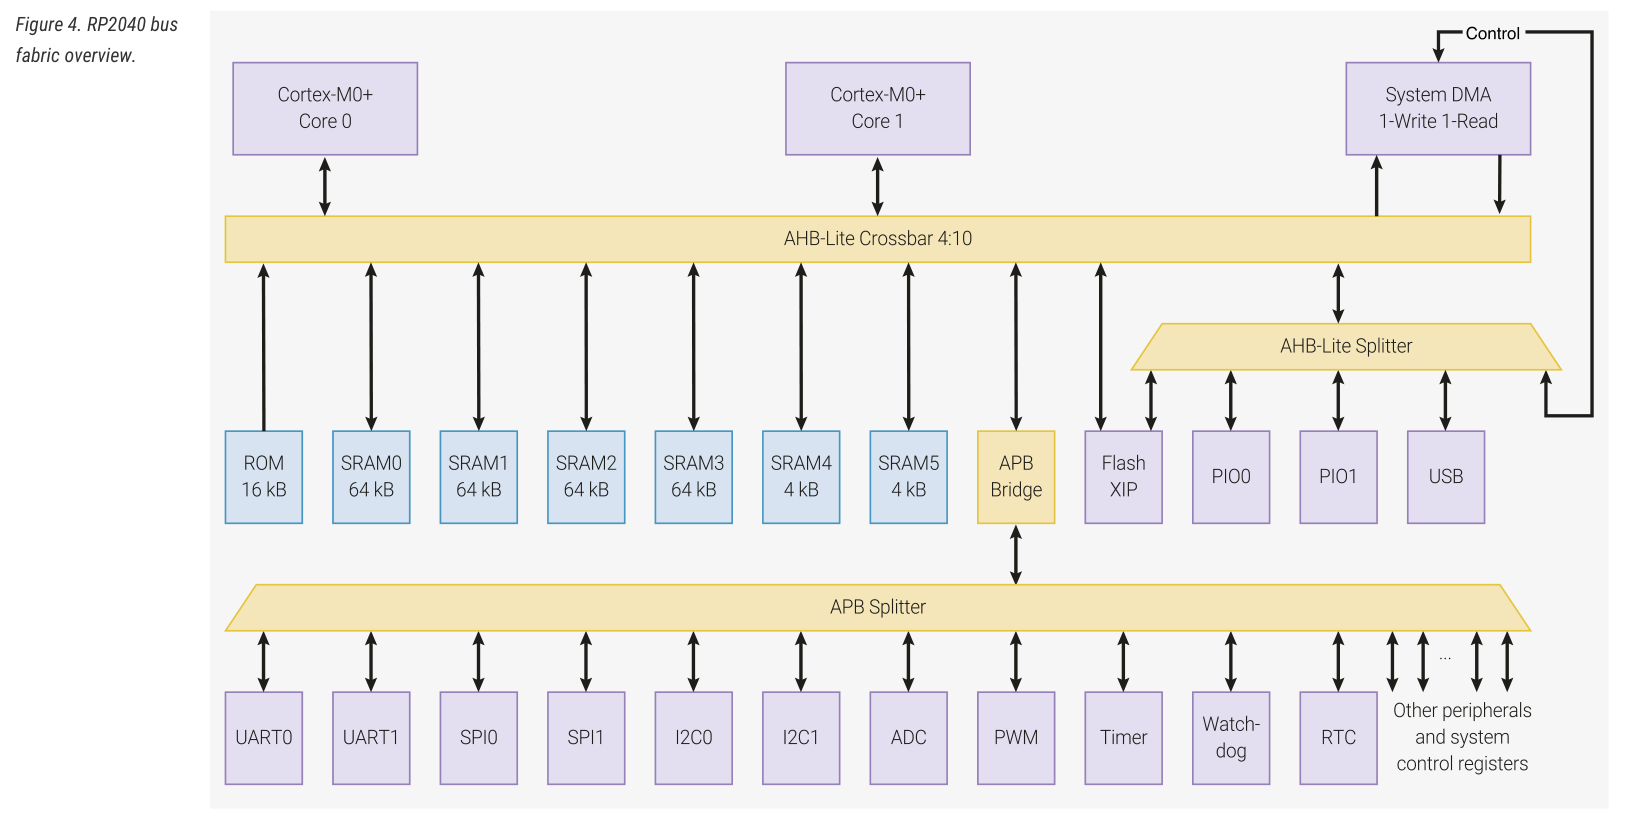
按照手册,四个 AHB-Lite master 可以同时访问四个不同的下游设备。如果多个 master 试图同时访问某个下游设备,那么裁判规则如下:首先,高优先级的 master 拥有访问权;若仍无法裁决,则在其中进行 round robin。默认情况下,四个 master 的优先级均为 0。
上一篇文章提到,为了提升并行能力,RP2040 的主内存空间是由四个 SRAM bank 交错提供的。从 0x20000000 开始的地址空间,会被以 4 byte 为单位轮流映射到这 4 个 bank 中。那么,我们可以想象这样几个场景:
- 线性地拷贝内存,例如
memcpy。如果每次传输时,src 都不幸地与 dst 在同一个 bank,则每个时钟周期要么读取,要么写入。这会使得吞吐率降低到 50%。 - cpu 在不停地读取内存,同时 DMA 在将一大片字符串送到某个寄存器。那么,cpu 访存时,有 25% 的概率撞上 DMA 正在使用的内存;cpu 在 round robin 中胜出的概率为 50%。这会导致 cpu 访存时有 12.5% 的概率需要等待一个时钟周期。
现在来进行线性拷贝实验。思路很简单:建立两个 uint32 数组,然后将 A 数组拷贝到 B 数组从 0、1、2、3 开始的位置上。这四次拷贝中,一定有一次拷贝是 src、dst 永远位于相同 SRAM bank 的。
一个最朴素的实现如下:启动 DMA,然后调用 dma_channel_wait_for_finish_blocking 等待 DMA 完成,多次重复实验取平均值。然而,在这个过程中,cpu 会进入 busy wait,去轮询 DMA 的寄存器,这对性能可能有影响(实际测试结果,一般情况的 2 KB 拷贝耗费 8.083 us,恶劣情况是 10.483 us)。我们最好让 cpu 呆在原地执行 nop 性质的指令。
DMA 可以配置 irq,在数据传输完成后会发起中断,我们可以利用这个特性来计时。做法如下:
- cpu core 将
start_time设为当前时间,然后启动 DMA,自己进入睡眠; - DMA 结束后触发中断,中断处理程序将
end_time设为当前时间; - cpu 从睡眠中唤醒,读取
end_time,计算实验结果。
然而,这个实现也存在问题。我们现在唯一的计时手段是 get_absolute_time(),它的精度是 us,但我们完成几 KB 拷贝,时间也是 us 级别的。这会造成相当严重的测量误差。因此,我们需要在中断程序中启动新一轮 DMA,完成 n 轮传输之后,最后报告结果。代码如下:
#include "pico/stdlib.h"
#include <cstdio>
#include "hardware/dma.h"

const uint num_bytes = 32 * 1024;

static uint32_t data_src[num_bytes / 4 + 16];
static uint32_t buffer[num_bytes / 4 + 16];

static uint64_t start_time, end_time;

static uint chan;

void dma_irq_handler(void);

void init_dma() {
    chan = dma_claim_unused_channel(true);

    dma_channel_config c = dma_channel_get_default_config(chan);
    channel_config_set_transfer_data_size(&c, DMA_SIZE_32);
    channel_config_set_read_increment(&c, true);
    channel_config_set_write_increment(&c, true);

    dma_channel_configure(
            chan,
            &c,
            nullptr,
            nullptr,
            num_bytes / 4,
            false
    );

    dma_channel_set_irq0_enabled(chan, true);
    irq_set_exclusive_handler(DMA_IRQ_0, dma_irq_handler);
    irq_set_enabled(DMA_IRQ_0, true);
}

void* data_dst;

void start_dma() {
    dma_channel_set_read_addr(chan, data_src, false);
    dma_channel_set_write_addr(chan, data_dst, false);
    dma_channel_start(chan);
}

static uint finished_epoch;
static const uint epoch_num = 1000;

// DMA 执行完成后触发
void dma_irq_handler() {
    finished_epoch++;

    if(finished_epoch != epoch_num) {
        start_dma();
    } else {
        end_time = to_us_since_boot(get_absolute_time());
    }
    dma_channel_acknowledge_irq0(chan);
}

float transfer_benchmark(void *dst) {
    start_time = to_us_since_boot(get_absolute_time());
    end_time = start_time;

    finished_epoch = 0;

    data_dst = dst;
    start_dma();

    sleep_ms(200);

    uint64_t total_us = end_time - start_time;
    printf("total_us = %llu\n", total_us);

    return (float)total_us / epoch_num;
}

int main() {
    stdio_init_all();

    puts("\n\nbegin test:");

    init_dma();

    for(int offset=0; offset<8; offset++) {
        float cost = transfer_benchmark(buffer + offset);
        printf("offset=%d: avg %f us / %d bytes copy from %p to %p\n", offset, cost, num_bytes, data_src, data_dst);
    }

    puts("done.");

    while(true) {
        tight_loop_contents();
    }
}
先来进行理论计算。一般情况下,每个时钟周期内,DMA 可以传输 4 字节的数据,因此传输 32768 个字节,需要 8192 个时钟周期。而一个时钟周期为 8ns,因此理论耗时为 65.536 us。特殊情况下,耗时翻倍,应当为 131.072 us。
然而,实验结果如下:
begin test:
total_us = 66082
offset=0: avg 66.082001 us / 32768 bytes copy from 2000847C to 2000043C
total_us = 66057
offset=1: avg 66.056999 us / 32768 bytes copy from 2000847C to 20000440
total_us = 98816
offset=2: avg 98.816002 us / 32768 bytes copy from 2000847C to 20000444
total_us = 66065
offset=3: avg 66.065002 us / 32768 bytes copy from 2000847C to 20000448
total_us = 66049
offset=4: avg 66.049004 us / 32768 bytes copy from 2000847C to 2000044C
total_us = 66057
offset=5: avg 66.056999 us / 32768 bytes copy from 2000847C to 20000450
total_us = 98816
offset=6: avg 98.816002 us / 32768 bytes copy from 2000847C to 20000454
total_us = 66065
offset=7: avg 66.065002 us / 32768 bytes copy from 2000847C to 20000458
done.
正常情况的吞吐率接近理论计算结果,但恶劣情况下的耗时仅为正常耗时的 1.5 倍而非 2 倍,与预期不符。而如果我们不是线性拷贝,而是从单个地址拷贝到单个地址(即把 read_increment, write_increment 设为 false),则结果如下:
begin test:
total_us = 131614
offset=0: avg 131.613998 us / 32768 bytes copy from 2000847C to 2000043C
total_us = 66081
offset=1: avg 66.081001 us / 32768 bytes copy from 2000847C to 20000440
total_us = 66081
offset=2: avg 66.081001 us / 32768 bytes copy from 2000847C to 20000444
total_us = 66081
offset=3: avg 66.081001 us / 32768 bytes copy from 2000847C to 20000448
total_us = 131601
offset=4: avg 131.600998 us / 32768 bytes copy from 2000847C to 2000044C
total_us = 66081
offset=5: avg 66.081001 us / 32768 bytes copy from 2000847C to 20000450
total_us = 66081
offset=6: avg 66.081001 us / 32768 bytes copy from 2000847C to 20000454
total_us = 66081
offset=7: avg 66.081001 us / 32768 bytes copy from 2000847C to 20000458
done.
异常情况耗时为正常情况的 2 倍,与理论计算结果相符。也就是说,我们现在面临这样的情况:「读写 bank 1、读写 bank 2、读写 bank3、读写 bank4」与连续读写同一个 bank,有巨大的性能差异(前者耗时为 1.5x 正常耗时,后者为 2x)。这该如何解释呢?

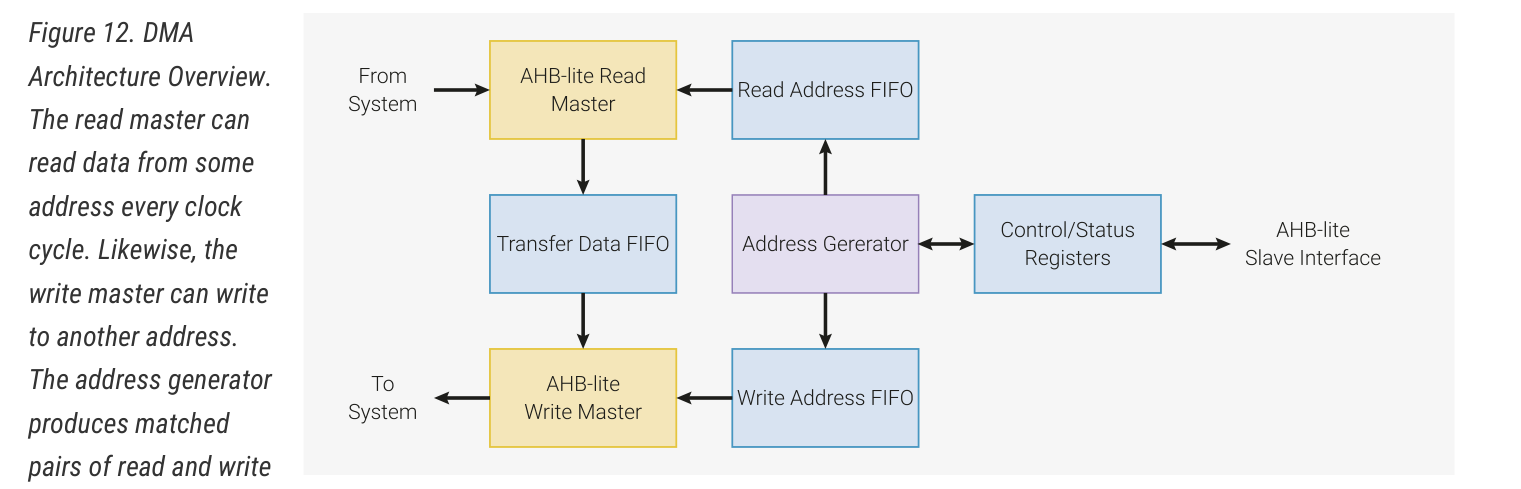
观察 DMA 的结构,它内部有读取地址队列、写入地址队列、数据队列,读写是分离的。也就是说,bank 2 的读取不一定要等到 bank 1 写入完成之后才能执行,而是在读完 bank 1 之后就可以执行;读取 bank 2 的时钟周期内,可能同时正在写入 bank 1。既然读取与写入并不耦合,那么拷贝耗时不到 2x 也是可以理解的了。而对于连续读写同一个 bank 的情况,由于该 bank 在一个时钟周期内只能读取或写入一次,因此耗时为理想情况的 2 倍。