

0x00 前言
过去一个月间,笔者学习了 RP2040 的 C++ 和 Python 开发,相关笔记已经连载在本站。笔者的主业是网络安全,现在正该对 pico sdk 进行漏洞挖掘,看看能否找出 bug。
显而易见,pico sdk 中最复杂的代码是 Pico W 开发板的网络协议栈,它有两个层级:由 cyw43-driver 提供 CYW43439 芯片驱动;由 lwip 提供 TCP/IP 服务。详情可参考 RP2040 学习笔记第六篇。这两个库都是第三方库,上游库本身没有用到 RP2040 特有的功能,可以猜测它们的输入输出方式会比较容易改造,使得我们可以在 x64 上跑起来程序,从而高效 fuzz。
嵌入式程序的 fuzz 远比一般 Linux 程序 fuzz 要艰难。写下本节时,笔者还不知道能否从 pico sdk 中寻找到漏洞。但不管怎么说,我们得尽力做好我们能做的事情,然后,“等待和希望”。
本文将详细分析 RP2040 与 CYW43439 的通讯,考察 pico sdk 是如何实现网络功能的。
0x01 cyw43-driver 分析
cyw43-driver 是 George Robotics(即开发 MicroPython 的公司)的开源项目,我们可以在 Github 上找到原始代码,这份代码被搬运到了 pico sdk 的 lib/cyw43-driver 目录下。在学习笔记中,我们曾经追踪过“点亮 GPIO”的通讯过程,发现 cyw43 库使用了 RP2040 的 PIO 来完成 SPI 通讯。然而,PIO 是 RP2040 这个 MCU 的特殊功能,George Robotics 的原始版本 cyw43-driver 不太可能如此实现 SPI。翻阅代码,发现 George Robotics 版本的 cyw43_write_bytes 函数并非由 PIO 实现,而是:
int cyw43_write_bytes(cyw43_int_t *self, uint32_t fn, uint32_t addr, size_t len, const uint8_t *buf) {
    (void)self;
    return cyw43_sdio_cmd53(true, fn, addr, len, (uint8_t *)buf);
}
而 pico sdk 版本中,这个函数会去调用 cyw43_spi_transfer() 进行 SPI 传输。显然树莓派在移植 cyw43-driver 时修改了不少代码。我们接下来的漏洞挖掘,也在 pico sdk 移植版 cyw43-driver 的基础上进行。
既然 cyw43-driver 是负责与 CYW43439 通讯的底层组件,我们理应先阅读 CYW43439 的文档。文档有 89 页,逐行阅读不太可行,必须抓重点。先看这颗芯片的特性:
- 支持 2.4GHz WiFi(IEEE 802.11b/g/n)和蓝牙 5.0
- 搭载 Cortex-M3 处理器、512KB SRAM、640KB ROM
- WiFi 支持 SDIO v2.0 和 generic SPI 协议
结构图如下:
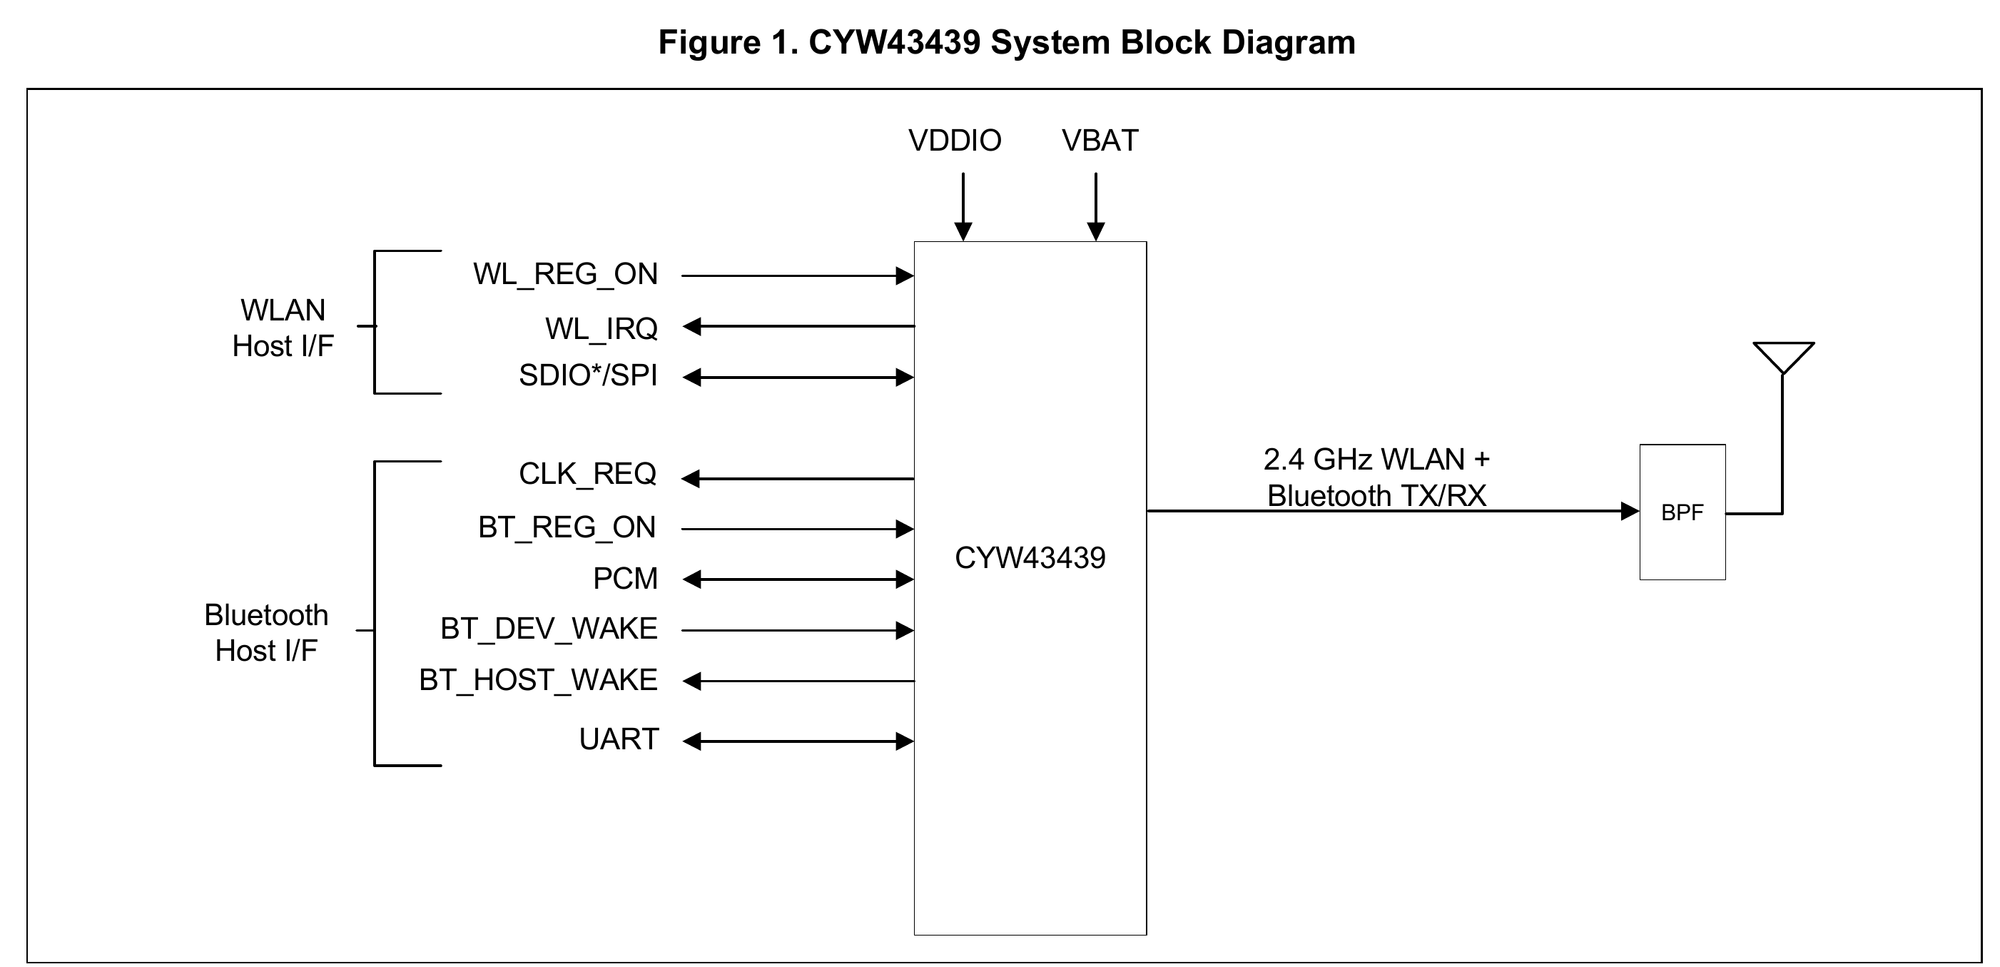
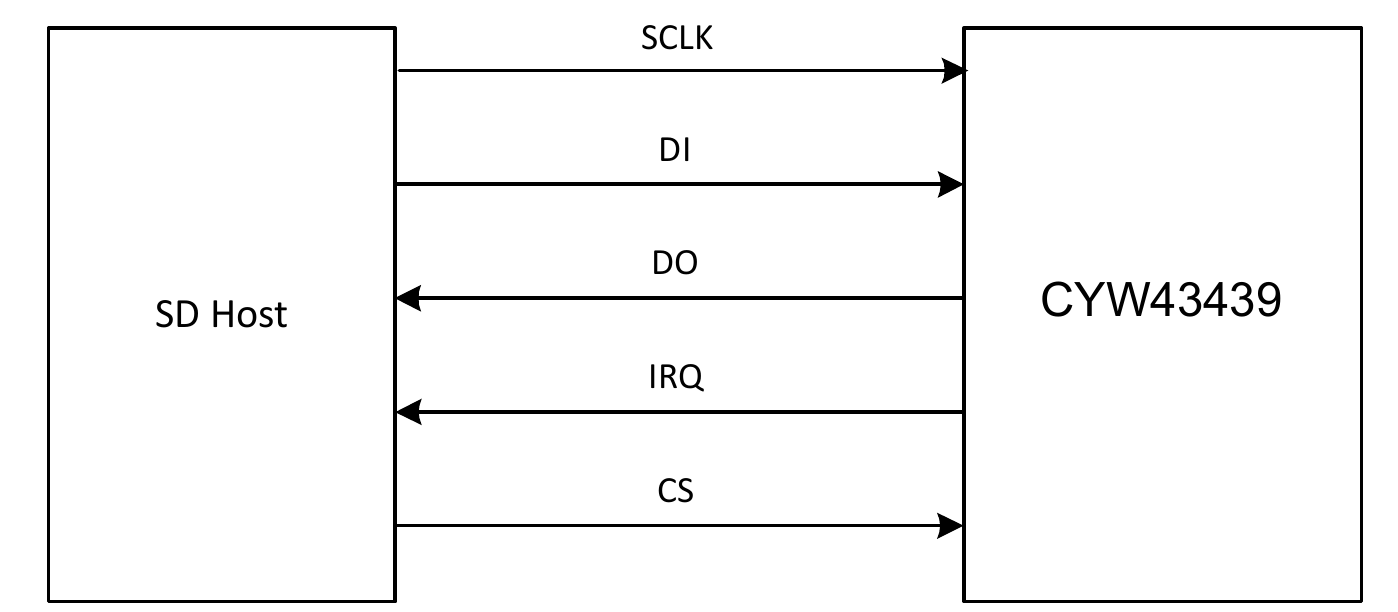
查阅资料可知,SDIO 有 4-bit、1-bit 和 SPI 模式,因此 SDIO 可以兼容 SPI 协议。CYW43439 的 SPI 模式的最大频率为 50MHz,信号线为时钟、MOSI、MISO、CS 和 IRQ。每次传输,帧尺寸上限为 2KB。
指令为 32bit,结构如下图所示,详见 datasheet 的 4.2 Generic SPI Mode 章节。
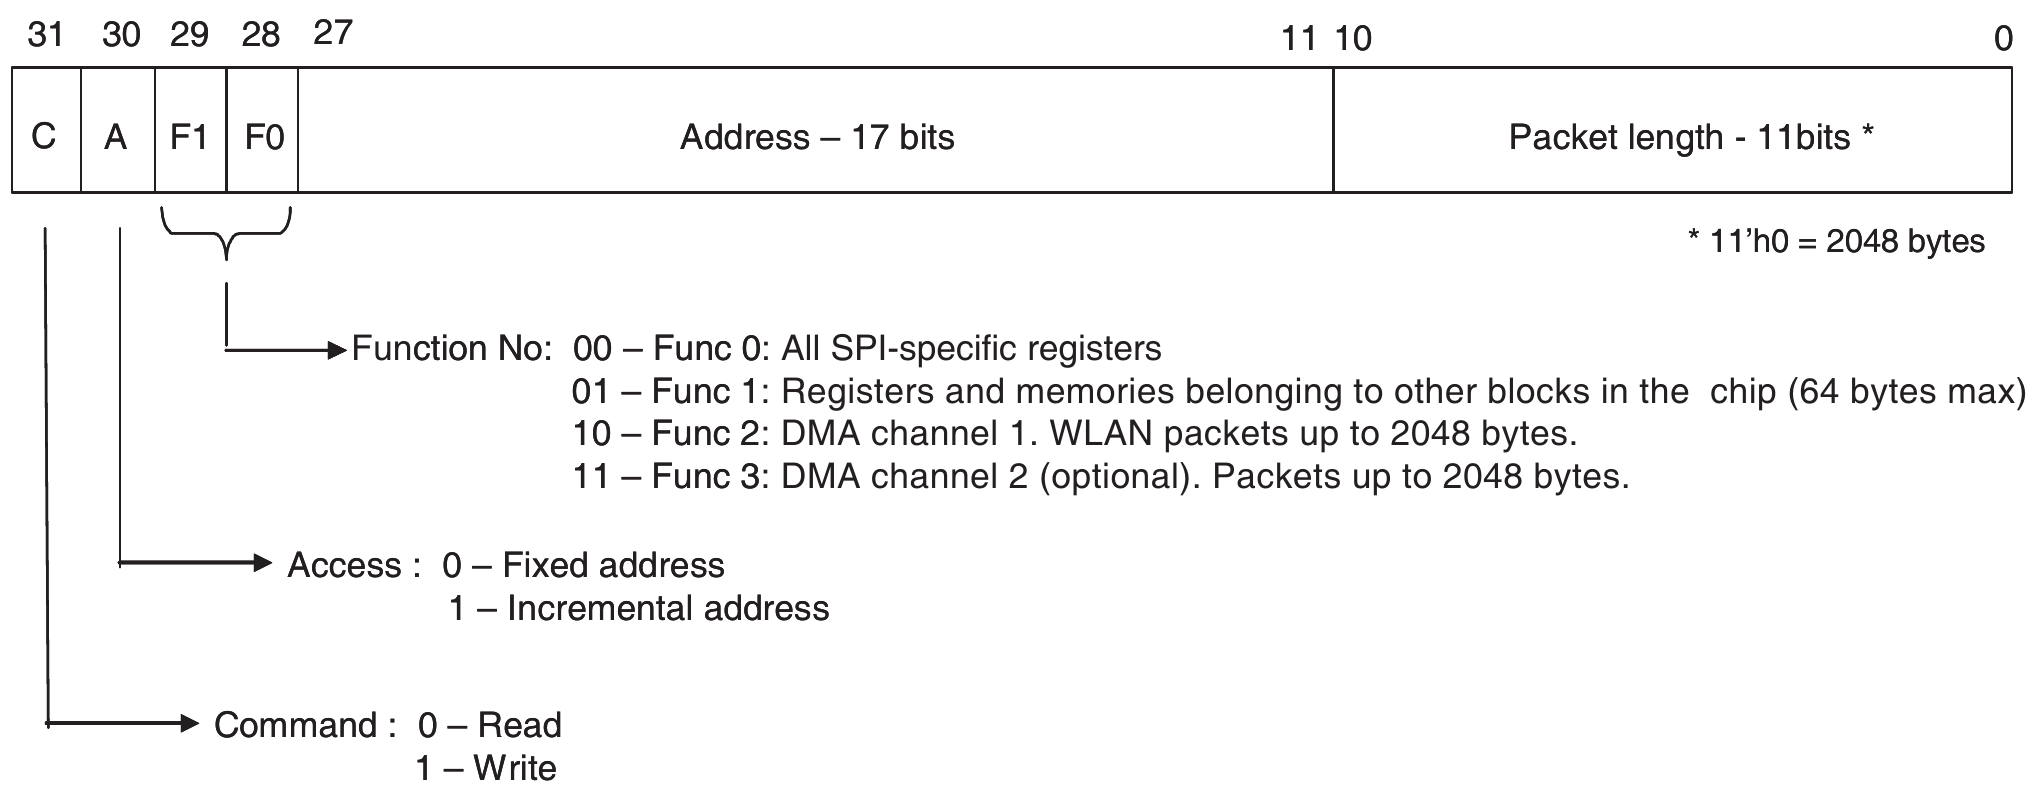
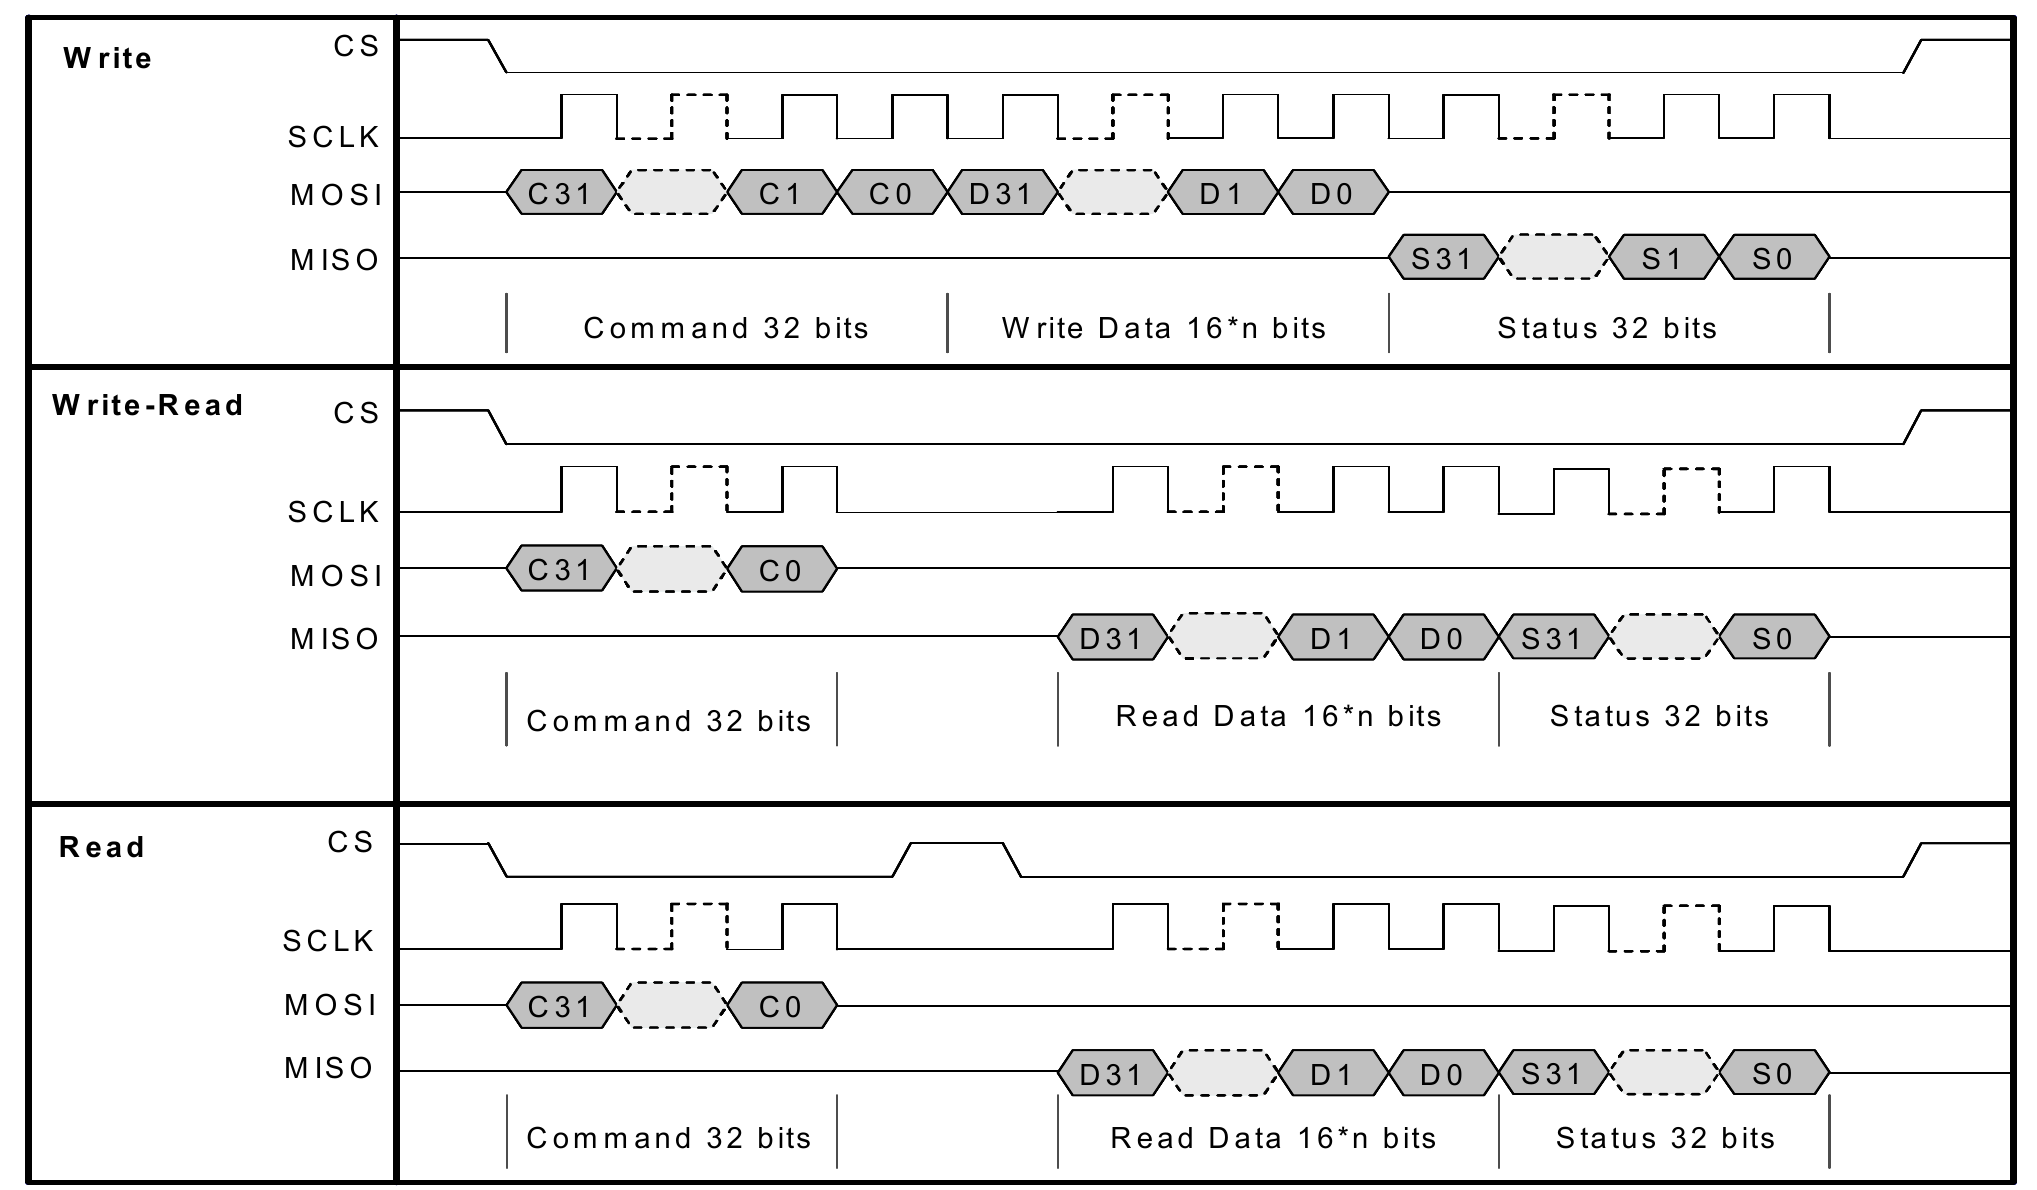
对于 write 指令,首先发送 32bit 的指令码,紧接着发送数据块;对于 read 指令,也是先发送 32bit 指令码,然后在一段(确定性的)时延之后,读取数据块。另外,如果开启了 status 信息(默认开启),则 CYW43439 会返回 32bit 的信息,表示当前状态。
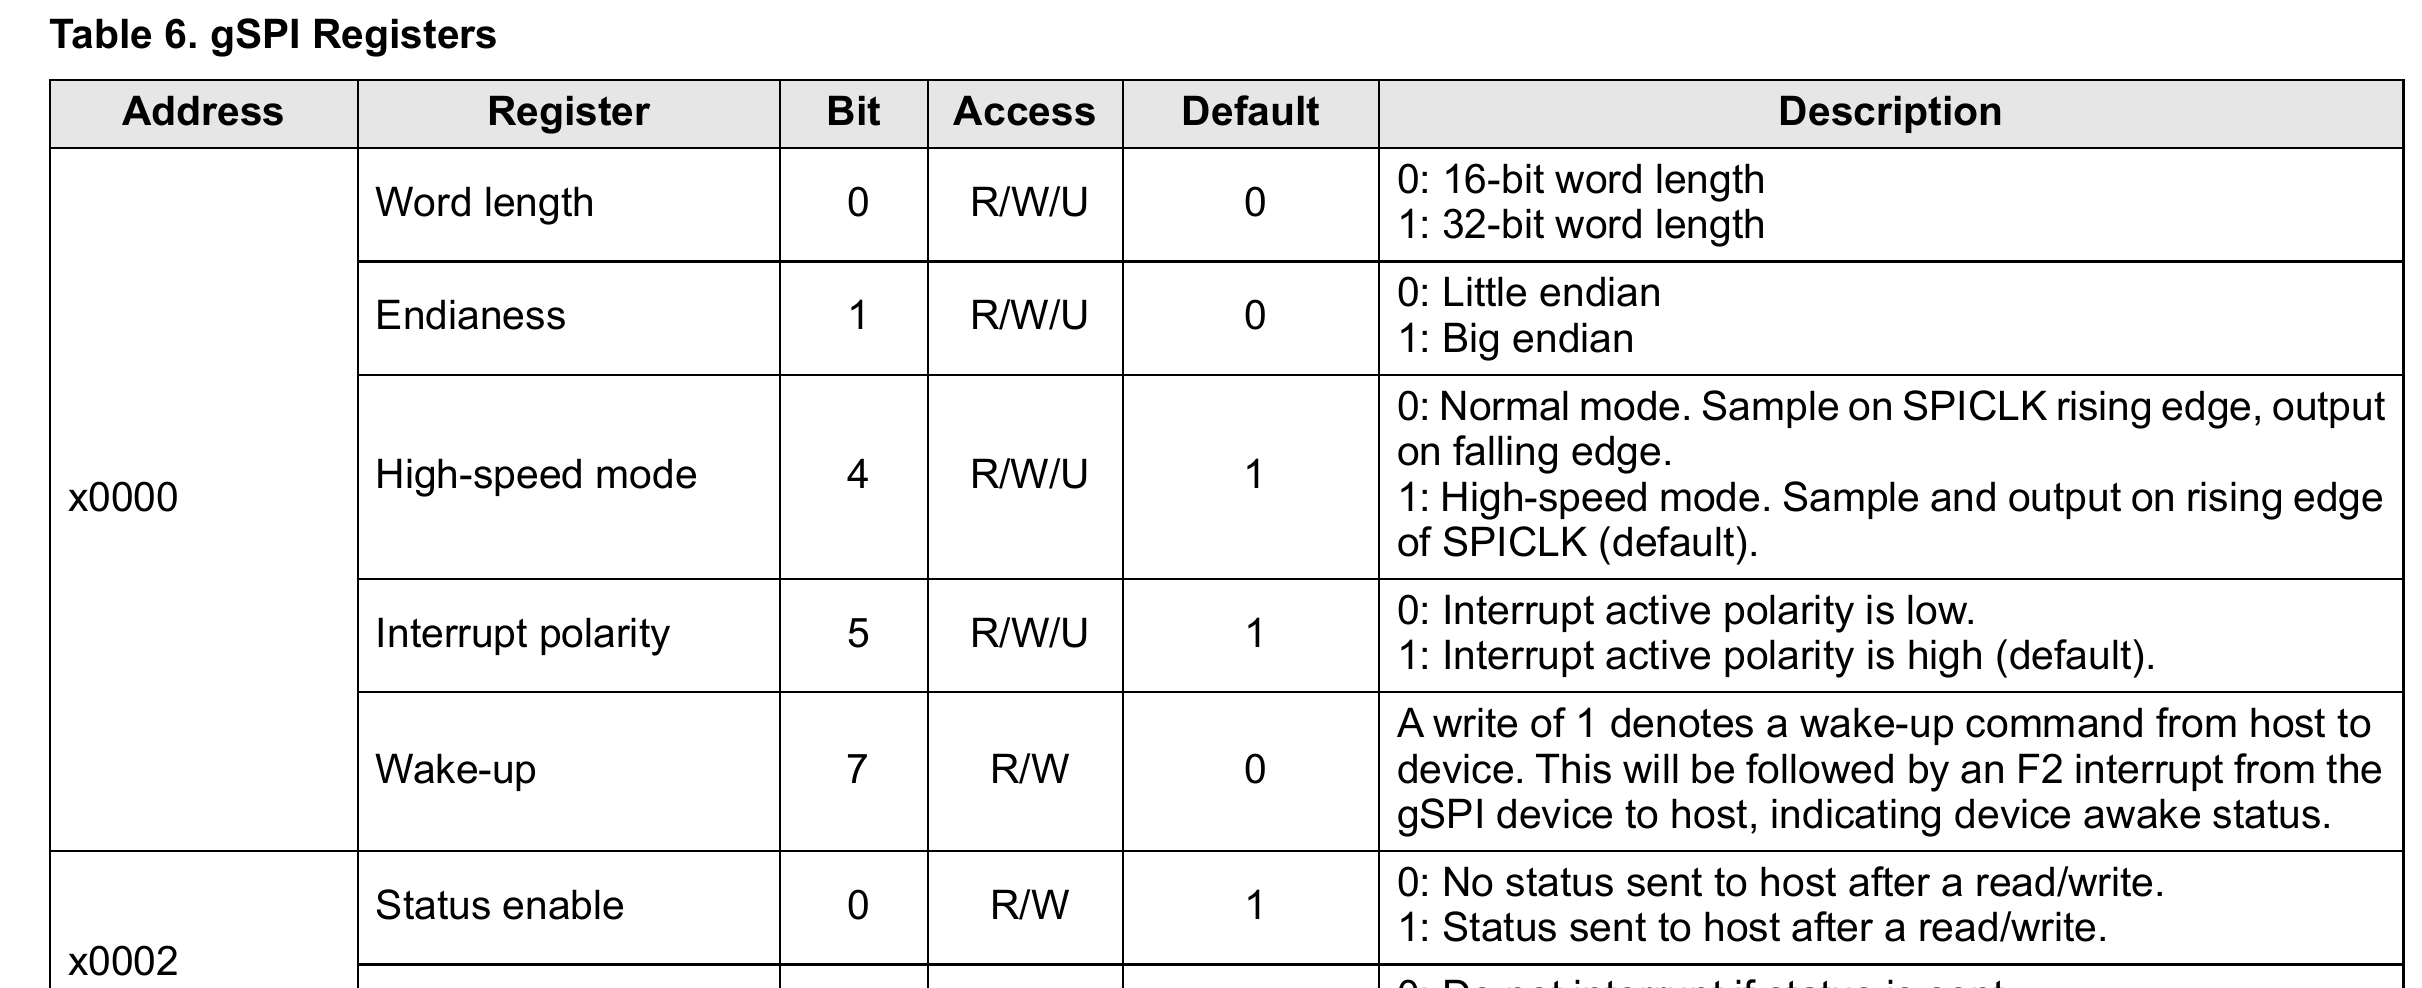
各个寄存器的详细信息在 Table 6. gSPI Registers 给出:
至此,我们已经了解芯片的 SPI 通讯方式。现在来做一个实验,截取 driver 与芯片之间的通讯。注意到 cyw43_spi_transfer() 中已经预留 DUMP_SPI_TRANSACTIONS 调试逻辑,我们只需修改 src/rp2_common/pico_cyw43_driver/cyw43_bus_pio_spi.c 的内容,无需用逻辑分析仪抓取 SPI 通讯信号。代码修改如下:
// 修改前
#ifndef NDEBUG
//#define ENABLE_SPI_DUMPING 1
#endif

// Set to 1 to enable
#if ENABLE_SPI_DUMPING //NDEBUG
#if 0
#define DUMP_SPI_TRANSACTIONS(A) A
#else
static bool enable_spi_packet_dumping; // set to true to dump
#define DUMP_SPI_TRANSACTIONS(A) if (enable_spi_packet_dumping) {A}
#endif

static uint32_t counter = 0;
#else
#define DUMP_SPI_TRANSACTIONS(A)
#endif


// 修改后
#ifndef NDEBUG
#define ENABLE_SPI_DUMPING 1
#endif

// Set to 1 to enable
#if ENABLE_SPI_DUMPING //NDEBUG
#if 1
#define DUMP_SPI_TRANSACTIONS(A) A
#else
static bool enable_spi_packet_dumping; // set to true to dump
#define DUMP_SPI_TRANSACTIONS(A) if (enable_spi_packet_dumping) {A}
#endif

static uint32_t counter = 0;
#else
#define DUMP_SPI_TRANSACTIONS(A)
#endif
现在来运行 pico-examples 中的 picow_blink 项目,捕获 RP2040 与 CYW43439 之间的通讯。初始化过程中进行了 3000 余次通讯,然后 LED 开始闪烁。最初几次通讯日志是:
[0] bus TX/RX 4 bytes rx 8:
a0 04 40 00
RXed:
00 00 00 00 03 03 03 03

[1] bus TX/RX 4 bytes rx 8:
a0 04 40 00
RXed:
00 00 00 00 be ad fe ed

[2] bus TX only 8 bytes:
00 04 c0 00 04 b3 00 02
RXed:

[3] bus TX/RX 4 bytes rx 8:
04 00 00 40
RXed:
00 00 00 00 b3 00 02 00

[4] bus TX only 8 bytes:
01 e8 00 c0 10 00 00 00
RXed:

[5] bus TX only 8 bytes:
01 20 00 c0 99 00 00 00
RXed:
按照手册,主机应该轮询 F0 0x14 寄存器,直到返回 0xFEEDBEAD 表示 CYW43439 已就绪。上面日志中的 a0 04 40 00 即为轮询请求,由于此时处于 16 bit 字长小端序模式,故实际应当理解为 0x4000a004,语义为 read, incremental, F0, addr=0x14,packet_len=4。第二次轮询时,CYW43439 返回了 0xfeedbead,表示设备就绪。
接下来,主机发送了 00 04 c0 00 04 b3 00 02,其中指令是 0xc0000004(语义为 write, incremental, F0, addr=0x00, packet_len=4),数据是 0x000204b3。这条指令设置了一些寄存器:
- word length 从 0 改为 1,即字长由 16 bit 变成 32 bit
- endianess 从 0 改为 1,即改用大端序
- high-speed mode 保持 1 不变,即在 CLK 上升沿取样并输出
- interrupt polarity 保持 1 不变,即启用中断
- wake-up 从 0 变成 1,表示唤醒设备
- status enable 从 1 变成 0,即不要回复 status
- interrupt with status 从 0 变成 1,即无论是否有 status,都启用中断
果然 RX 没有任何回复,所以这条指令确实关掉了 status。接着往下看,主机发出了 04 00 00 40,当前处于 32 bit 字长大端序模式,因此指令为 0x40000004,语义是 read, incremental, F0, addr=0x00, packet_len=4,即读取 SPI 寄存器。结果是 00 00 00 00 b3 00 02 00,即 0x000200b3,与我们之前写进去的值一致(寄存器 0x01 没有值)。
我们可以写一个脚本来 parse 报文:
import struct
from rich import print

class SpiLog():

    def __init__(self, s):
        tx, rx = s.split(':')[1:3]
        tx, rx = map(lambda x: x.replace('RXed', '').strip(), [tx, rx])
        self.tx, self.rx = map(lambda x: bytes.fromhex(x), [tx, rx])

    def parse(self):
        print(f'{self.tx = }')
        print('tx len:', len(self.tx))

        p = self.tx[:4][::-1]
        cmd = struct.unpack('>I', p)[0]

        print('cmd:', hex(cmd), ' '.join(map(lambda x: bin(x)[2:].rjust(8, '0'), p)))
        flag_rw = cmd >> 31
        flag_access = cmd >> 30 & 1
        funcno = cmd >> 28 & 0b11
        addr = cmd >> 11 & ((1<<17) - 1)
        length = cmd & ((1<<11) - 1)

        print(f' - rw: {["read", "write"][flag_rw]}')
        print(f' - access: {["fixed", "incremental"][flag_access]}')
        print(f' - function no: F{funcno}')
        print(f' - address: {hex(addr)}')
        print(f' - packet len: {length}')

        print('\n')
现在,来看看 blink 程序如何设置 CYW43439 上的 GPIO。报文如下:
[3828] bus TX only 48 bytes:
2c 00 00 e0 2c 00 d3 ff  32 00 00 0c 00 00 00 00
07 01 00 00 10 00 00 00  02 00 33 00 00 00 00 00
67 70 69 6f 6f 75 74 00  01 00 00 00 01 00 00 00
RXed:
解析如下:
self.tx = b',\x00\x00\xe0,\x00\xd3\xff2\x00\x00\x0c\x00\x00\x00
          \x00\x07\x01\x00\x00\x10\x00\x00\x00\x02\x003\x00\x00\x00\x00
          \x00gpioout\x00\x01\x00\x00\x00\x01\x00\x00\x00'
tx len: 48
cmd: 0xe000002c 11100000 00000000 00000000 00101100
 - rw: write
 - access: incremental
 - function no: F2
 - address: 0x0
 - packet len: 44
rx len: 0
datasheet 中并没有给出完整的 F1、F2 和 F3 的功能描述。英飞凌提供了一个开源的 host driver,它能提供透明的网络传输服务,即:执行主机的网络请求,但向主机隐藏 SPI、SDIO 等底层传输细节。运行在 SPI 上的协议是 BDC/LMAC,每个 IEEE 802.11 frame 会被包裹在一个数据包中。不过,cyw43-driver 的代码规模远比英飞凌官方驱动小,应该是对英飞凌驱动的轻量级重写。
前文提到,在初始化过程中,driver 会与 SoC 通讯 3000 余次。通讯次数如此之多,是因为在初始化期间,pico sdk 会在 cyw43_ll_bus_init() 中调用 cyw43_download_resource() ,将一份固件烧录到 CYW43439 中。这份固件位于 lib/cyw43-driver/firmware/w43439A0_7_95_49_00_combined.h,长达 225KB。调用栈:
cyw43_write_bytes cyw43_bus_pio_spi.c:543
cyw43_download_resource cyw43_ll.c:438
cyw43_ll_bus_init cyw43_ll.c:1658
cyw43_ensure_up cyw43_ctrl.c:187
cyw43_wifi_on cyw43_ctrl.c:469
cyw43_wifi_set_up cyw43_ctrl.c:549
cyw43_arch_enable_sta_mode cyw43_arch.c:33
main picow_wifi_scan.c:33
platform_entry crt0.S:260
最终由 cyw43_write_bytes() 将固件写入到 SoC。具体而言,写入 F1 0x8000 地址,每次写 64 个字节,共写入 224256 个字节,即 3504 次写入。
现在来观察 cyw43-driver 暴露了哪些接口。写个脚本分析 cyw43.h:
import clang.cindex
import os

def is_function_decl(node):
    return node.kind == clang.cindex.CursorKind.FUNCTION_DECL

def get_functions_in_header(file_path):
    index = clang.cindex.Index.create()
    translation_unit = index.parse(file_path)

    index = clang.cindex.Index.create()
    compdb = clang.cindex.CompilationDatabase.fromDirectory('/home/blue/Desktop/dev/pico-examples/cmake-build-debug/')
    commands = compdb.getCompileCommands(file_path)

    file_args = []
    for command in commands:
        for argument in command.arguments:
            file_args.append(argument)

    file_args = file_args[2:-2]

    translation_unit = index.parse(file_path, file_args)


    def traverse_cursor(cursor):
        if is_function_decl(cursor) and cursor.location.file and cursor.location.file.name == file_path:
            print(f"{os.path.basename(cursor.location.file.name)}: {cursor.spelling}")

        for child in cursor.get_children():
            traverse_cursor(child)

    for cursor in translation_unit.cursor.get_children():
        traverse_cursor(cursor)

get_functions_in_header('/home/blue/Desktop/dev/pico-sdk/lib/cyw43-driver/src/cyw43.h')
结果如下:
cyw43.h: cyw43_init
cyw43.h: cyw43_deinit
cyw43.h: cyw43_ioctl
cyw43.h: cyw43_send_ethernet
cyw43.h: cyw43_wifi_pm
cyw43.h: cyw43_wifi_get_pm
cyw43.h: cyw43_wifi_link_status
cyw43.h: cyw43_wifi_set_up
cyw43.h: cyw43_wifi_get_mac
cyw43.h: cyw43_wifi_update_multicast_filter
cyw43.h: cyw43_wifi_scan
cyw43.h: cyw43_wifi_scan_active
cyw43.h: cyw43_wifi_join
cyw43.h: cyw43_wifi_leave
cyw43.h: cyw43_wifi_get_rssi
cyw43.h: cyw43_wifi_get_bssid
cyw43.h: cyw43_wifi_ap_get_ssid
cyw43.h: cyw43_wifi_ap_get_auth
cyw43.h: cyw43_wifi_ap_set_channel
cyw43.h: cyw43_wifi_ap_set_ssid
cyw43.h: cyw43_wifi_ap_set_password
cyw43.h: cyw43_wifi_ap_set_auth
cyw43.h: cyw43_wifi_ap_get_max_stas
cyw43.h: cyw43_wifi_ap_get_stas
cyw43.h: cyw43_is_initialized
cyw43.h: cyw43_cb_tcpip_init
cyw43.h: cyw43_cb_tcpip_deinit
cyw43.h: cyw43_cb_tcpip_set_link_up
cyw43.h: cyw43_cb_tcpip_set_link_down
cyw43.h: cyw43_tcpip_link_status
cyw43.h: cyw43_gpio_set
cyw43.h: cyw43_gpio_get
cyw43.h: cyw43_pm_value
这些都是比较底层的功能。cyw43-driver 仅仅提供了链路层 API,而 TCP/IP 要靠 lwip 来实现。后文将分析 lwip。
0x02 pico_async_context 分析
我们在学习笔记第六篇中提到过,pico sdk 中有轮询、中断、FreeRTOS 三种方式使用网络功能。然而,cyw43 驱动只有一份(lib/cyw43-driver 是底层代码, src/rp2_common/pico_cyw43_driver 是其 adapter),它是如何支持多种使用方法的?答案在于 pico_async_context 库。
根据文档,async context 库“提供了一个逻辑上单线程的上下文,来开展工作并响应异步请求”,因此适合用于包装第三方库。针对异步任务,async context 库提供两种 worker:
- when_pending worker:当有 pending 状态的任务时,予以处理
- at_time worker:在特定时间执行
pico sdk 提供了三种 context:
- async_context_poll:用户需要手动调用
async_context_poll()处理任务 - async_context_threadsafe_background:利用中断来处理回调,用户无需手动调用
async_context_poll() - async_context_freertos:使用单独的“async_context” task。
这部分的文档语焉不详,读完之后如堕云雾。我们直接来看代码。相关文件位于 src/rp2_common/pico_async_context 目录。
at time worker 定义在 src/rp2_common/pico_async_context/include/pico/async_context.h:
typedef struct async_work_on_timeout {
    /*!
     * private link list pointer
     */
    struct async_work_on_timeout *next;
    /*!
     * Method called when the timeout is reached; may not be NULL
     *
     * Note, that when this method is called, the timeout has been removed from the async_context, so
     * if you want the timeout to repeat, you should re-add it during this callback
     * @param context
     * @param timeout
     */
    void (*do_work)(async_context_t *context, struct async_work_on_timeout *timeout);
    /*!
     * The next timeout time; this should only be modified during the above methods
     * or via async_context methods
     */
    absolute_time_t next_time;
    /*!
     * User data associated with the timeout instance
     */
    void *user_data;
} async_at_time_worker_t;
这其中有一个函数指针 do_work,即为回调函数。再看 when pending worker 的定义:
typedef struct async_when_pending_worker {
    /*!
     * private link list pointer
     */
    struct async_when_pending_worker *next;
    /*!
     * Called by the async_context when the worker has been marked as having "work pending"
     *
     * @param context the async_context
     * @param worker the function to be called when work is pending
     */
    void (*do_work)(async_context_t *context, struct async_when_pending_worker *worker);
    /**
     * True if the worker need do_work called
     */
    bool work_pending;
    /*!
     * User data associated with the worker instance
     */
    void *user_data;
} async_when_pending_worker_t;
如果有 pending 状态的任务待执行,则 do_work 会被调用以完成任务。这个 worker 是否有任务待执行,是由 work_pending 属性表示的。
/*!
 * \brief Implementation of an async_context type, providing methods common to that type
 * \ingroup pico_async_context
 */
typedef struct async_context_type {
    uint16_t type;
    // see wrapper functions for documentation
    void (*acquire_lock_blocking)(async_context_t *self);
    void (*release_lock)(async_context_t *self);
    void (*lock_check)(async_context_t *self);
    uint32_t (*execute_sync)(async_context_t *context, uint32_t (*func)(void *param), void *param);
    bool (*add_at_time_worker)(async_context_t *self, async_at_time_worker_t *worker);
    bool (*remove_at_time_worker)(async_context_t *self, async_at_time_worker_t *worker);
    bool (*add_when_pending_worker)(async_context_t *self, async_when_pending_worker_t *worker);
    bool (*remove_when_pending_worker)(async_context_t *self, async_when_pending_worker_t *worker);
    void (*set_work_pending)(async_context_t *self, async_when_pending_worker_t *worker);
    void (*poll)(async_context_t *self); // may be NULL
    void (*wait_until)(async_context_t *self, absolute_time_t until);
    void (*wait_for_work_until)(async_context_t *self, absolute_time_t until);
    void (*deinit)(async_context_t *self);
} async_context_type_t;

/*!
 * \brief Base structure type of all async_contexts. For details about its use, see \ref pico_async_context.
 * \ingroup pico_async_context
 *
 * Individual async_context_types with additional state, should contain this structure at the start.
 */
struct async_context {
    const async_context_type_t *type;
    async_when_pending_worker_t *when_pending_list;
    async_at_time_worker_t *at_time_list;
    absolute_time_t next_time;
    uint16_t flags;
    uint8_t  core_num;
};
上面代码中的 async_context_type 类似于接口,指定了 type 属性和一大批函数指针。async_context 则在上述接口以外,还记录了 worker 链表、context 所属的 cpu 核等信息。
接下来是几个函数:
static inline void async_context_acquire_lock_blocking(async_context_t *context) {
    context->type->acquire_lock_blocking(context);
}

static inline void async_context_release_lock(async_context_t *context) {
    context->type->release_lock(context);
}

static inline void async_context_lock_check(async_context_t *context) {
    context->type->lock_check(context);
}

// 这个函数用于在 context 中立即执行一段代码
static inline uint32_t async_context_execute_sync(async_context_t *context, uint32_t (*func)(void *param), void *param) {
    return context->type->execute_sync(context, func, param);
}

// 以下是 at time worker 管理
static inline bool async_context_add_at_time_worker(async_context_t *context, async_at_time_worker_t *worker) {
    return context->type->add_at_time_worker(context, worker);
}

static inline bool async_context_add_at_time_worker_at(async_context_t *context, async_at_time_worker_t *worker, absolute_time_t at) {
    worker->next_time = at;
    return context->type->add_at_time_worker(context, worker);
}

static inline bool async_context_add_at_time_worker_in_ms(async_context_t *context, async_at_time_worker_t *worker, uint32_t ms) {
    worker->next_time = make_timeout_time_ms(ms);
    return context->type->add_at_time_worker(context, worker);
}

static inline bool async_context_remove_at_time_worker(async_context_t *context, async_at_time_worker_t *worker) {
    return context->type->remove_at_time_worker(context, worker);
}

// 以下是 when pending worker 管理
static inline bool async_context_add_when_pending_worker(async_context_t *context, async_when_pending_worker_t *worker) {
    return context->type->add_when_pending_worker(context, worker);
}

static inline bool async_context_remove_when_pending_worker(async_context_t *context, async_when_pending_worker_t *worker) {
    return context->type->remove_when_pending_worker(context, worker);
}

// 将这个 worker 标记为“有 pending 任务”
static inline void async_context_set_work_pending(async_context_t *context, async_when_pending_worker_t *worker) {
    context->type->set_work_pending(context, worker);
}

// 执行 context 中的任务。用户应该经常调用这个函数
static inline void async_context_poll(async_context_t *context) {
    if (context->type->poll) context->type->poll(context);
}

static inline void async_context_wait_until(async_context_t *context, absolute_time_t until) {
    context->type->wait_until(context, until);
}

static inline void async_context_wait_for_work_until(async_context_t *context, absolute_time_t until) {
    context->type->wait_for_work_until(context, until);
}

static inline void async_context_wait_for_work_ms(async_context_t *context, uint32_t ms) {
    async_context_wait_for_work_until(context, make_timeout_time_ms(ms));
}

// 返回这个 context 所属的 cpu 核
static inline uint async_context_core_num(const async_context_t *context) {
    return context->core_num;
}

static inline void async_context_deinit(async_context_t *context) {
    context->type->deinit(context);
}
以上就是 async context 的接口。我们观察 CMake 文件:
pico_add_library(pico_async_context_base NOFLAG)
target_include_directories(pico_async_context_base_headers INTERFACE ${CMAKE_CURRENT_LIST_DIR}/include)
target_sources(pico_async_context_base INTERFACE
        ${CMAKE_CURRENT_LIST_DIR}/async_context_base.c
        )
pico_mirrored_target_link_libraries(pico_async_context_base INTERFACE pico_platform)

pico_add_library(pico_async_context_poll)
target_sources(pico_async_context_poll INTERFACE
        ${CMAKE_CURRENT_LIST_DIR}/async_context_poll.c
)
pico_mirrored_target_link_libraries(pico_async_context_poll INTERFACE pico_async_context_base)

pico_add_library(pico_async_context_threadsafe_background)
target_sources(pico_async_context_threadsafe_background INTERFACE
        ${CMAKE_CURRENT_LIST_DIR}/async_context_threadsafe_background.c
        )
pico_mirrored_target_link_libraries(pico_async_context_threadsafe_background INTERFACE pico_async_context_base)

pico_add_library(pico_async_context_freertos)
target_sources(pico_async_context_freertos INTERFACE
        ${CMAKE_CURRENT_LIST_DIR}/async_context_freertos.c
        )
pico_mirrored_target_link_libraries(pico_async_context_freertos INTERFACE pico_async_context_base)
pico sdk 提供了 pico_async_context_poll、 pico_async_context_threadsafe_background 、 pico_async_context_freertos ,它们都是基于 pico_async_context_base 的。看一眼 async_context_base.c:
#include "pico/async_context_base.h"

bool async_context_base_add_at_time_worker(async_context_t *self, async_at_time_worker_t *worker) {
    async_at_time_worker_t **prev = &self->at_time_list;
    while (*prev) {
        if (worker == *prev) {
            return false;
        }
        prev = &(*prev)->next;
    }
    *prev = worker;
    worker->next = NULL;
    return true;
}
上述代码逻辑就是把新的 at time worker 插入到 context 的 at time worker 链表尾部。紧接着还有几个函数用于 worker 链表的增删,我们快进到后面的代码:
async_at_time_worker_t *async_context_base_remove_ready_at_time_worker(async_context_t *self) {
    async_at_time_worker_t **best_prev = NULL;
    if (self->at_time_list) {
        absolute_time_t earliest = get_absolute_time();
        for (async_at_time_worker_t **prev = &self->at_time_list; *prev; prev = &(*prev)->next) {
            if (absolute_time_diff_us((*prev)->next_time, earliest) >= 0) {
                earliest = (*prev)->next_time;
                assert(!is_at_the_end_of_time(earliest)); // should never be less than now
                best_prev = prev;
            }
        }
    }
    async_at_time_worker_t *rc;
    if (best_prev) {
        rc = *best_prev;
        *best_prev = rc->next;
    } else {
        rc = NULL;
    }
    return rc;
}
这个函数找出现在最该干活的那个 at time worker,将其从链表中删除并返回。接着往下看:
void async_context_base_refresh_next_timeout(async_context_t *self) {
    absolute_time_t earliest = at_the_end_of_time;
    for (async_at_time_worker_t *worker = self->at_time_list; worker; ) {
        async_at_time_worker_t *next = worker->next;
        if (absolute_time_diff_us(worker->next_time, earliest) > 0) {
            earliest = worker->next_time;
        }
        worker = next;
    }
    self->next_time = earliest;
}
上述函数用于把 at time worker 链表中最早的预定干活时间记录到 context 的 next_time 属性中。
absolute_time_t async_context_base_execute_once(async_context_t *self) {
    async_at_time_worker_t *at_time_worker;
    while (NULL != (at_time_worker = async_context_base_remove_ready_at_time_worker(self))) {
        at_time_worker->do_work(self, at_time_worker);
    }
    for(async_when_pending_worker_t *when_pending_worker = self->when_pending_list; when_pending_worker; when_pending_worker = when_pending_worker->next) {
        if (when_pending_worker->work_pending) {
            when_pending_worker->work_pending = false;
            when_pending_worker->do_work(self, when_pending_worker);
        }
    }
    async_context_base_refresh_next_timeout(self);
    return self->next_time;
}
上述函数的逻辑是:首先把现在该做的所有 at time 工作做完,然后把所有 when pending 工作做完,最后更新 context 的 next_time 属性并返回。
bool async_context_base_needs_servicing(async_context_t *self) {
    absolute_time_t now = get_absolute_time();
    if (self->at_time_list) {
        for (async_at_time_worker_t *worker = self->at_time_list; worker; worker = worker->next) {
            if (absolute_time_diff_us(worker->next_time, now) >= 0) {
                return true;
            }
        }
    }
    for(async_when_pending_worker_t *when_pending_worker = self->when_pending_list; when_pending_worker; when_pending_worker = when_pending_worker->next) {
        if (when_pending_worker->work_pending) {
            return true;
        }
    }
    return false;
}
上述函数的作用是检查 context 中是否有该干的活。到此为止,我们看完了 async_context_base.c 文件。
下面来看最朴素的 context 实现, async_context_poll.c。
static void noop(__unused async_context_t *context) { }

static const async_context_type_t template;

bool async_context_poll_init_with_defaults(async_context_poll_t *self) {
    memset(self, 0, sizeof(*self));
    self->core.core_num = get_core_num();
    self->core.type = &template;
    self->core.flags = ASYNC_CONTEXT_FLAG_POLLED | ASYNC_CONTEXT_FLAG_CALLBACK_FROM_NON_IRQ;
    sem_init(&self->sem, 1, 1);
    return true;
}
上述代码中的 sem_init() 是一个 pico_sync 库提供的信号量 API。初始化 sem 之后,可以用 sem_acquire() 获取许可,用 sem_release() 释放许可。上面的代码初始化了一个 initial_permits 和 max_permits 均为 1 的 sem,故事实上这是一个互斥锁。
static void async_context_poll_wake_up(async_context_t *self_base) {
    sem_release(&((async_context_poll_t *)self_base)->sem);
}

// 给一个 when pending worker 标记为「有任务待执行」
static void async_context_poll_requires_update(async_context_t *self_base, async_when_pending_worker_t *worker) {
    worker->work_pending = true;
    async_context_poll_wake_up(self_base);
}

// 把 context 中现在该做的事全做完
static void async_context_poll_poll(async_context_t *self_base) {
    async_context_base_execute_once(self_base);
}

static void async_context_poll_wait_until(__unused async_context_t *self_base, absolute_time_t until) {
    sleep_until(until);
}

static void async_context_poll_wait_for_work_until(async_context_t *self_base, absolute_time_t until) {
    absolute_time_t next_time = self_base->next_time;
    async_context_poll_t *self = (async_context_poll_t *)self_base;
    sem_acquire_block_until(&self->sem, absolute_time_min(next_time, until));
}
这份代码中的 async_context_poll_wait_for_work_until 中,会等到超时或是锁被释放。但由于 poll 模式运行在单核上,故这个锁其实有点多余。
static void async_context_poll_lock_check(async_context_t *self_base) {
    if (__get_current_exception() || get_core_num() != self_base->core_num) {
        panic("async_context_poll context check failed (IRQ or wrong core)");
    }
}

uint32_t async_context_poll_execute_sync(__unused async_context_t *context, uint32_t (*func)(void *param), void *param) {
    return func(param);
}上述代码中,__get_current_exception 是返回当前 cpu 正在处理的 irq 编号,若并未在处理 irq 则返回 0。因此 async_context_poll_lock_check 不允许通过 irq 或其它核心访问 context。
文件的最后,是一张函数表:
static const async_context_type_t template = {
        .type = ASYNC_CONTEXT_POLL,
        .acquire_lock_blocking = noop,
        .release_lock = noop,
        .lock_check = async_context_poll_lock_check,
        .execute_sync = async_context_poll_execute_sync,
        .add_at_time_worker = async_context_base_add_at_time_worker,
        .remove_at_time_worker = async_context_base_remove_at_time_worker,
        .add_when_pending_worker = async_context_base_add_when_pending_worker,
        .remove_when_pending_worker = async_context_base_remove_when_pending_worker,
        .set_work_pending = async_context_poll_requires_update,
        .poll = async_context_poll_poll,
        .wait_until = async_context_poll_wait_until,
        .wait_for_work_until = async_context_poll_wait_for_work_until,
        .deinit = noop,
};
以上,我们看完了 poll 模式的实现。
0x03 回顾 wifi scan
了解 async context 的具体机制之后,我们回顾之前运行过的 WiFi 扫描代码。学习笔记中提到过,pico_cyw43_driver 和 pico_async_context 都是底层库,它们被集成到 pico_cyw43_arch_lwip_poll 中。用户代码的 CMake 文件如下:
add_executable(picow_wifi_scan_poll
        picow_wifi_scan.c
        )
target_include_directories(picow_wifi_scan_poll PRIVATE
        ${CMAKE_CURRENT_LIST_DIR}
        ${CMAKE_CURRENT_LIST_DIR}/.. # for our common lwipopts
        )
target_link_libraries(picow_wifi_scan_poll
        pico_cyw43_arch_lwip_poll
        pico_stdlib
        )
pico_add_extra_outputs(picow_wifi_scan_poll)
简化后的 main 函数:
int main() {
    stdio_init_all();

    if (cyw43_arch_init()) {
        printf("failed to initialise\n");
        return 1;
    }

    cyw43_arch_enable_sta_mode();

    absolute_time_t scan_time = nil_time;
    bool scan_in_progress = false;
    while(true) {
        if (absolute_time_diff_us(get_absolute_time(), scan_time) < 0) {
            if (!scan_in_progress) {
                cyw43_wifi_scan_options_t scan_options = {0};
                int err = cyw43_wifi_scan(&cyw43_state, &scan_options, NULL, scan_result);
                if (err == 0) {
                    printf("\nPerforming wifi scan\n");
                    scan_in_progress = true;
                } else {
                    printf("Failed to start scan: %d\n", err);
                    scan_time = make_timeout_time_ms(10000); // wait 10s and scan again
                }
            } else if (!cyw43_wifi_scan_active(&cyw43_state)) {
                scan_time = make_timeout_time_ms(10000); // wait 10s and scan again
                scan_in_progress = false;
            }
        }

        cyw43_arch_poll();
        cyw43_arch_wait_for_work_until(scan_time);
    }

    cyw43_arch_deinit();
    return 0;
}
按照代码逻辑,当 cyw43_wifi_scan() 运行后,它就会扫描周围的 WiFi,然后以某种方式调用 handler 处理数据。现在我们来观察它是如何调用 handler 的。相关逻辑位于 cyw43_do_ioctl() 函数,它在通过 SPI 协议发出指令之后,便开始轮询 CYW43439,直到指令执行结束或超时(超时时间为 1s)。轮询代码如下:
    while (cyw43_hal_ticks_us() - start < CYW43_IOCTL_TIMEOUT_US) {
        size_t res_len;
        uint8_t *res_buf;
        int ret = cyw43_ll_sdpcm_poll_device(self, &res_len, &res_buf);
        if (ret == CONTROL_HEADER) {
            #if CYW43_USE_STATS
            uint32_t time_us = cyw43_hal_ticks_us() - start;
            if (time_us > CYW43_STAT_GET(LONGEST_IOCTL_TIME)) {
                CYW43_STAT_SET(LONGEST_IOCTL_TIME, time_us);
            }
            #endif
            // it seems that res_len is always the length of the argument in buf
            memmove(buf, res_buf, len < res_len ? len : res_len);
            return 0;
        } else if (ret == ASYNCEVENT_HEADER) {
            cyw43_cb_process_async_event(self, cyw43_ll_parse_async_event(res_len, res_buf));
        } else if (ret == DATA_HEADER) {
            cyw43_cb_process_ethernet(self->cb_data, res_len >> 31, res_len & 0x7fffffff, res_buf);
        } else if (ret >= 0) {
            CYW43_WARN("do_ioctl: got unexpected packet %d\n", ret);
        }
        CYW43_DO_IOCTL_WAIT;
    }
若返回的报文是 ASYNCEVENT_HEADER,则调用 cyw43_cb_process_async_event() 函数进入处理流程。在 cyw43_cb_process_async_event 函数中,有如下逻辑:
if (ev->event_type == CYW43_EV_ESCAN_RESULT && self->wifi_scan_state == 1) {
        // Escan result event
        if (ev->status == 8) {
            // Partial result
            int ret = self->wifi_scan_cb(self->wifi_scan_env, &ev->u.scan_result);
            if (ret != 0) {
                // TODO need to abort scan, or just ignore any more results
            }
        } else if (ev->status == 0) {
            // Scan complete
            self->wifi_scan_state = 2;
        }

    }
这里直接调用 self->wifi_scan_cb 函数,该属性已经被赋值为 handler。因此,WiFi 扫描过程事实上是同步地获取结果、获取结果之后立即调用 hanler。
0x04 udp 案例
现在来看 cyw43-driver 与 lwip 是如何集成的。udp_beacon 示例代码如下:
#include <string.h>
#include <stdlib.h>

#include "pico/stdlib.h"
#include "pico/cyw43_arch.h"

#include "lwip/pbuf.h"
#include "lwip/udp.h"

#define UDP_PORT 4444
#define BEACON_MSG_LEN_MAX 127
#define BEACON_TARGET "255.255.255.255"
#define BEACON_INTERVAL_MS 1000

void run_udp_beacon() {
    struct udp_pcb* pcb = udp_new();

    ip_addr_t addr;
    ipaddr_aton(BEACON_TARGET, &addr);

    int counter = 0;
    while (true) {
        struct pbuf *p = pbuf_alloc(PBUF_TRANSPORT, BEACON_MSG_LEN_MAX+1, PBUF_RAM);
        char *req = (char *)p->payload;
        memset(req, 0, BEACON_MSG_LEN_MAX+1);
        snprintf(req, BEACON_MSG_LEN_MAX, "%d\n", counter);
        err_t er = udp_sendto(pcb, p, &addr, UDP_PORT);
        pbuf_free(p);
        if (er != ERR_OK) {
            printf("Failed to send UDP packet! error=%d", er);
        } else {
            printf("Sent packet %d\n", counter);
            counter++;
        }

        // Note in practice for this simple UDP transmitter,
        // the end result for both background and poll is the same

#if PICO_CYW43_ARCH_POLL
        // if you are using pico_cyw43_arch_poll, then you must poll periodically from your
        // main loop (not from a timer) to check for Wi-Fi driver or lwIP work that needs to be done.
        cyw43_arch_poll();
        sleep_ms(BEACON_INTERVAL_MS);
#else
        // if you are not using pico_cyw43_arch_poll, then WiFI driver and lwIP work
        // is done via interrupt in the background. This sleep is just an example of some (blocking)
        // work you might be doing.
        sleep_ms(BEACON_INTERVAL_MS);
#endif
    }
}

int main() {
    stdio_init_all();

    if (cyw43_arch_init()) {
        printf("failed to initialise\n");
        return 1;
    }

    cyw43_arch_enable_sta_mode();

    printf("Connecting to Wi-Fi...\n");
    if (cyw43_arch_wifi_connect_timeout_ms(WIFI_SSID, WIFI_PASSWORD, CYW43_AUTH_WPA2_AES_PSK, 30000)) {
        printf("failed to connect.\n");
        return 1;
    } else {
        printf("Connected.\n");
    }
    run_udp_beacon();
    cyw43_arch_deinit();
    return 0;
}
上述代码中,首先用 cyw43_arch_wifi_connect_timeout_ms() 连接到了 WiFi,然后 run_udp_beacon() 函数中全是调用 lwip 库的 API,没有看到 cyw43 的适配。lwip 是如何使用 cyw43 的?我们观察调用栈:
cyw43_send_ethernet cyw43_ctrl.c:452
cyw43_netif_output cyw43_lwip.c:95
ethernet_output ethernet.c:320
etharp_output etharp.c:897
ip4_output_if_src ip4.c:1041
udp_sendto_if_src udp.c:893
udp_sendto_if udp.c:692
udp_sendto udp.c:599
run_udp_beacon picow_udp_beacon.c:33
main picow_udp_beacon.c:76
platform_entry crt0.S:260
ethernet_output() 是 lwip 中调用的最低级函数,这个函数中调用了 netif->linkoutput(netif, p),于是剩余的工作交给了 cyw43-driver。初始化 netif 的代码位于 lib/cyw43-driver/src/cyw43_lwip.c:
STATIC err_t cyw43_netif_init(struct netif *netif) {
    netif->linkoutput = cyw43_netif_output;
    #if LWIP_IPV4
    netif->output = etharp_output;
    #endif
    netif->mtu = 1500;
    netif->flags = NETIF_FLAG_BROADCAST | NETIF_FLAG_ETHARP | NETIF_FLAG_ETHERNET | NETIF_FLAG_IGMP;
    #if LWIP_IPV6
    netif->output_ip6 = ethip6_output;
    netif->mld_mac_filter = cyw43_macfilter;
    netif->flags |= NETIF_FLAG_MLD6;
    #endif
    cyw43_wifi_get_mac(netif->state, netif->name[1] - '0', netif->hwaddr);
    netif->hwaddr_len = sizeof(netif->hwaddr);
    #if LWIP_IGMP
    netif_set_igmp_mac_filter(netif, cyw43_netif_update_igmp_mac_filter);
    #endif
    return ERR_OK;
}
而在 lib/cyw43-driver/src/cyw43_lwip.c 中:
void cyw43_cb_tcpip_init(cyw43_t *self, int itf) {
    // ...
    #if LWIP_IPV4
    netif_add(n, ip_2_ip4(&ipconfig[0]), ip_2_ip4(&ipconfig[1]), ip_2_ip4(&ipconfig[2]), self, cyw43_netif_init, input_func);
    // ...
}
所以,当我们最初调用 cyw43_arch_enable_sta_mode() 时,cyw43-driver 将自己这个网络设备注册到了 lwip 中。后续 lwip 库组装完 IP 报文,调用 netif->linkoutput() 时,控制流会转到 cyw43-driver,以实现后续操作。