

前几年为了把 iPad 的屏幕投到 Windows 电脑上,研究了很多种方案。基本上有这么几条路:
一、采用苹果原生的 AirPlay 协议
优点:AirPlay 协议利用局域网进行通讯,延迟低、传输速率高,能支撑更好的画质和更快的响应时间。且 iOS 和 iPadOS 都可以使用。
缺点:开源方案质量很差;闭源方案稍微要点钱。
二、采用第三方软件和协议
优点:通用性强,价格便宜;缺点是这类软件常常走公网通讯,延迟和带宽都要打折扣。
三、利用硬件采集卡
我用的几百块钱的丐版采集卡,先用绿联的 Type-C hub 转出 HDMI 接口,再连接 HDMI 视频采集卡,采集卡以 USB 协议和电脑通讯。刷新率极低、分辨率低、画质差。但是好的采集卡真的很贵,而且走 PCIe 协议,笔记本电脑没法用。
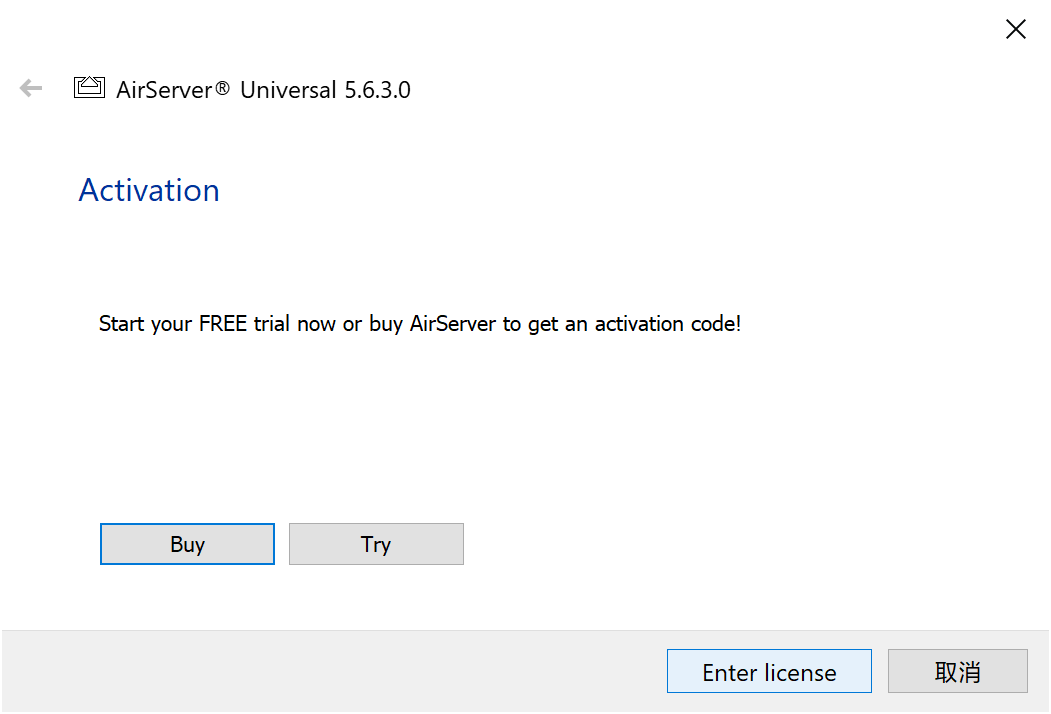
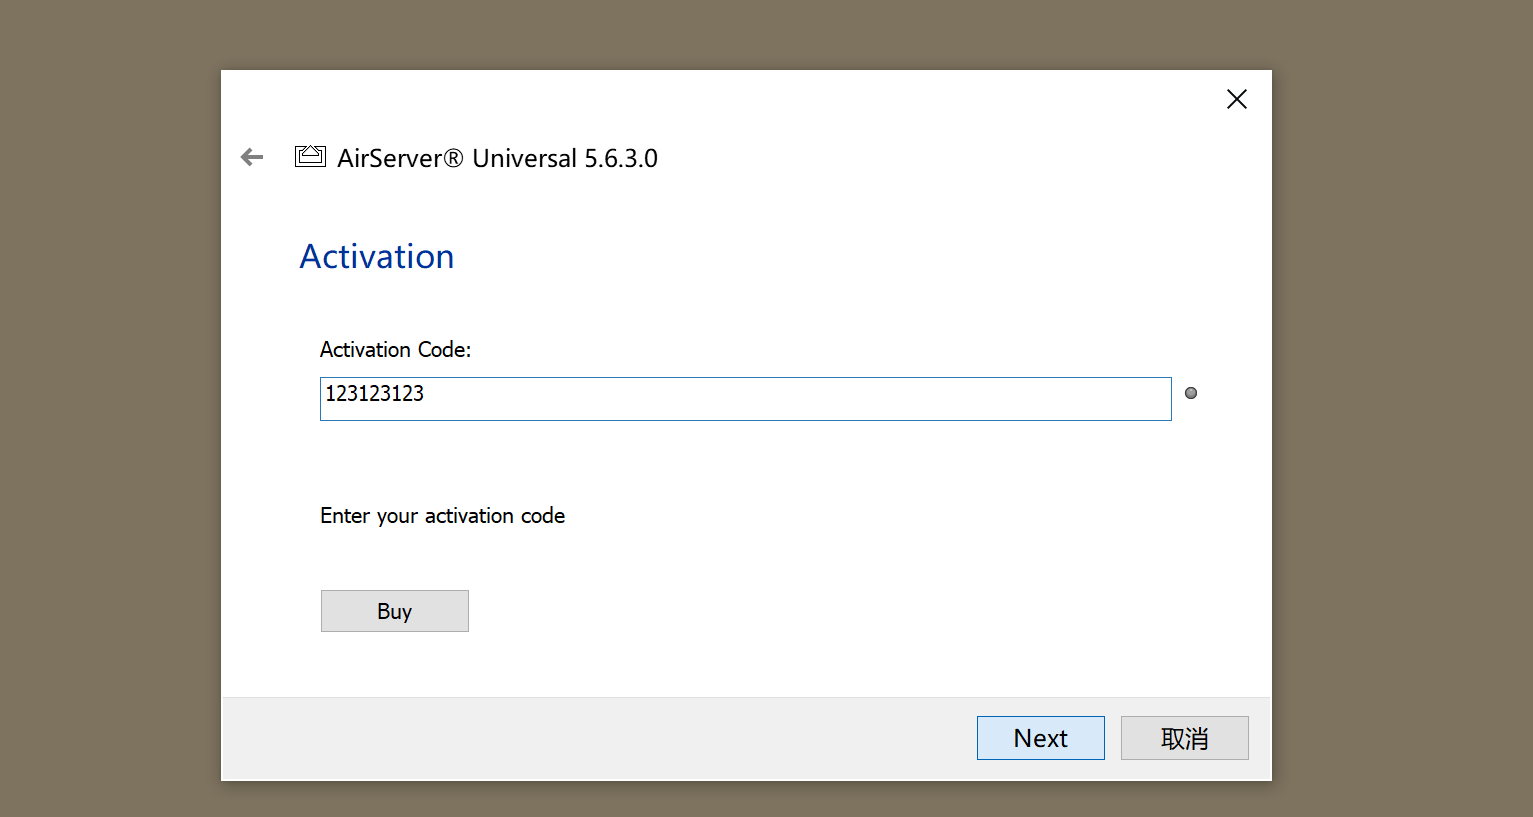
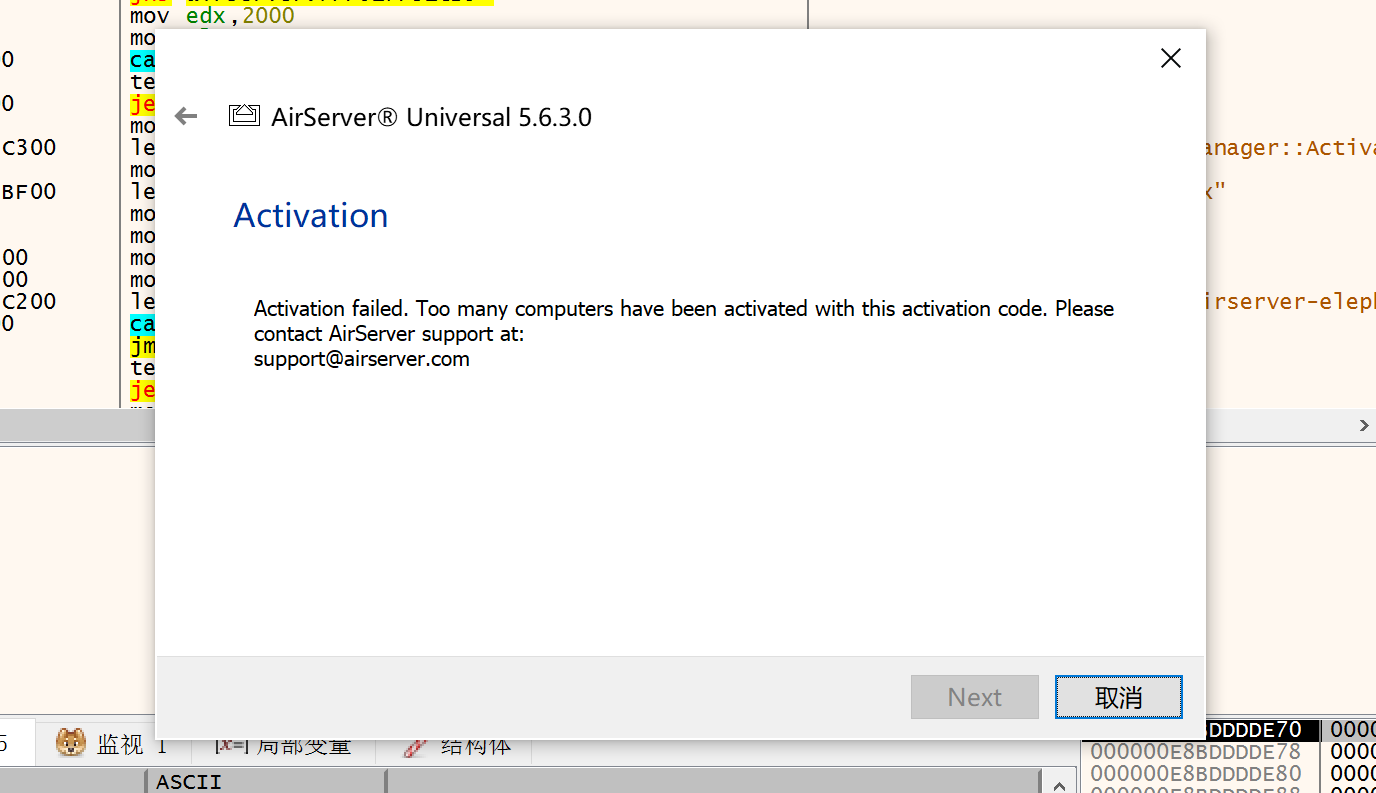
最终,在把上述三种方案尝试了个遍之后,我选择了走 AirPlay 协议的商业软件。去年 1 月购买了 AirServer Universe,它能让 Windows 电脑被 iPadOS 的「隔空播放」发现,非常省事;而且传输质量很高。价格也不算贵,学生价 12 美元。

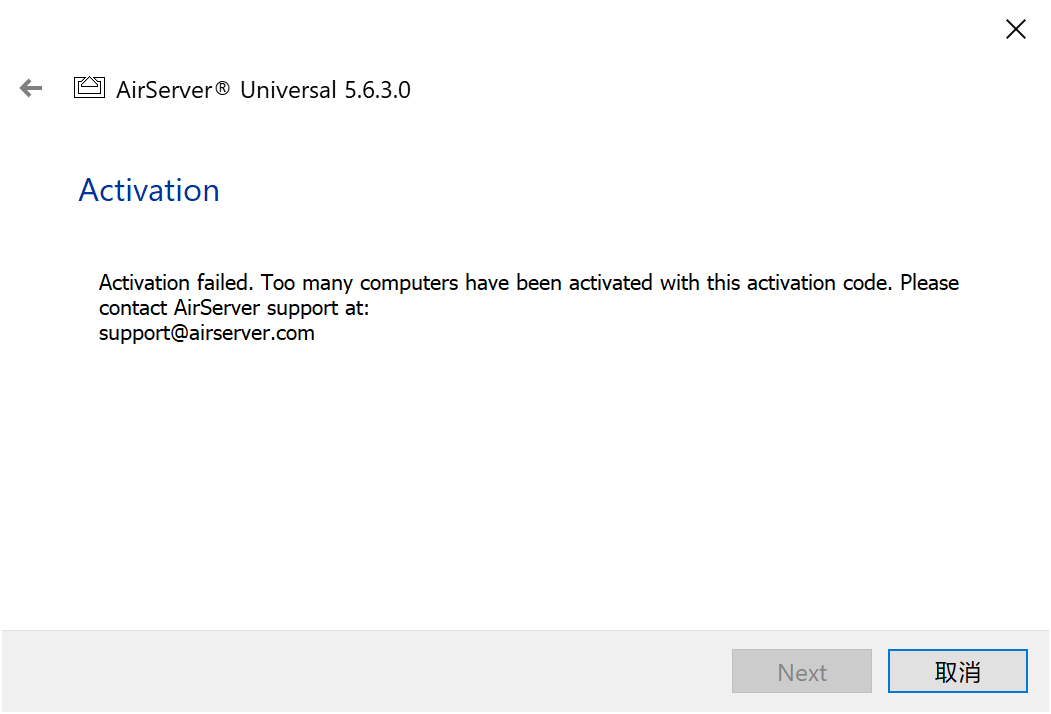
然而今年我换到台式机,发现原有的注册码没法用了,提示「激活了太多设备」。重买是不想买的,所以对它做一下逆向工程。本篇文章仅记录个人研究。
source: https://zhuanlan.zhihu.com/p/73849374
(一)为个人学习、研究或者欣赏,使用他人已经发表的作品;
……
source: http://www.gov.cn/banshi/2005-08/21/content_25098.htm
0x00 信息收集:无外界干预的程序行为分析
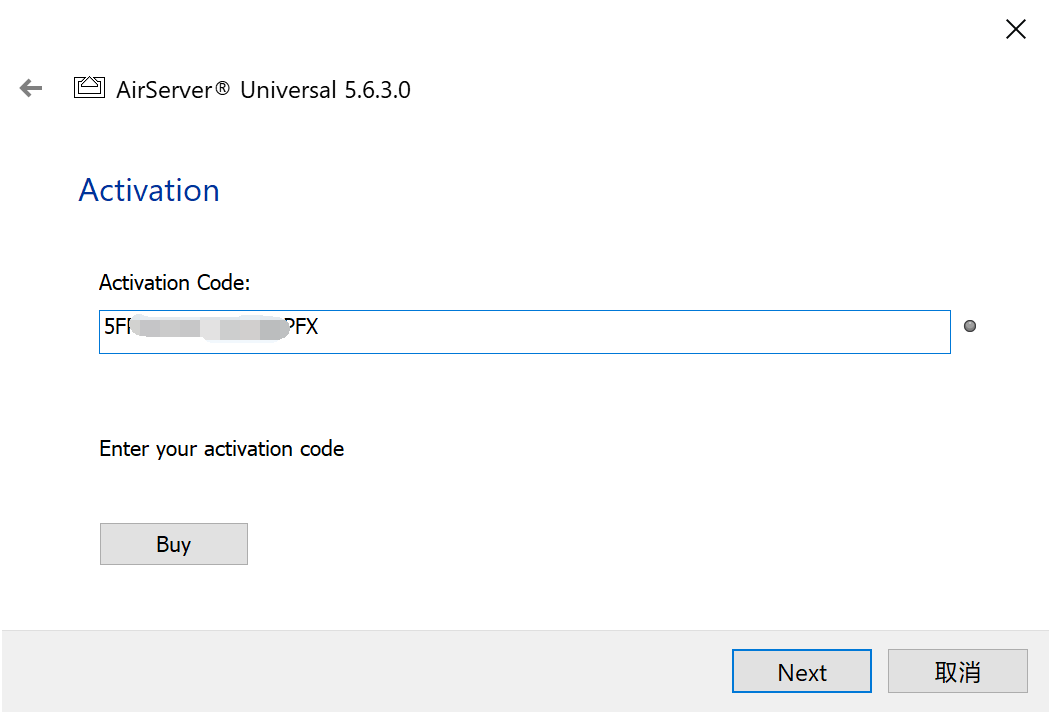
首先走一下正常逻辑,输入注册码并在线验证。实体机上:
可见就是典型的「发送注册码 - 服务器返回结果」的流程,但是一到虚拟机上就出了问题:

虚拟机中的 AirServer 的注册请求被直接 TCP RST 了。按理来讲,客户端刚刚发出了 Client Hello 报文,没有建立任何通讯,服务器为什么会 RST 掉?
从 SNI 报文里面读出网站域名是 activation.airserver.com,拿浏览器直接访问,没有问题:

于是确认锅一定在 AirServer 程序里面。暂且推测是它所采用的 https 库发起请求时,采用了不被服务端支持的加密方法。下面我们来验证一下。AirServer 请求的 Client Hello 报文:
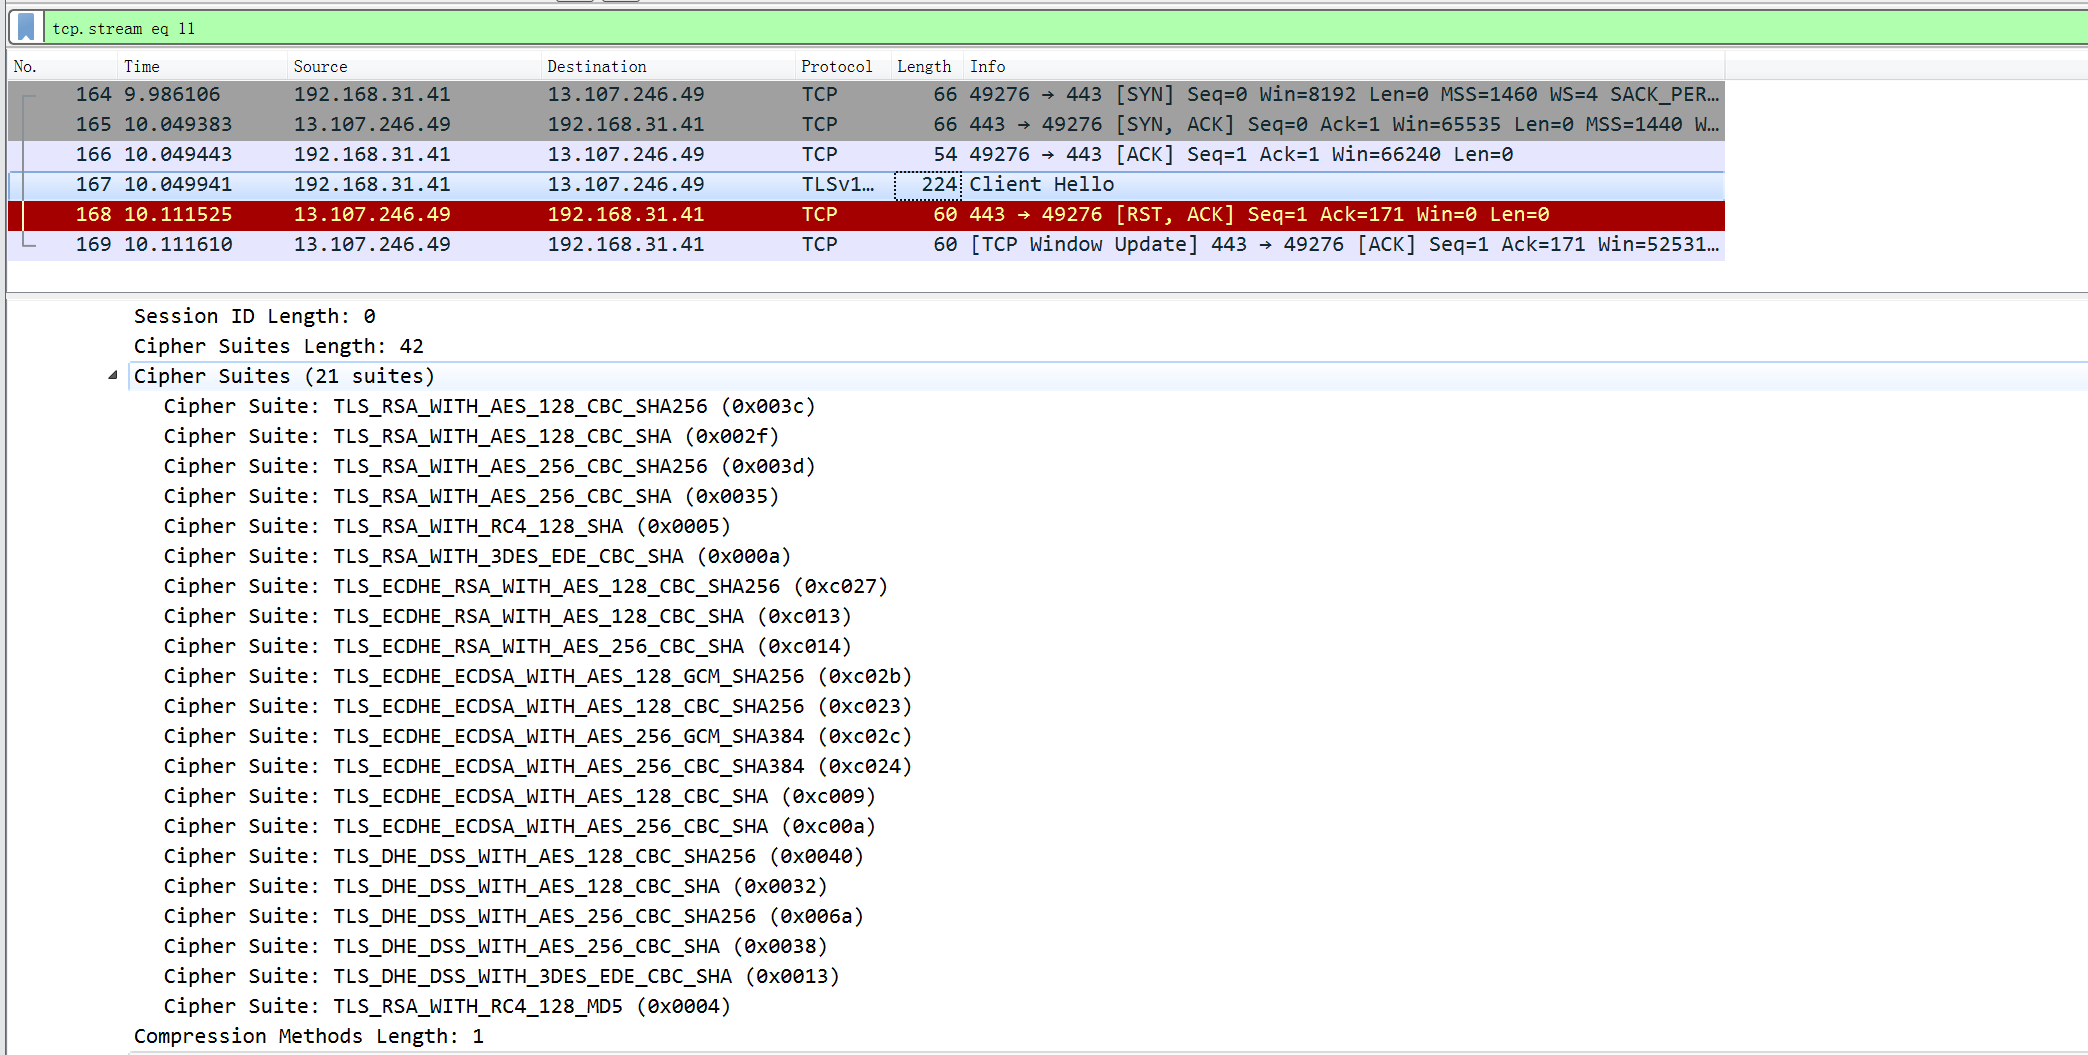
用 Firefox 浏览器做一次请求,看 Server Hello 报文:
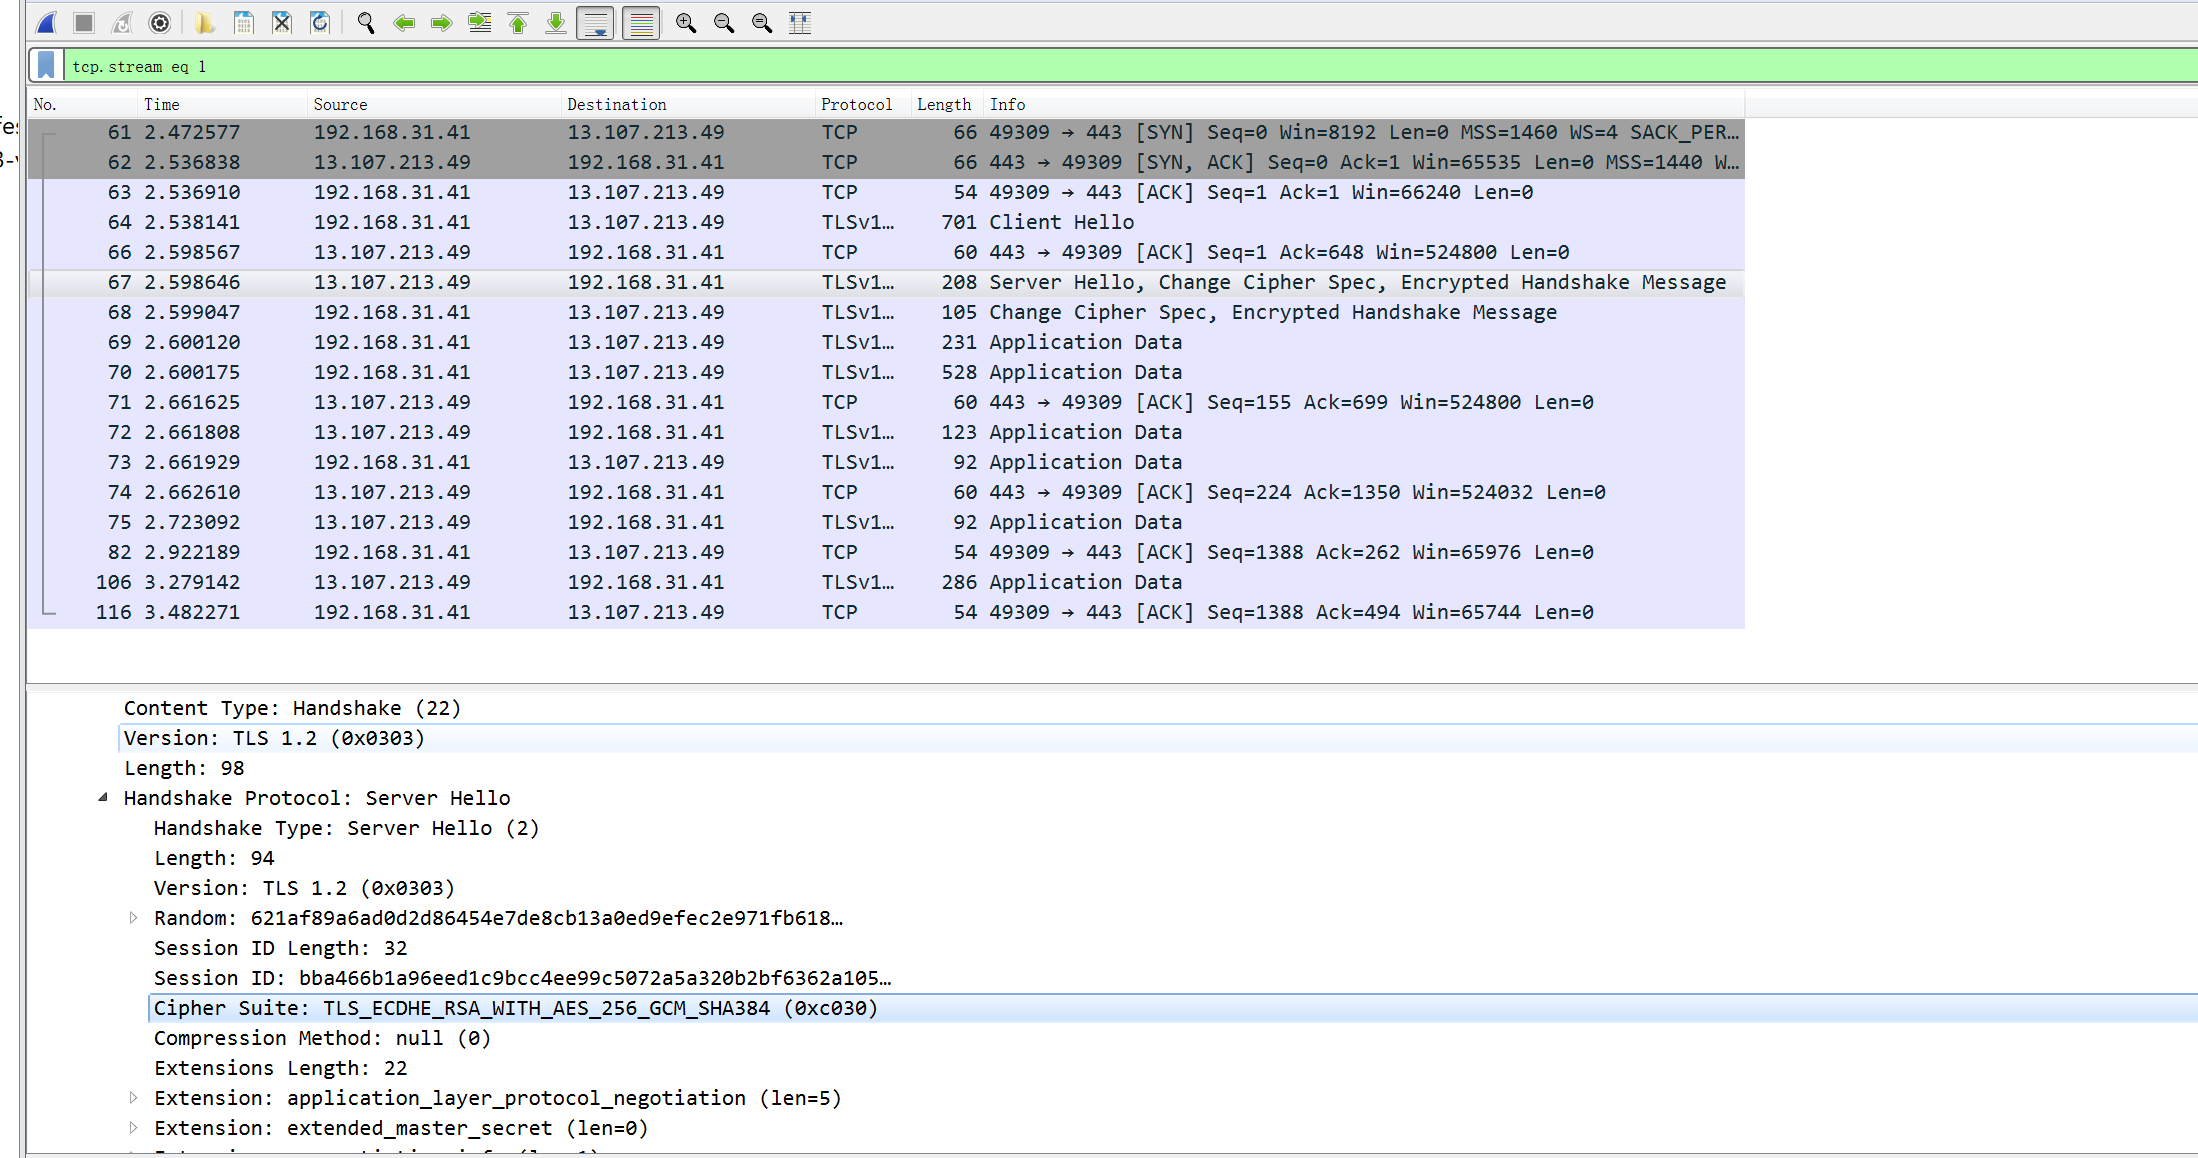
服务端选择了 Cipher Suite: TLS_ECDHE_RSA_WITH_AES_256_GCM_SHA384 (0xc030) 这个加密方法,正是 AirServer Client Hello 报文里没有的。所以服务端发送了一个 TCP RST 终止连接。
那么,为什么 Win10 实体机就能连?查阅资料:
原来 win7 TLS 根本没支持这个加密套件,我裂开来。现在我得去装个 Win10 LTSC 2021 虚拟机了。
装好了,我们继续。随便输一个注册码,通过 MITM 截获 https 报文:
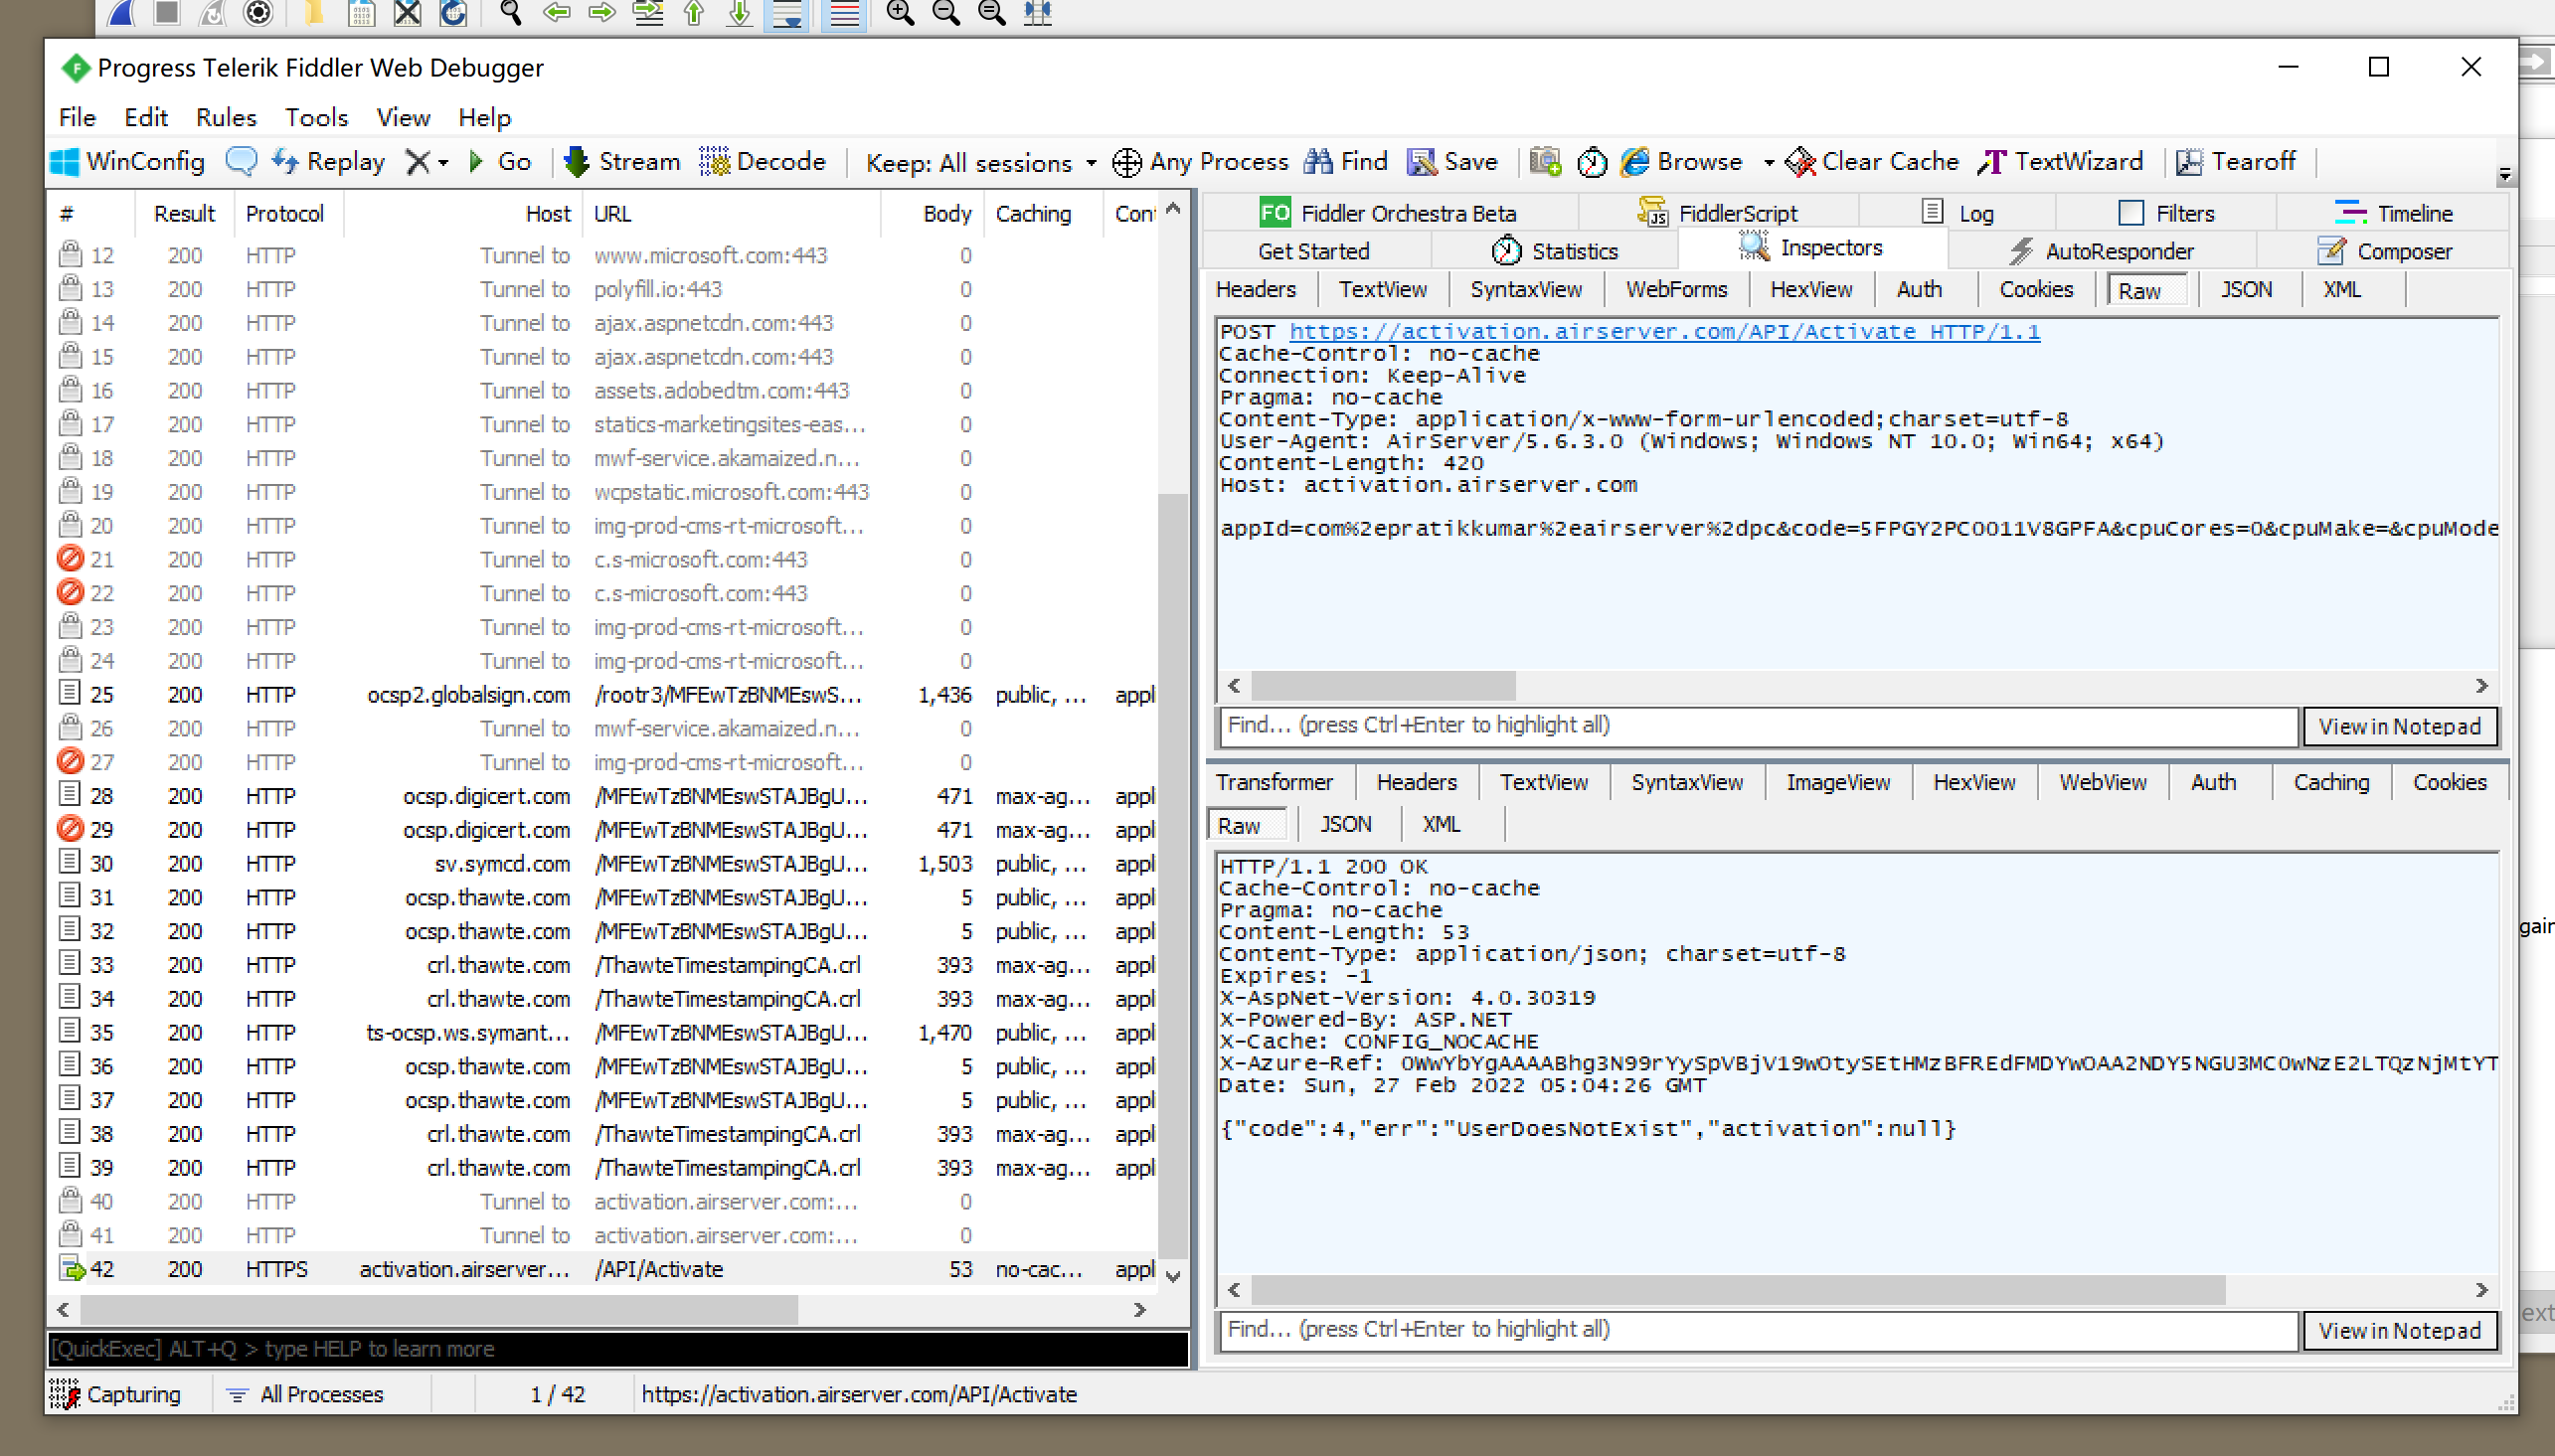
https 请求报文如下:
POST https://activation.airserver.com/API/Activate HTTP/1.1
Cache-Control: no-cache
Connection: Keep-Alive
Pragma: no-cache
Content-Type: application/x-www-form-urlencoded;charset=utf-8
User-Agent: AirServer/5.6.3.0 (Windows; Windows NT 10.0; Win64; x64)
Content-Length: 420
Host: activation.airserver.com

appId=com%2epratikkumar%2eairserver%2dpc&code=5FPGY2PC0011V8GPFA&cpuCores=0&cpuMake=&cpuModel=0&cpuSpeed=0&firewalls=&gpuMake=VMware%20SVGA%203D&gpuMem=15&gpuPP=true&hwRen=true&lang=zh&maxDirectX=10&maxPixelShader=3%2e0&maxVertexShader=3%2e0&mem=4094&minDirectX=9&model=VMware%2c%20Inc%2e%20VMware7%2c1&name=DESKTOP%2dHCVD3S0&osVer=10%2e0%20&subq=18525&udid=6f9b4588%2da488%2d45f1%2d964d%2d5957990b0b4f&ver=5%2e6%2e3%2e0
POST 上去的数据:
appId           com.pratikkumar.airserver-pc
code            5FPGY2PC0011V8GPFA
cpuCores        0
cpuMake
cpuModel        0
cpuSpeed        0
firewalls
gpuMake         VMware SVGA 3D
gpuMem          15
gpuPP           true
hwRen           true
lang            zh
maxDirectX      10
maxPixelShader  3.0
maxVertexShader 3.0
mem             4094
minDirectX      9
model           VMware, Inc. VMware7,1
name            DESKTOP-HCVD3S0
osVer           10.0
subq            18525
udid            6f9b4588-a488-45f1-964d-5957990b0b4f
ver             5.6.3.0
当验证码为瞎编时,返回的数据:
{"code":4,"err":"UserDoesNotExist","activation":null}当验证码为「已被使用过」时,返回的数据:
{"code":3,"err":"NoActivationsLeft","activation":null}现在我们做完了程序行为分析,接下来开始逆向。
0x01 信息收集:PE 文件基本信息
丢进扫描器看一下。
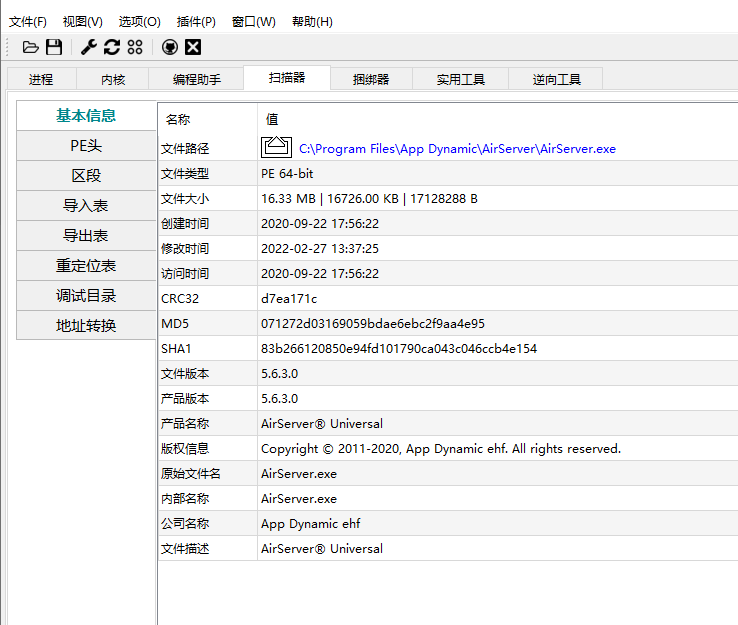
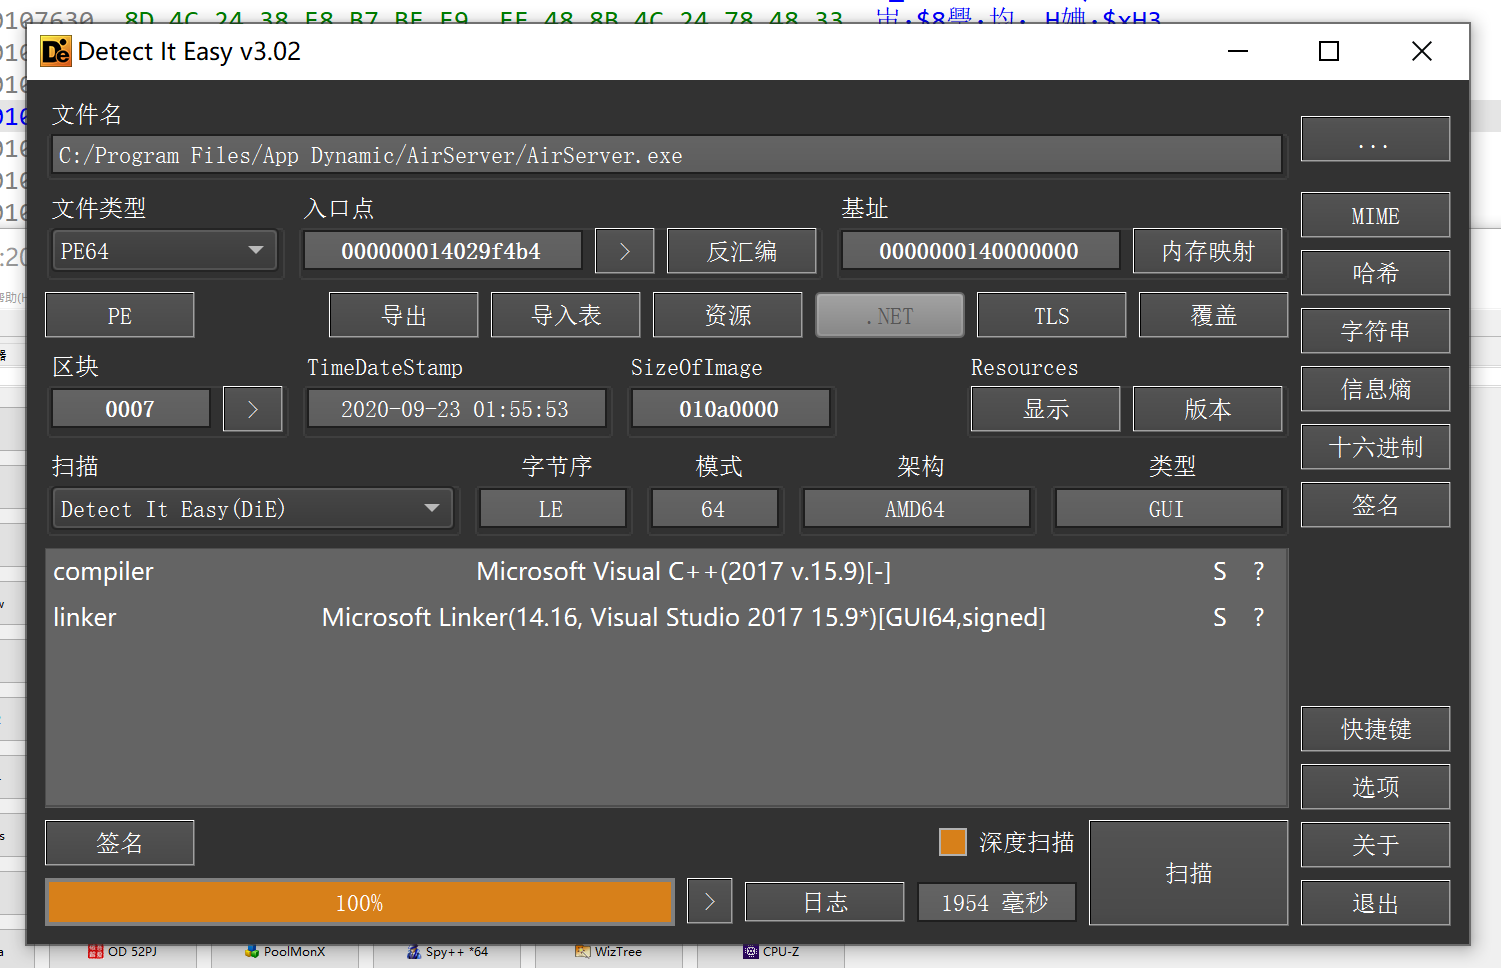
可见没加壳没加花,很适合分析。Res Hacker 没看出什么东西来。
0x02 定位注册逻辑
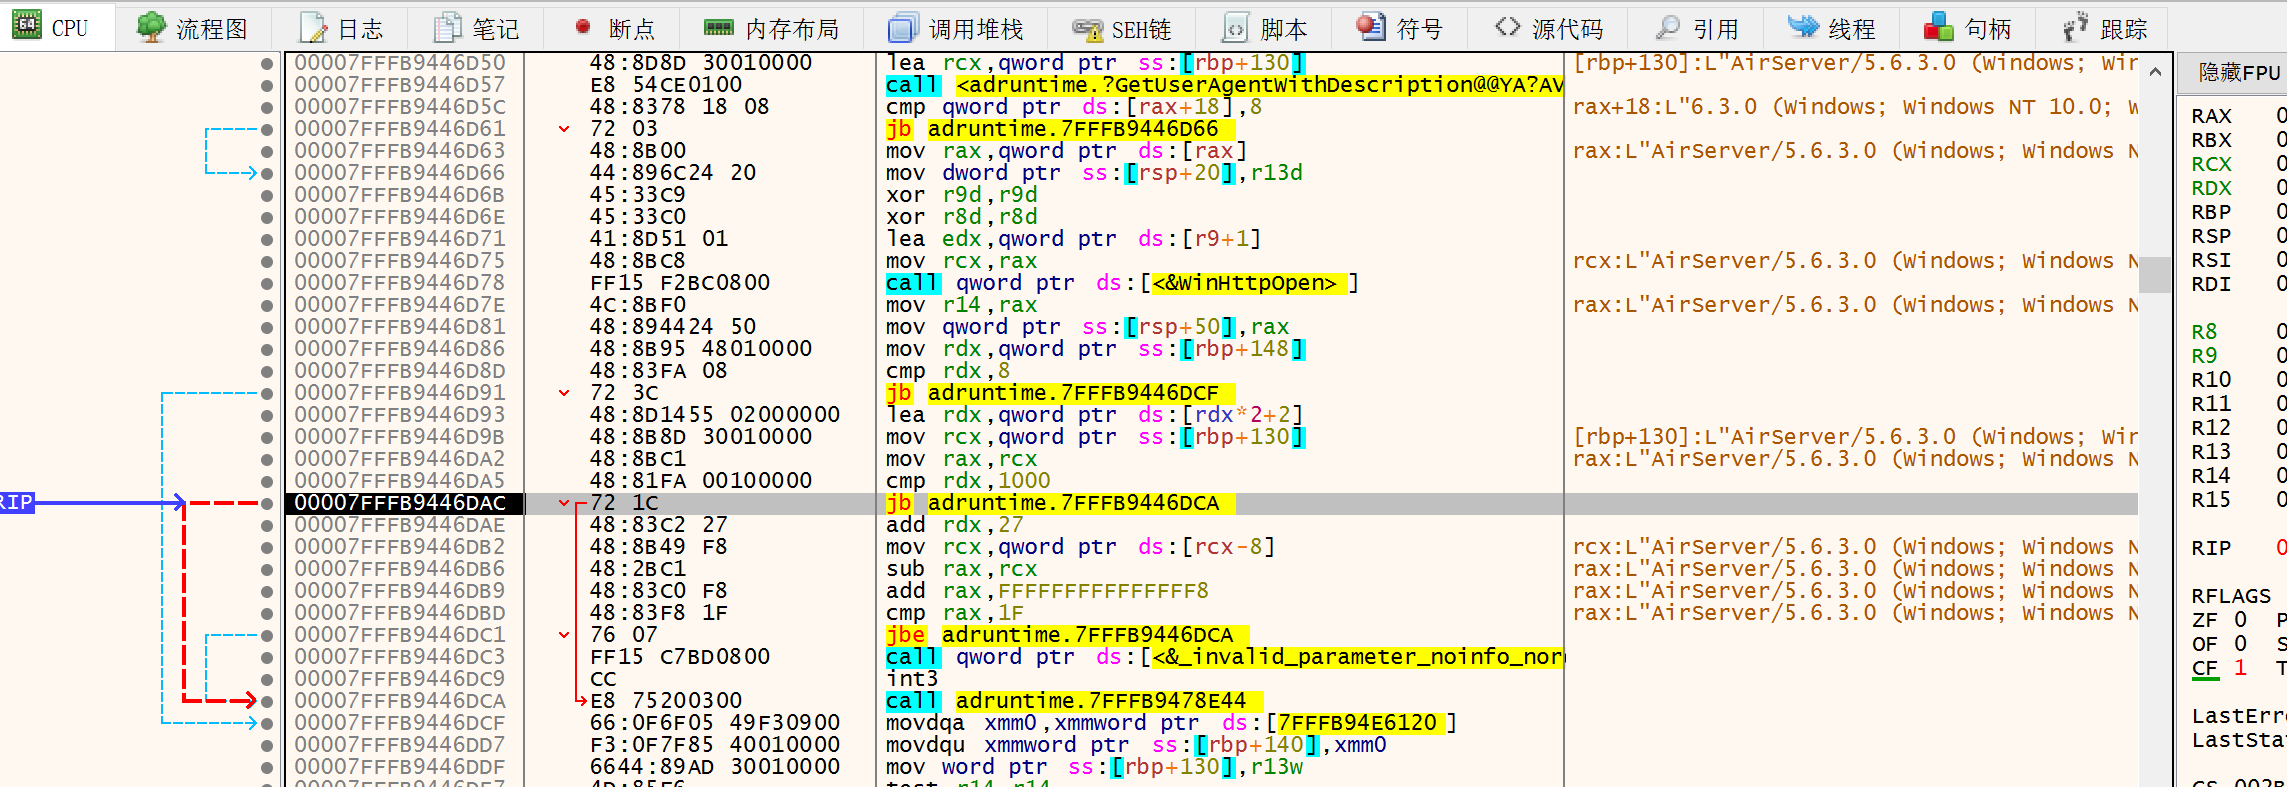
用 x64dbg 调试,首先进入到「输入注册码,准备在线验证」的界面:
此时给 airserver.exe 的 .data 段下一个一次性的执行断点。
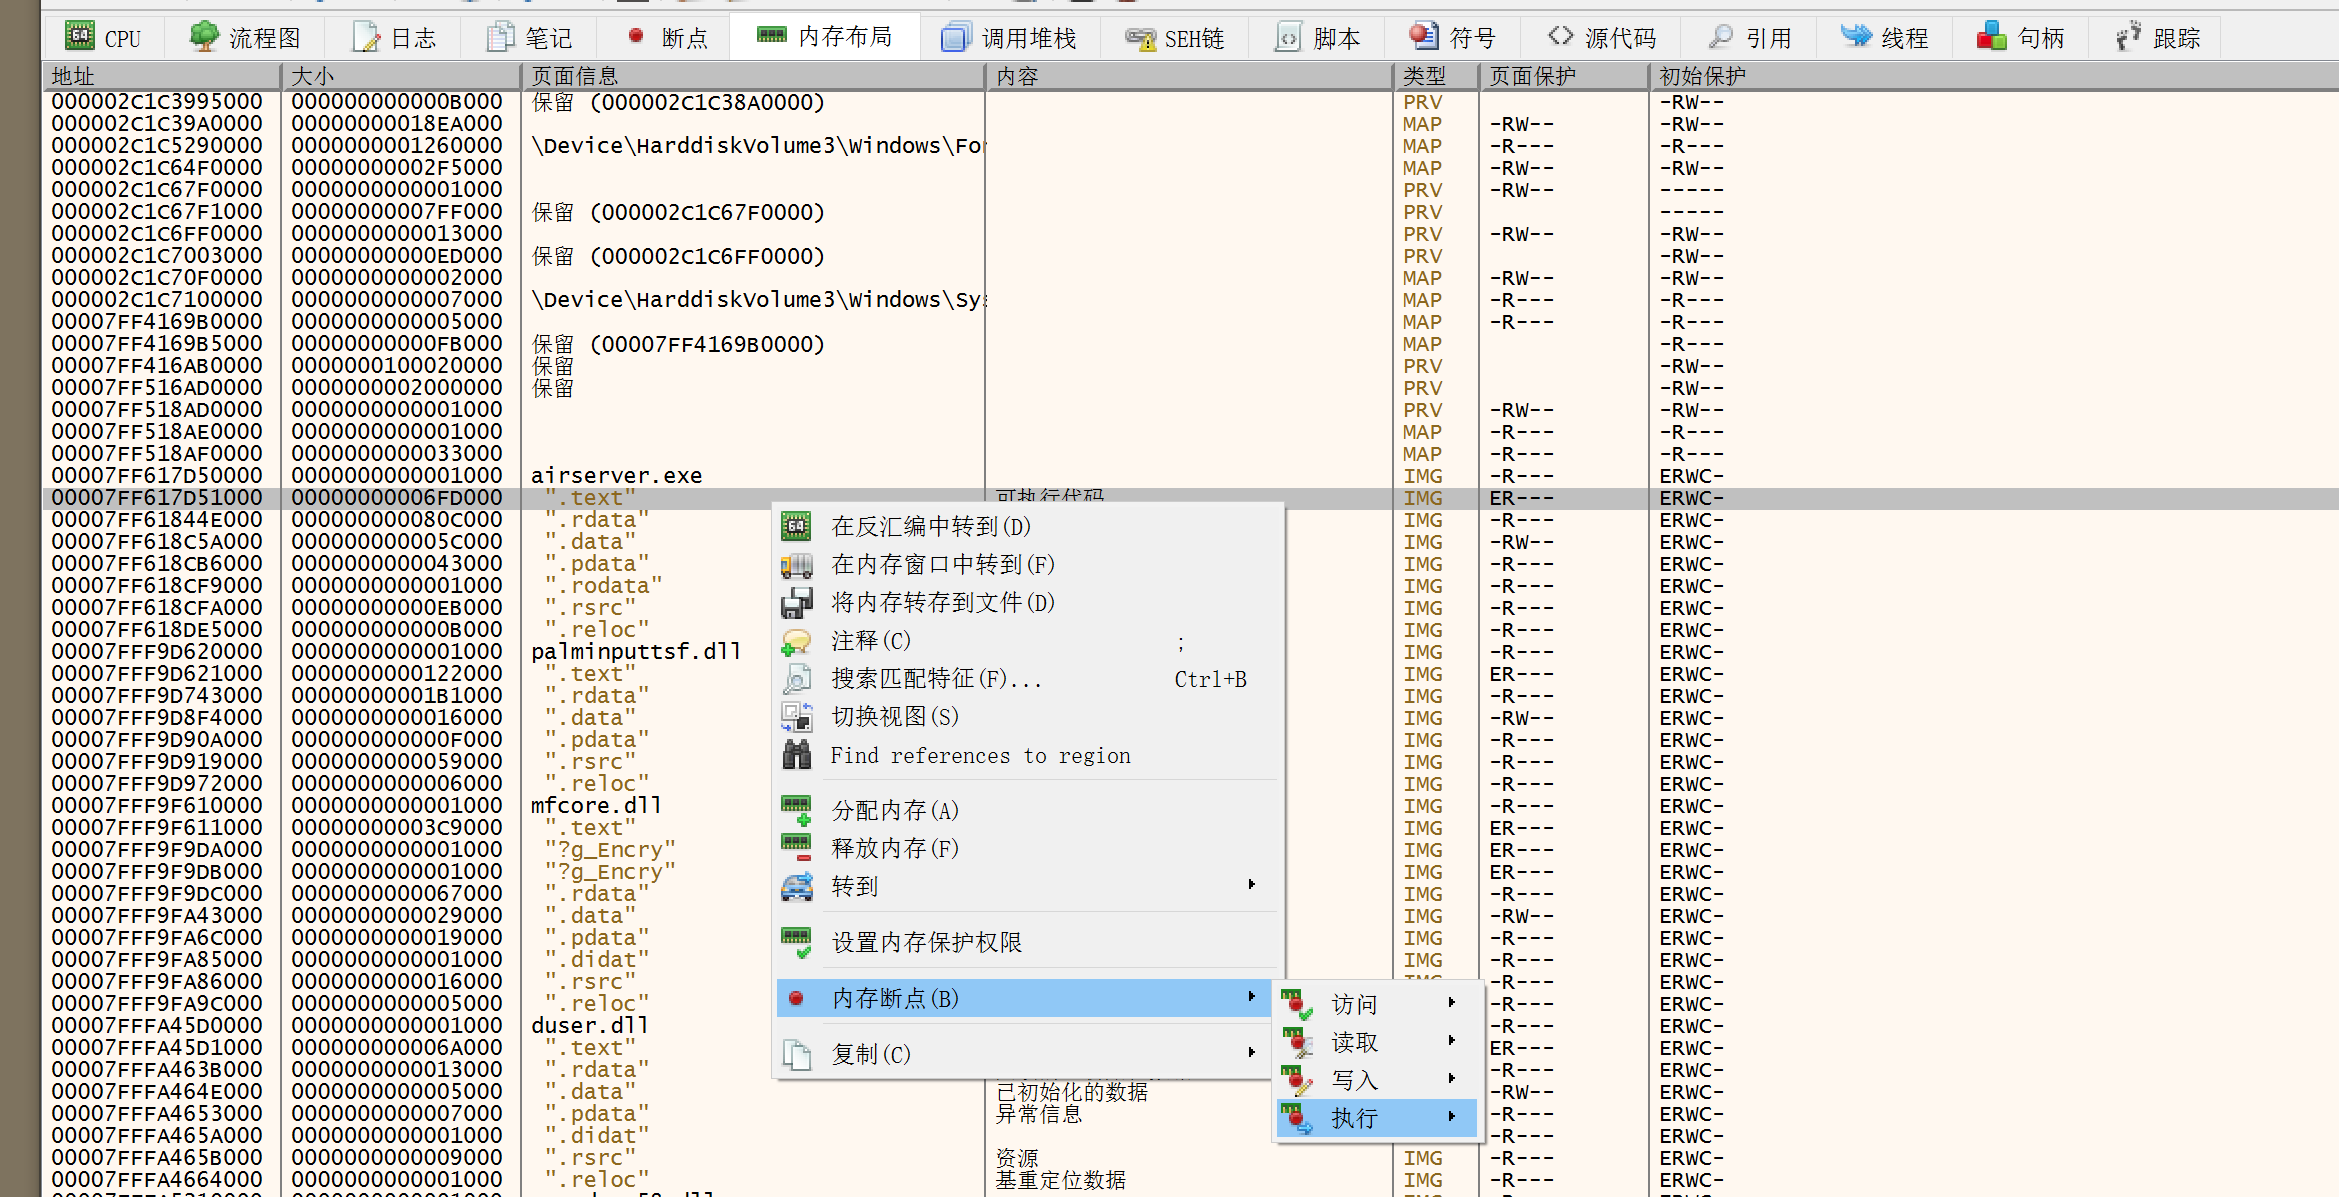
捕获中断,00007FF617F28F20 这里应该就是在线验证逻辑的入口。
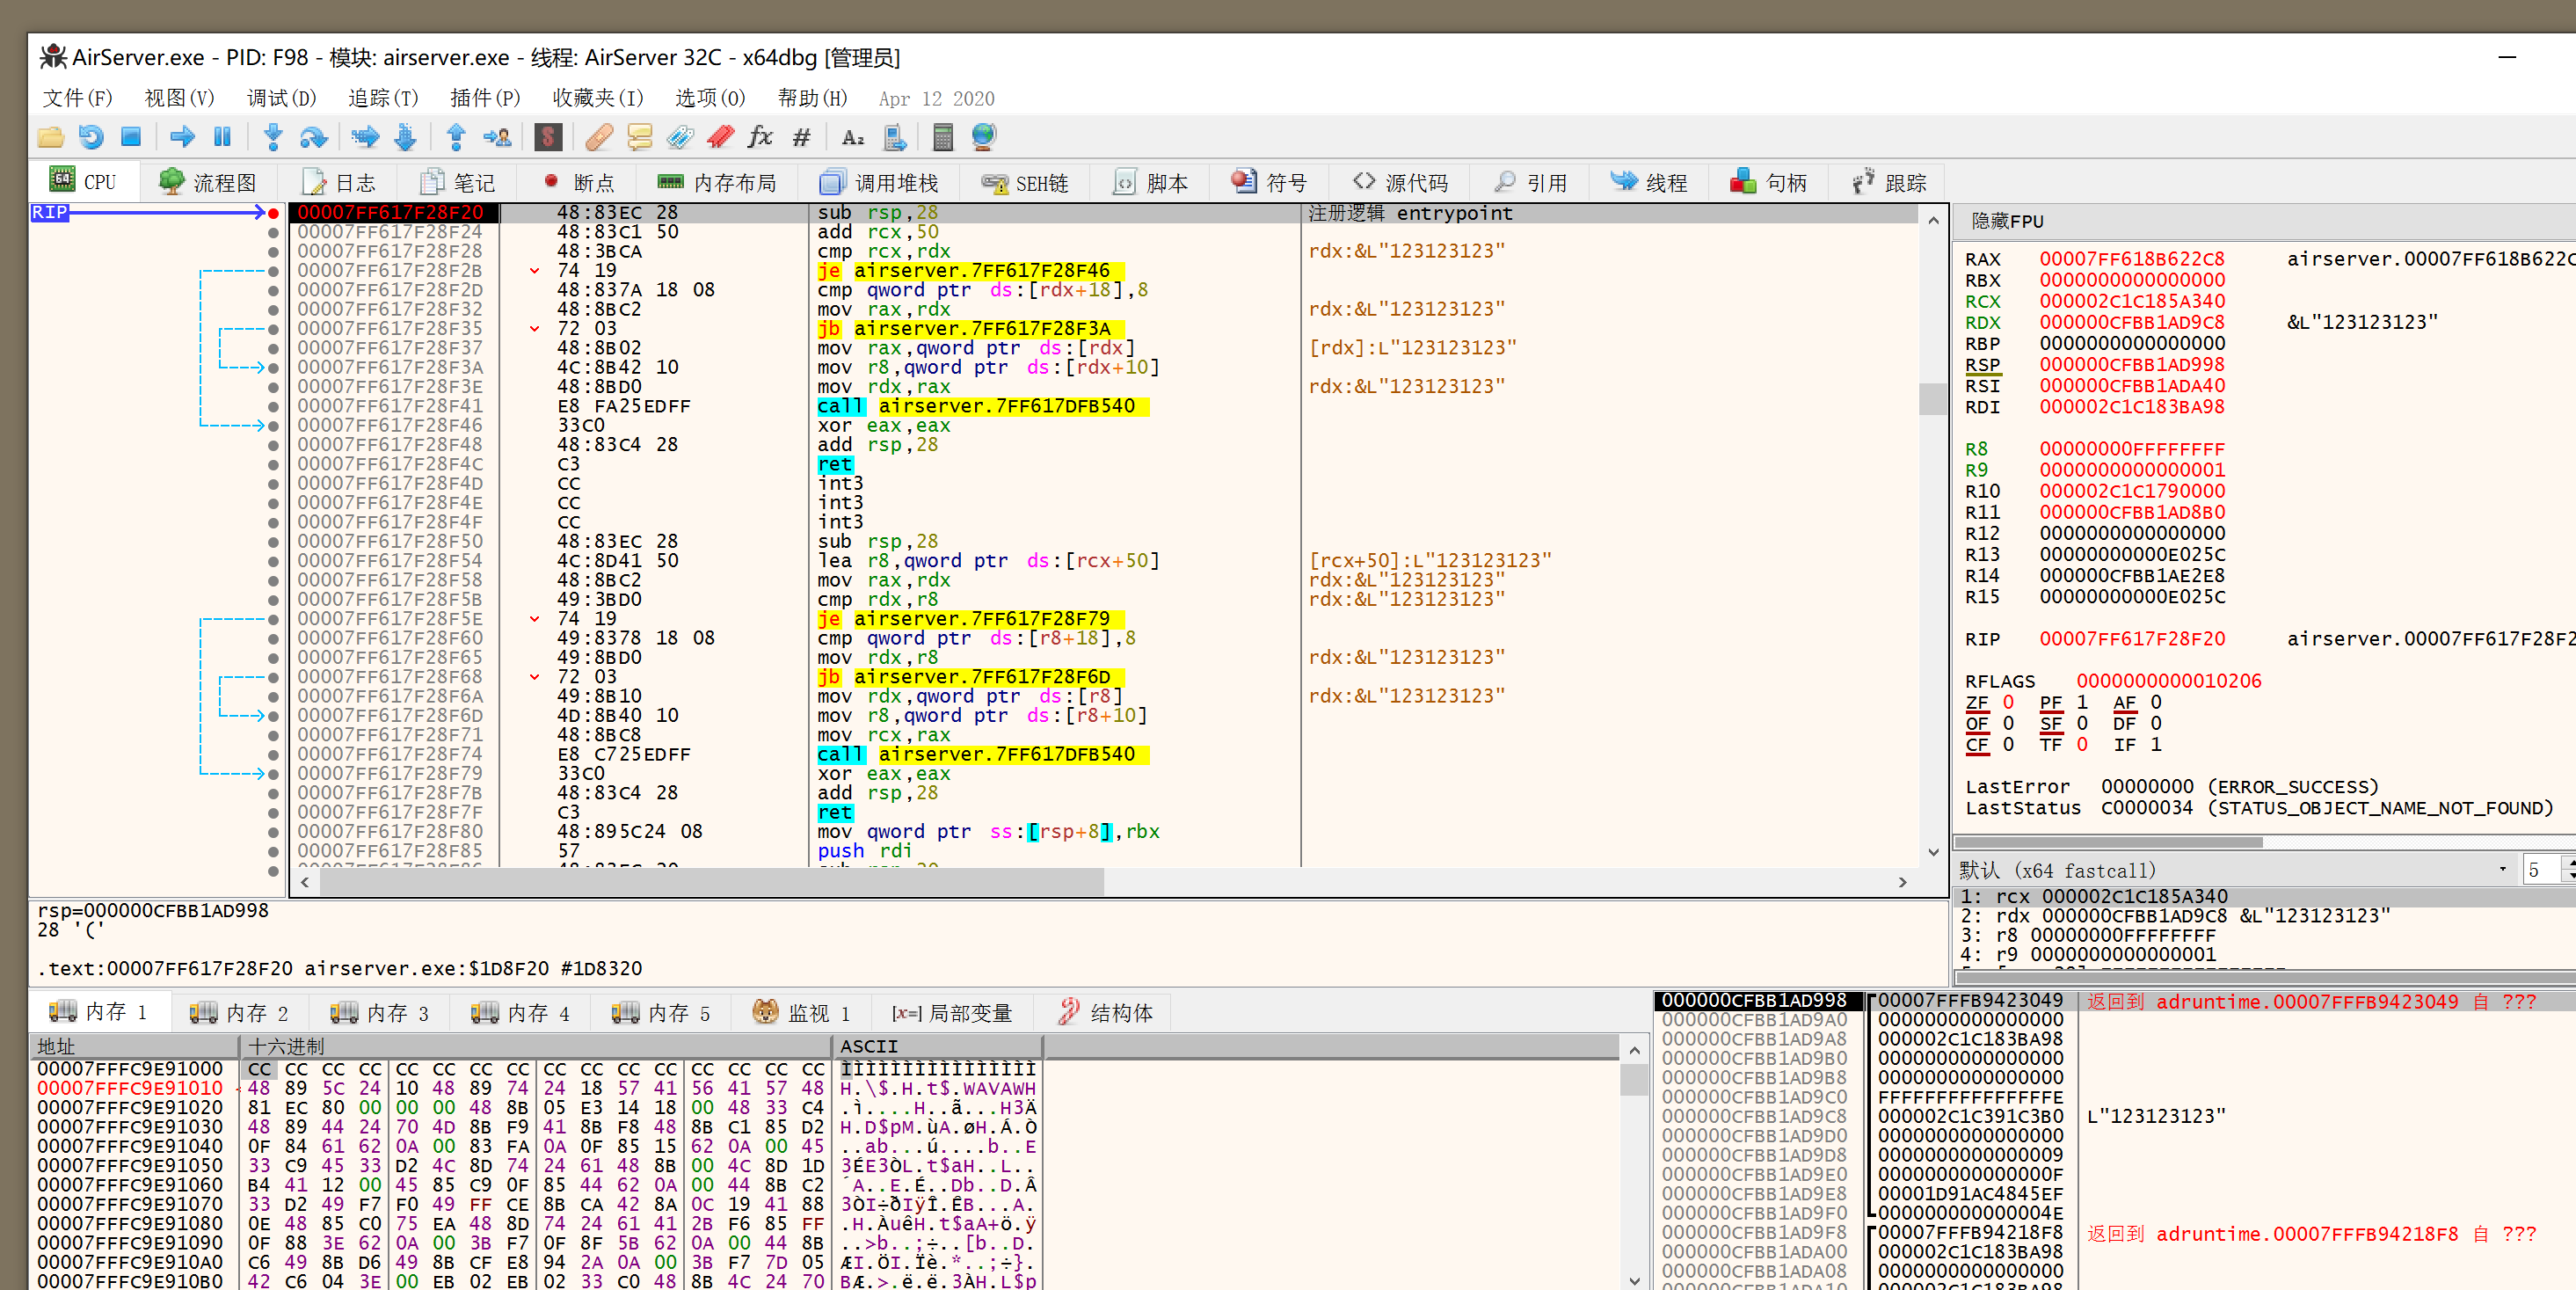
看看函数调用的上下文。执行到返回,发现 callee 是来自 adruntime.dll。

网上可以查到 adruntime.dll 的相关资料,它是由 App Dynamic(AirServer 的开发公司)开发的。
https://www.pconlife.com/viewfileinfo/adruntime-dll/
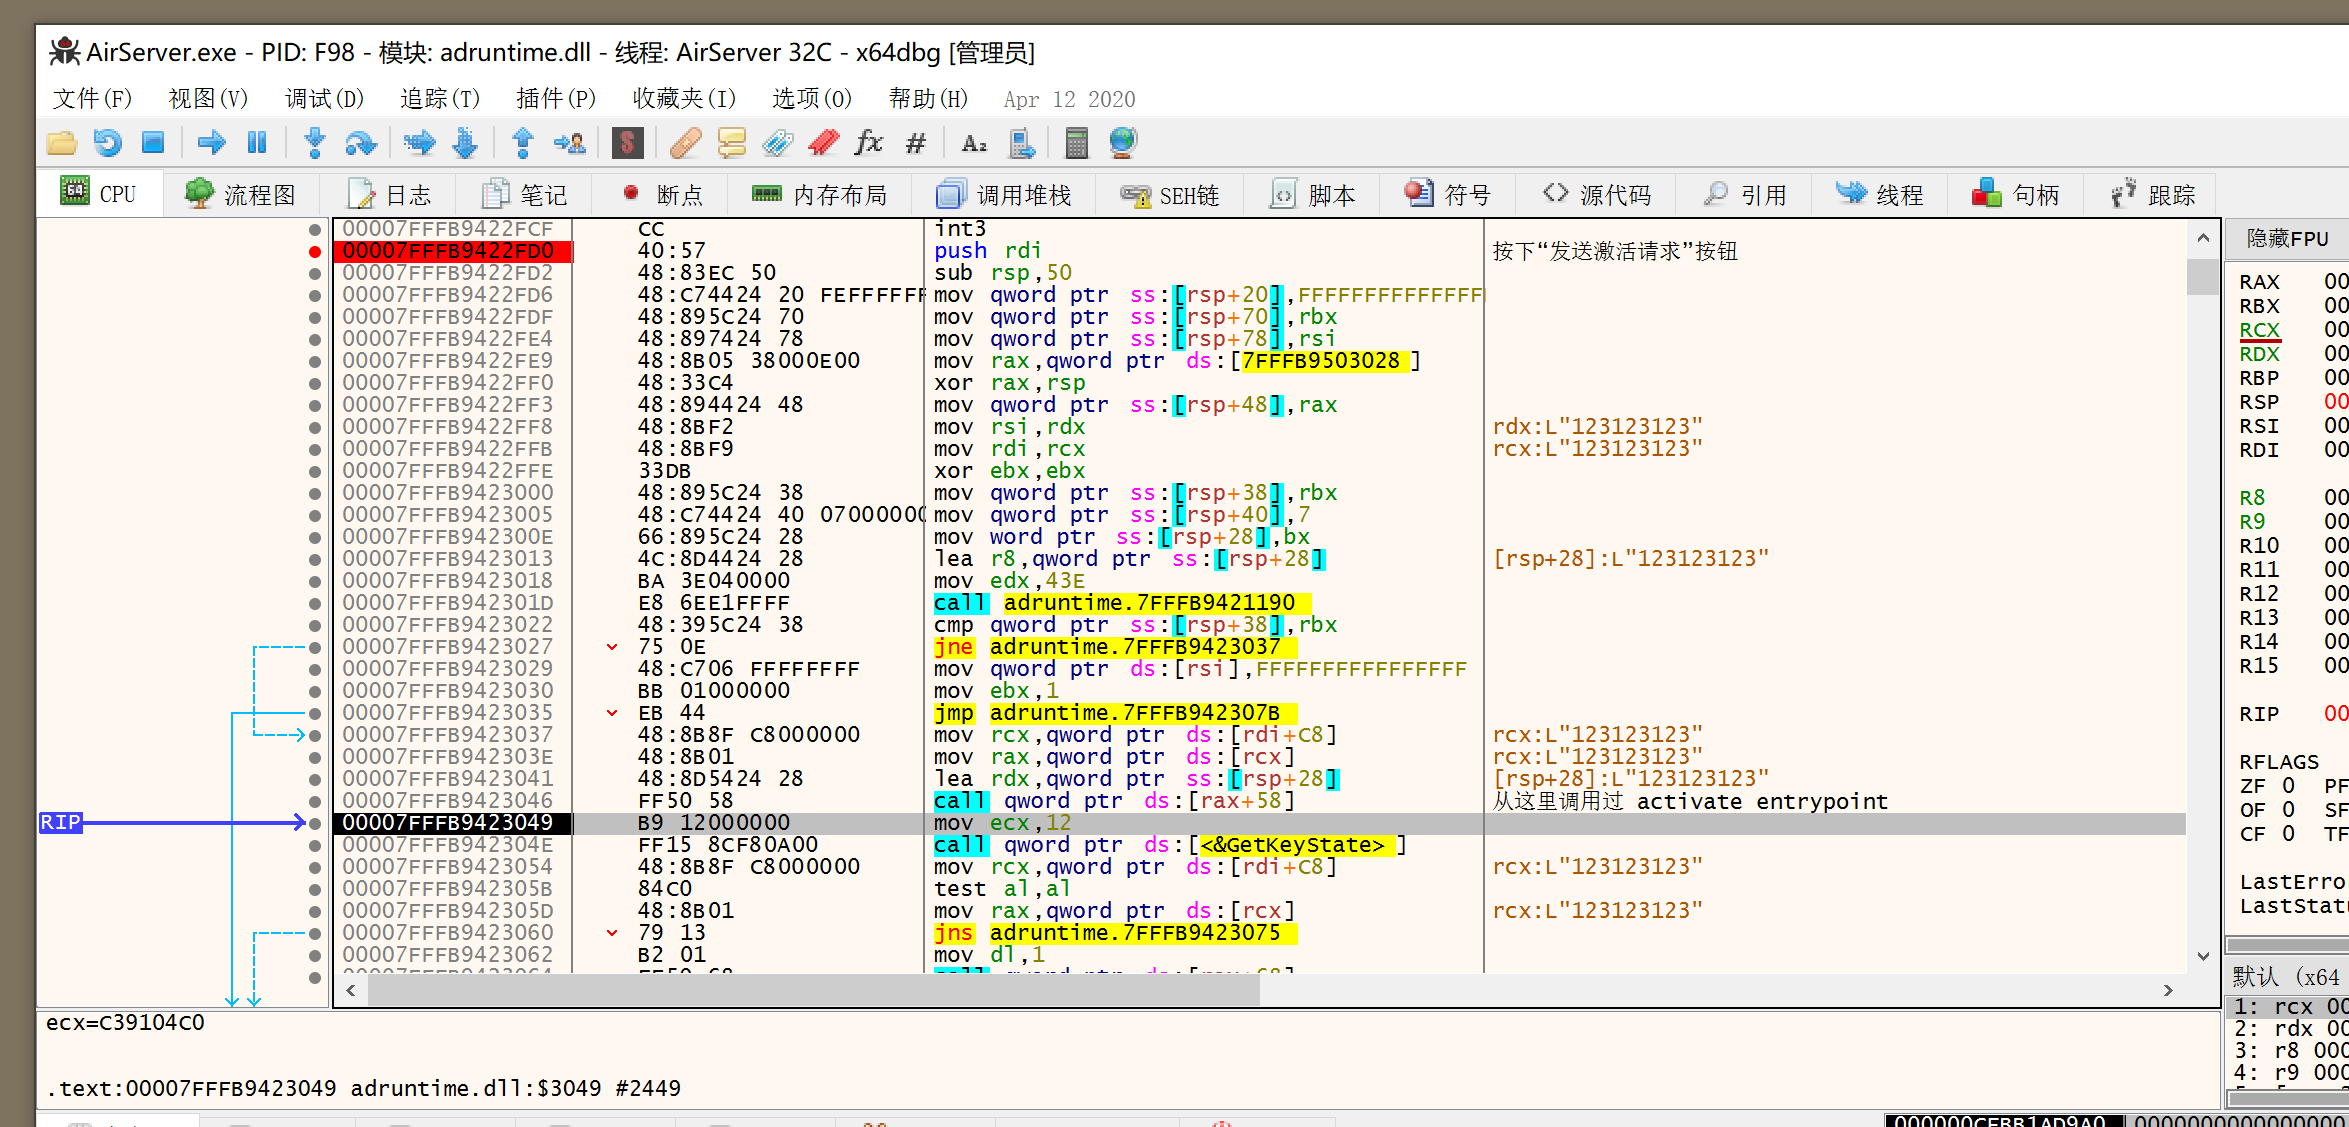
那么依据这个猜测,我们跳过 adruntime.dll 的所有逻辑,只关心 airserver.exe 的 .data 段。几次断点之后,我们来到下面的函数:
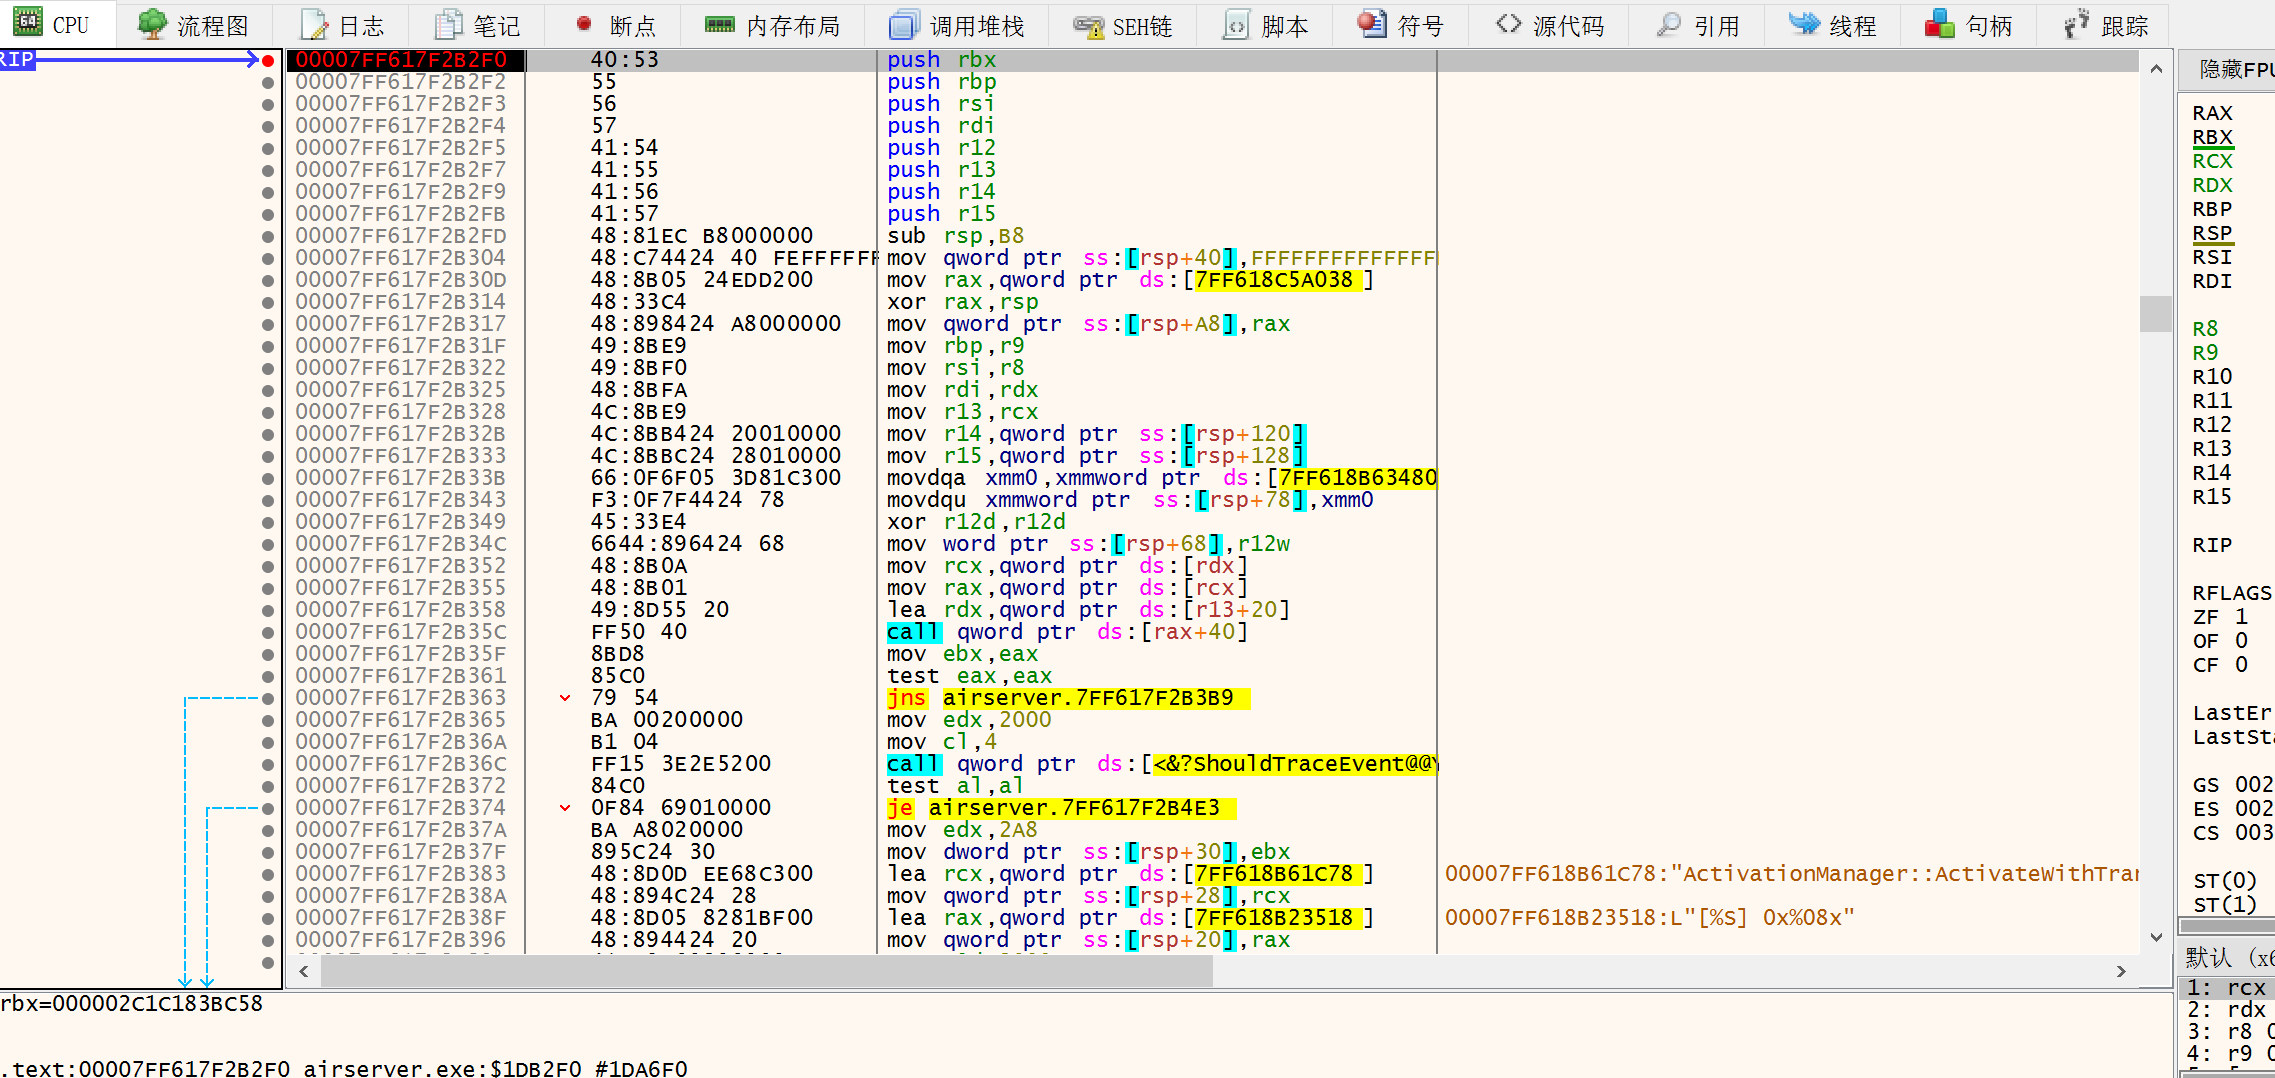
有文本 ActivationManager,很有可能与注册有关。
步过 B35C,发现这里有一个 uuid。由于我们抓包的时候,HTTP request 里面也有一个 uuid,我们打开 fiddler 继续 MITM,看看这个产生的 6f9b4588....0b4f 是不是提交上去的 uuid。
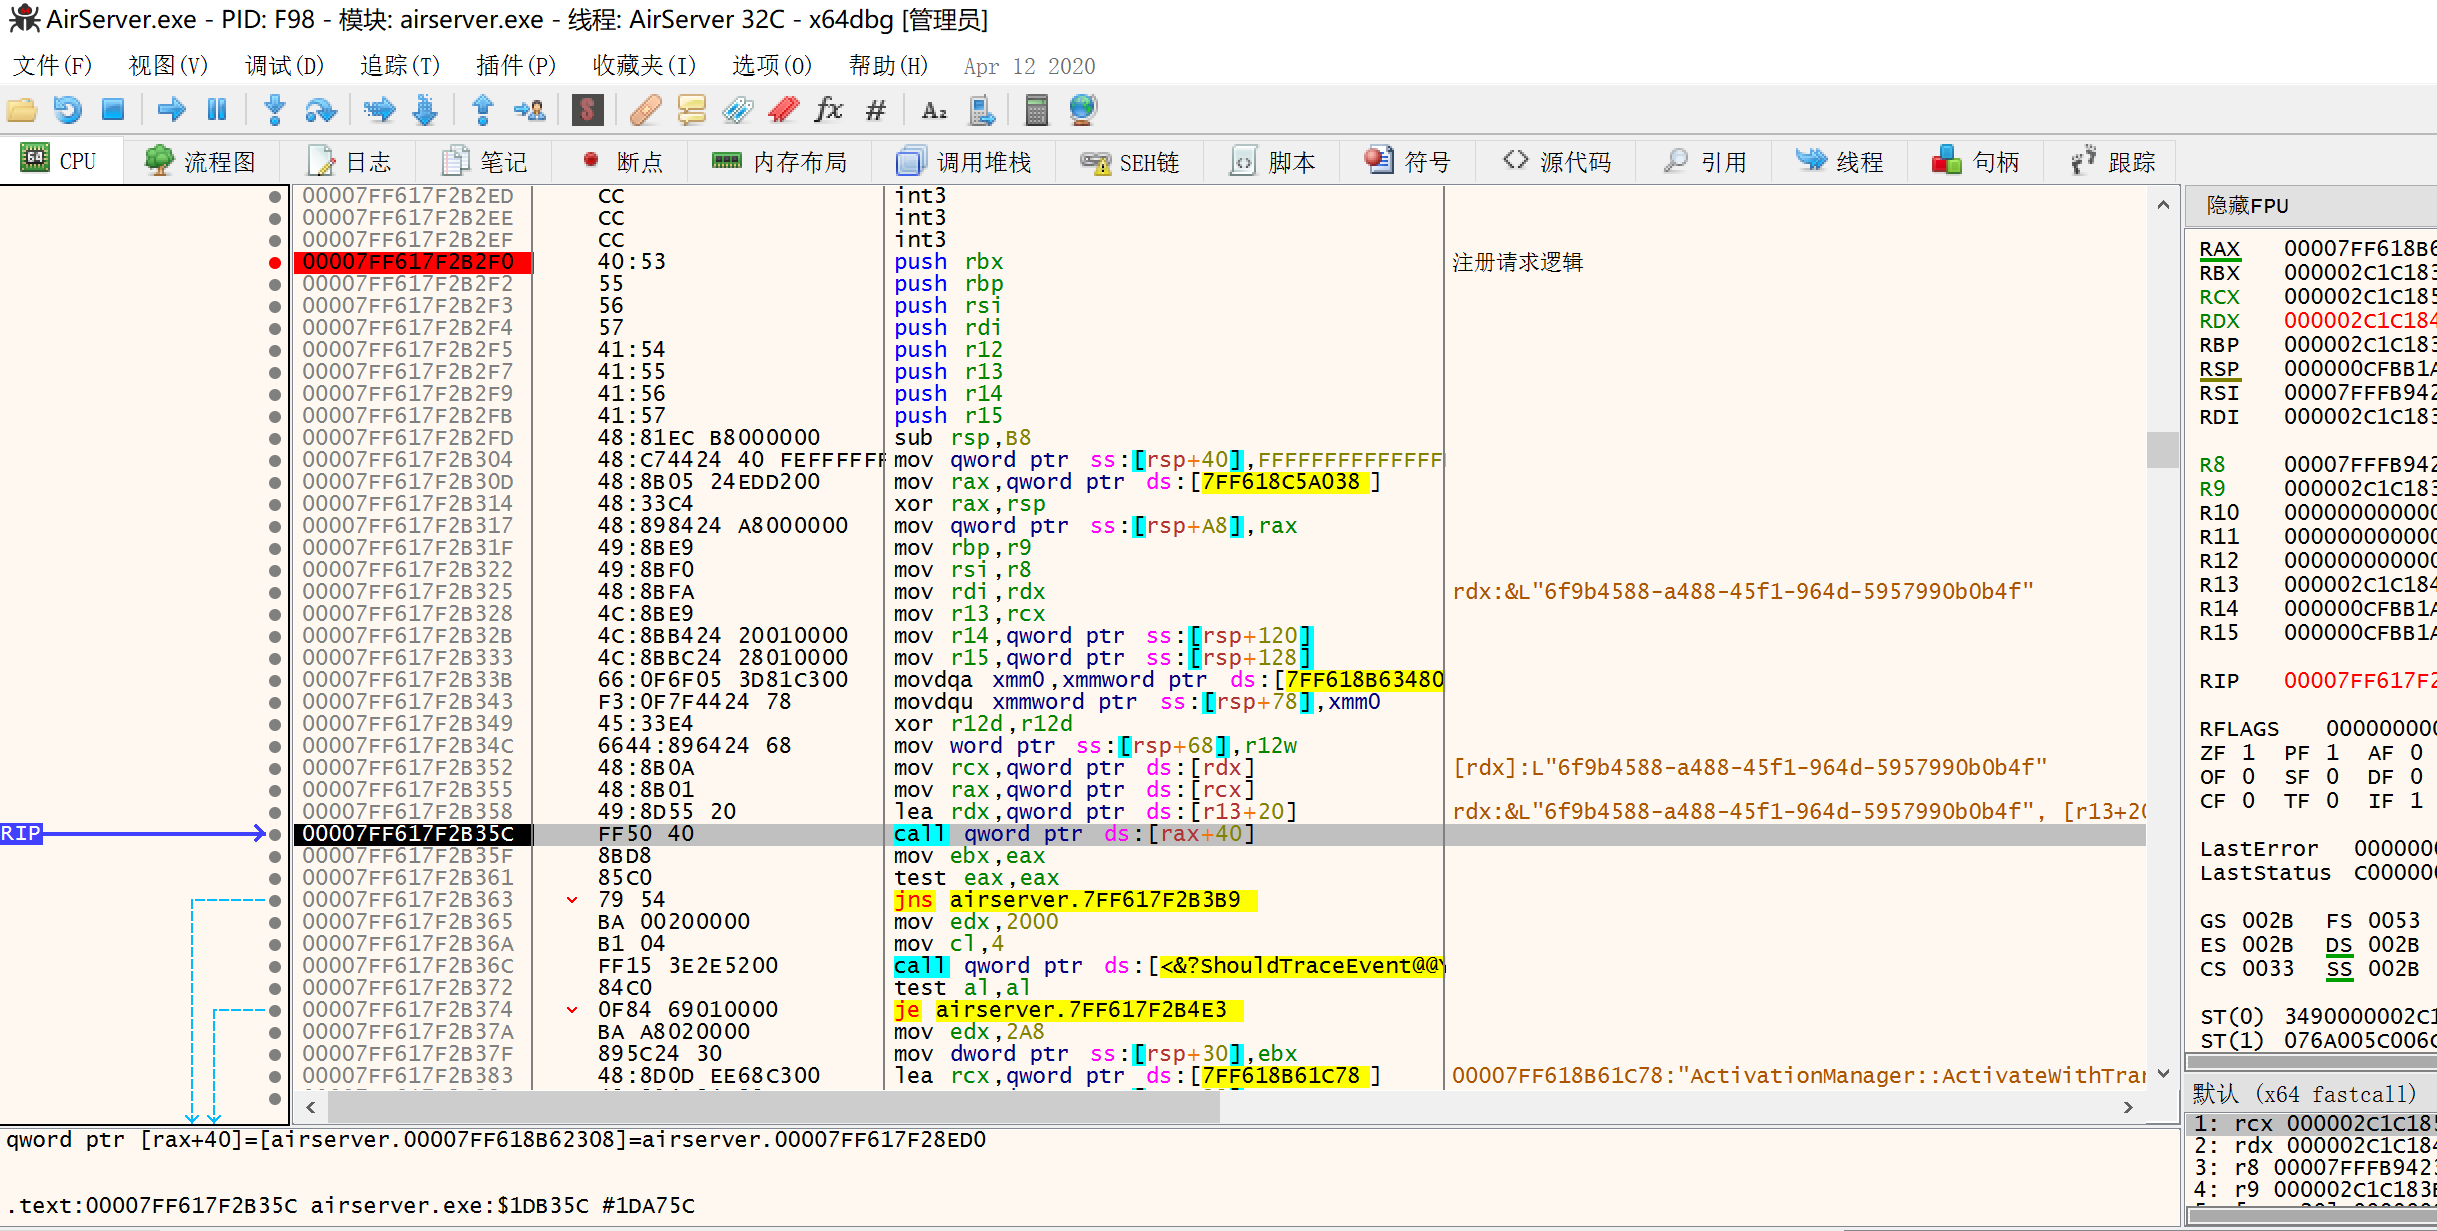
抓包结果如下。可见这个 uuid 确实是用于注册的。

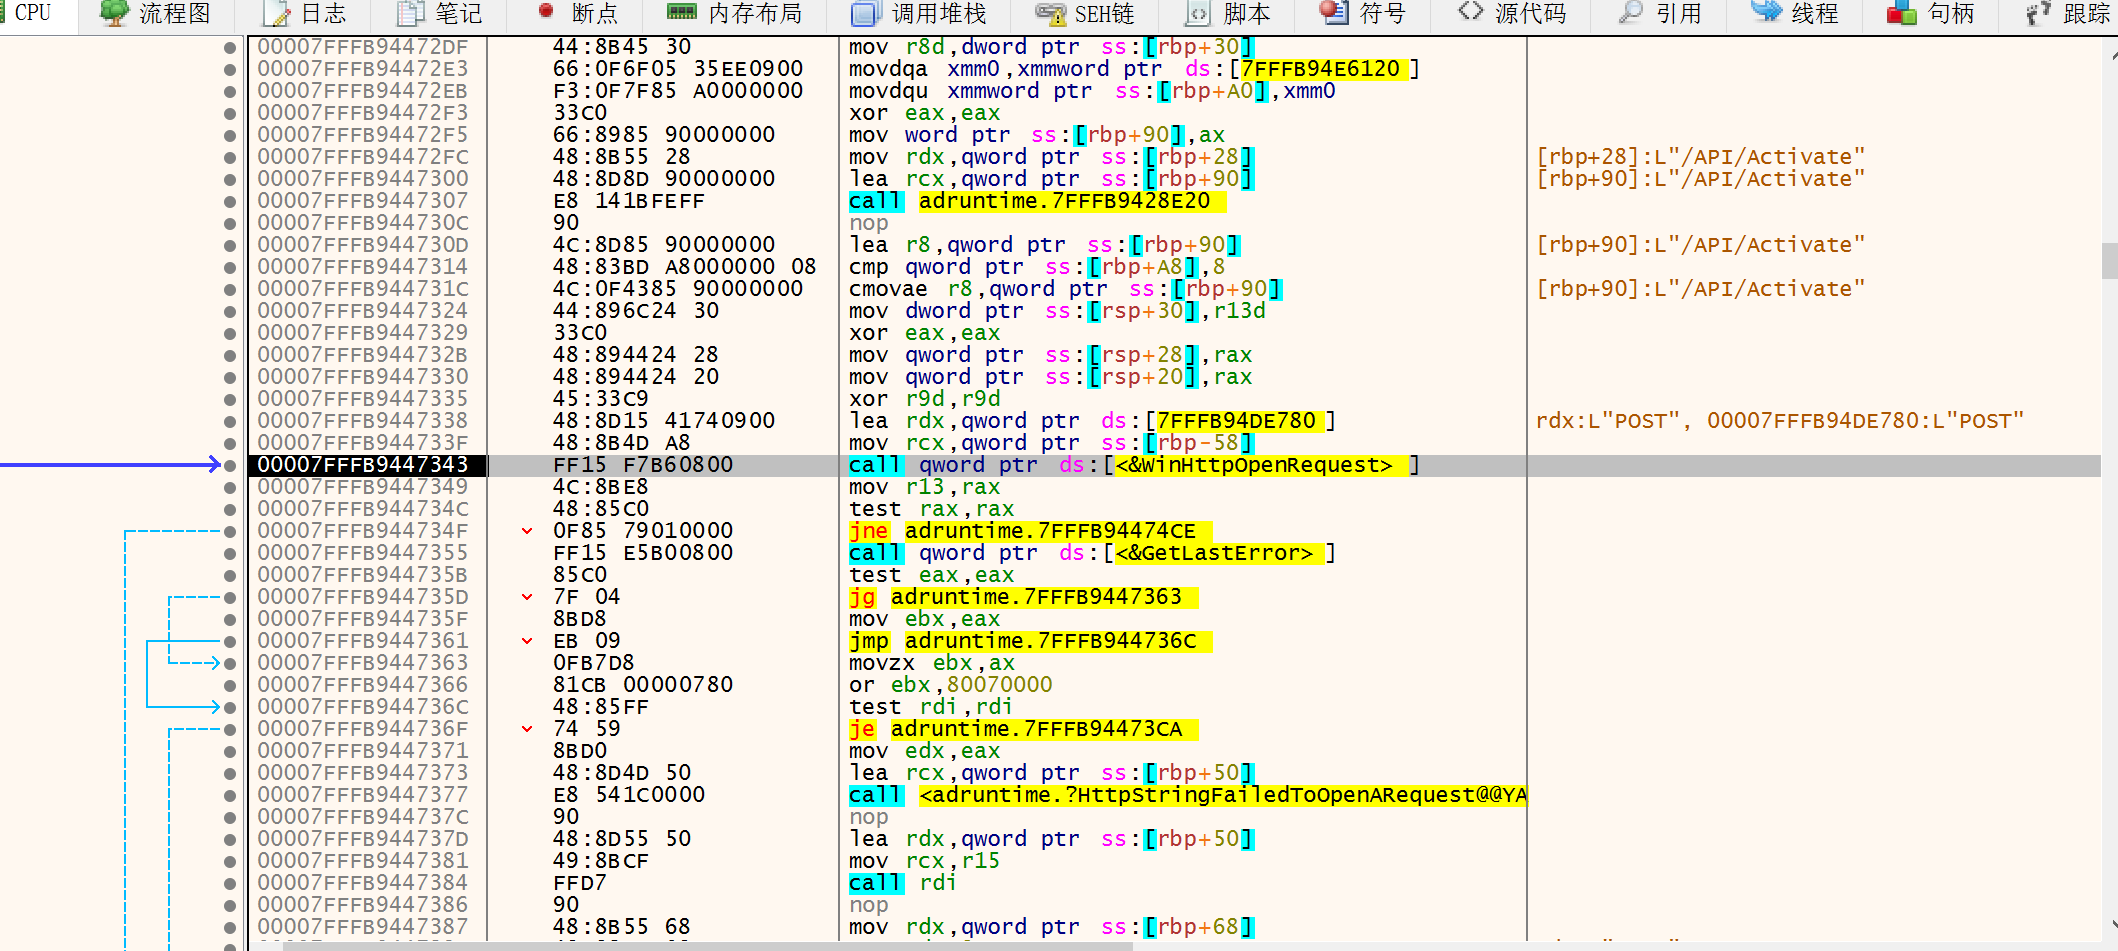
重新回到 B2F0,考察一下 HTTP 请求具体是在哪里发生的。注意到在 B405 这个位置产生了 HTTP 请求。
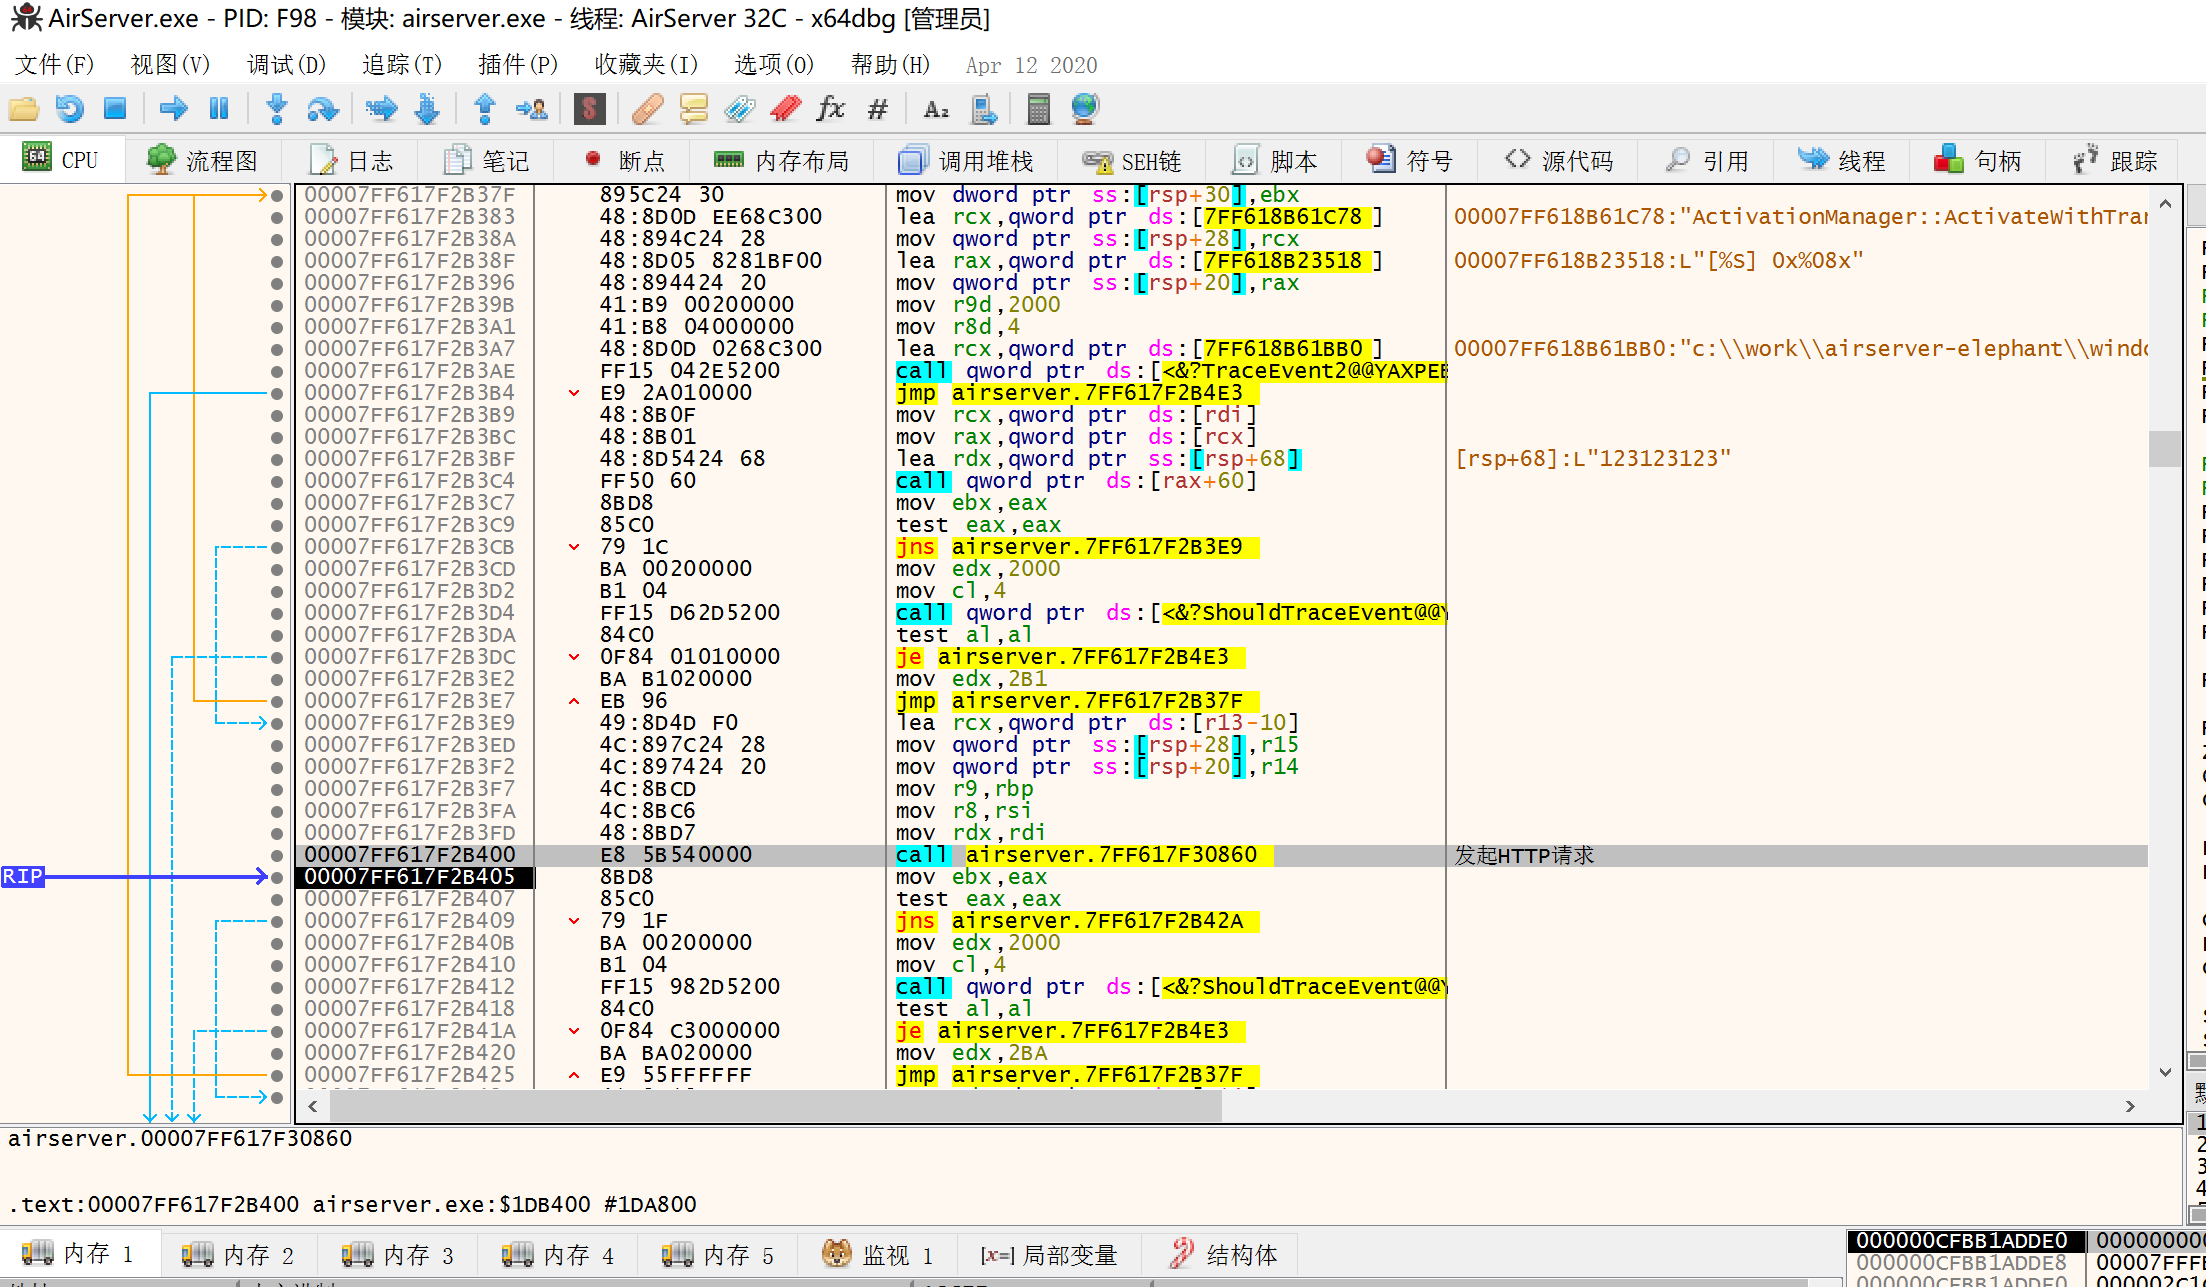
于是我们确定 B2F0 就是注册逻辑。跟进发起了 HTTP 请求的 0860 函数:
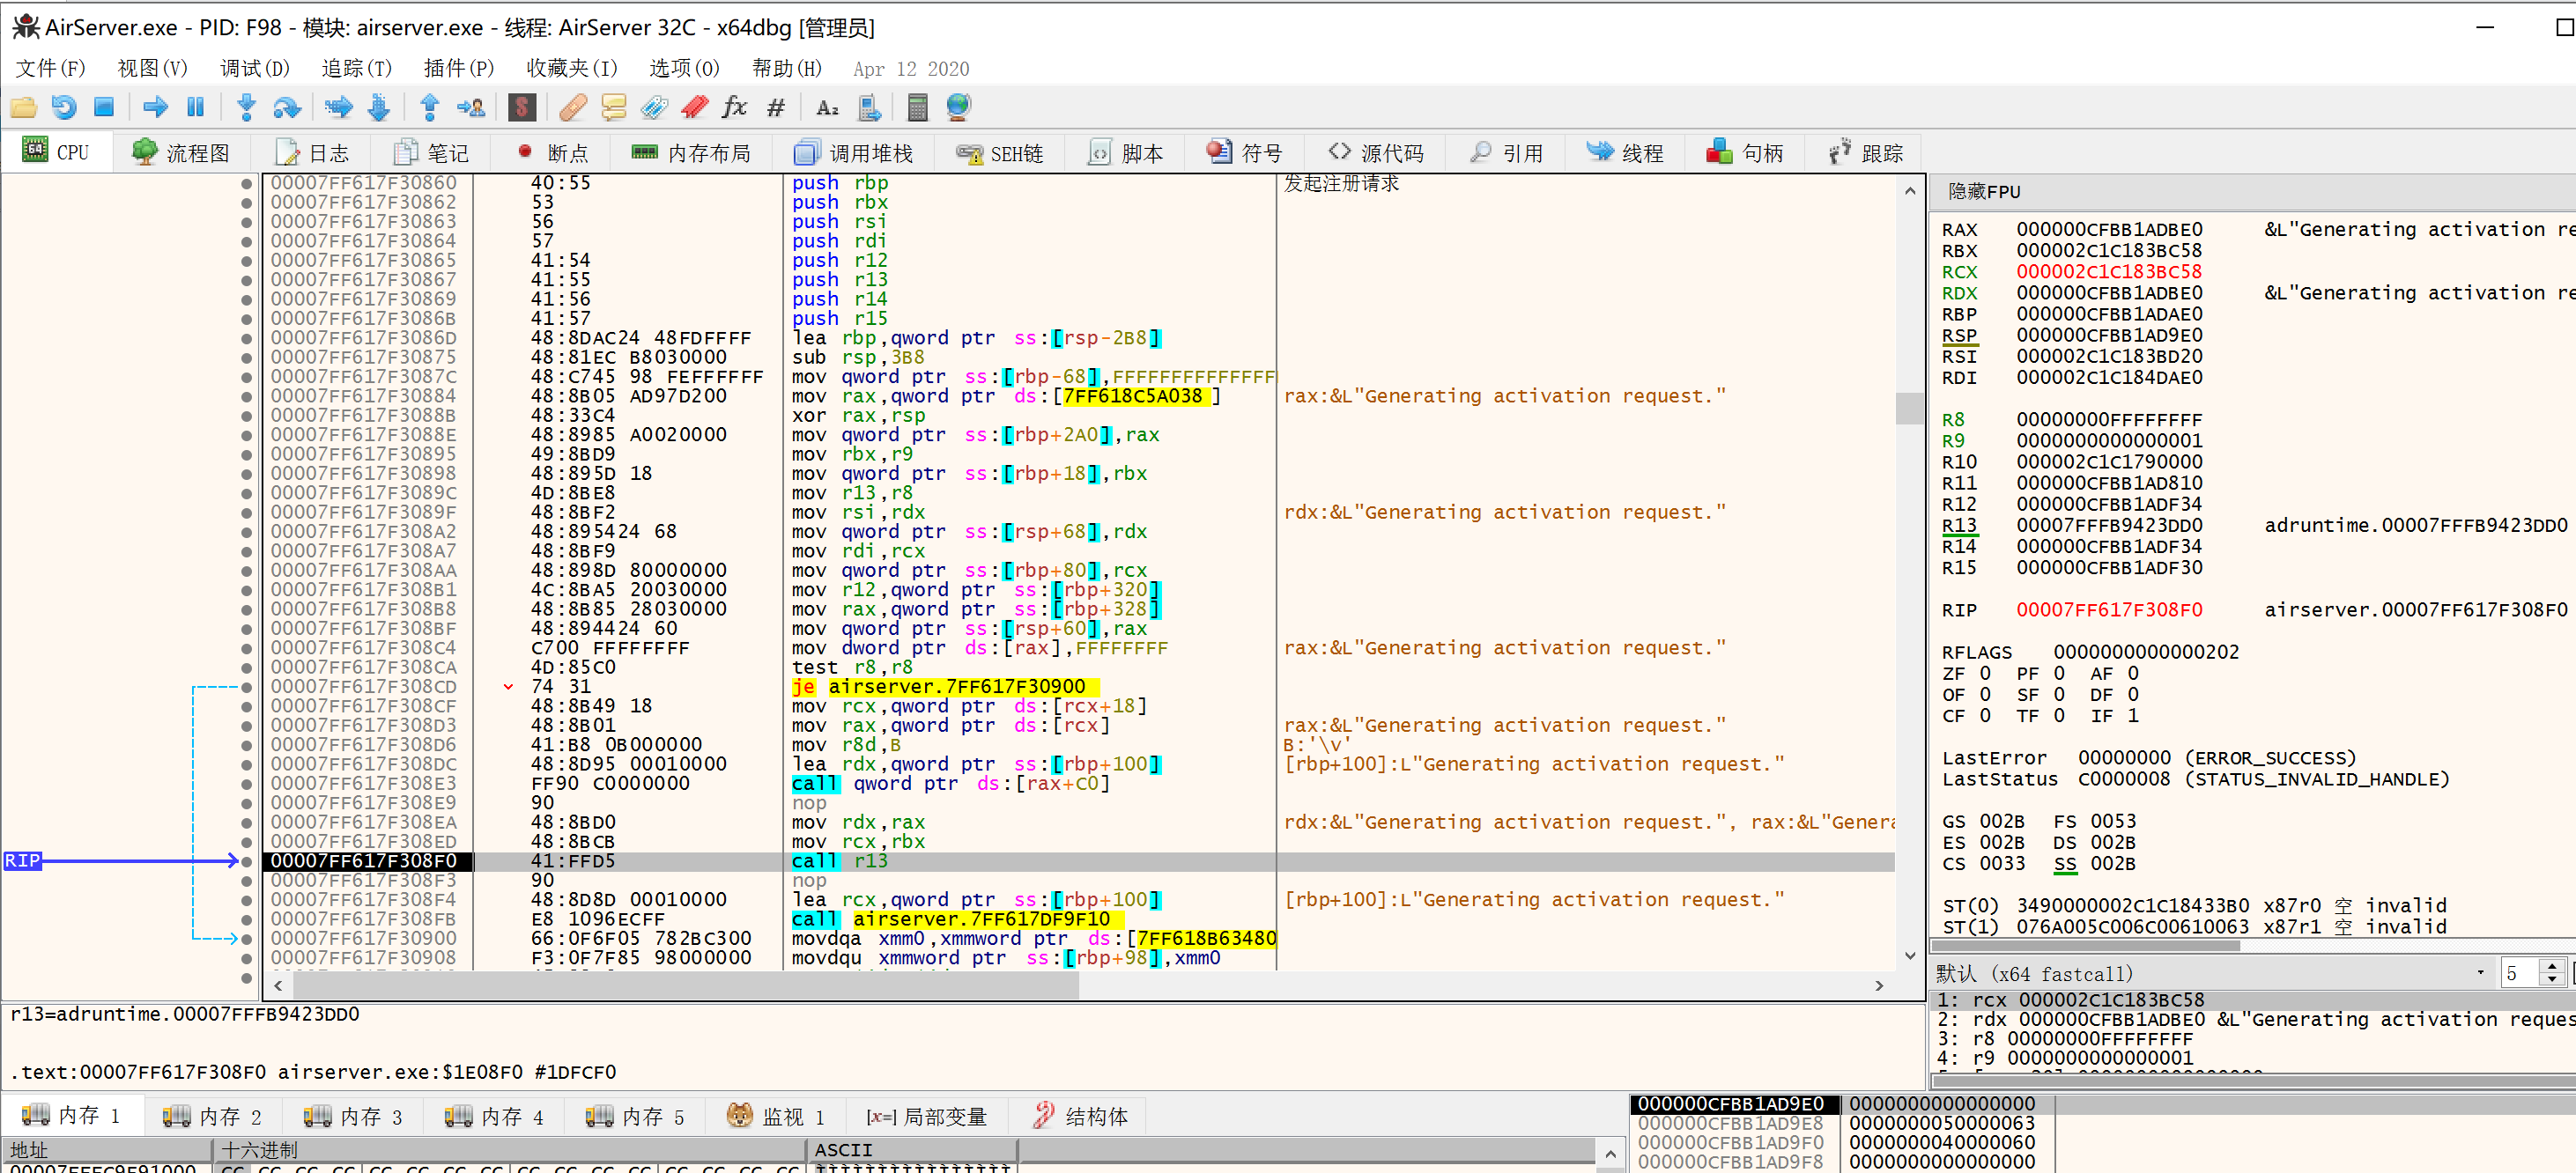
明显是在生产报文。所以我们应该算是找到了注册逻辑。
0x03 分析在线注册函数
分析 0860 函数,有几个关键点。
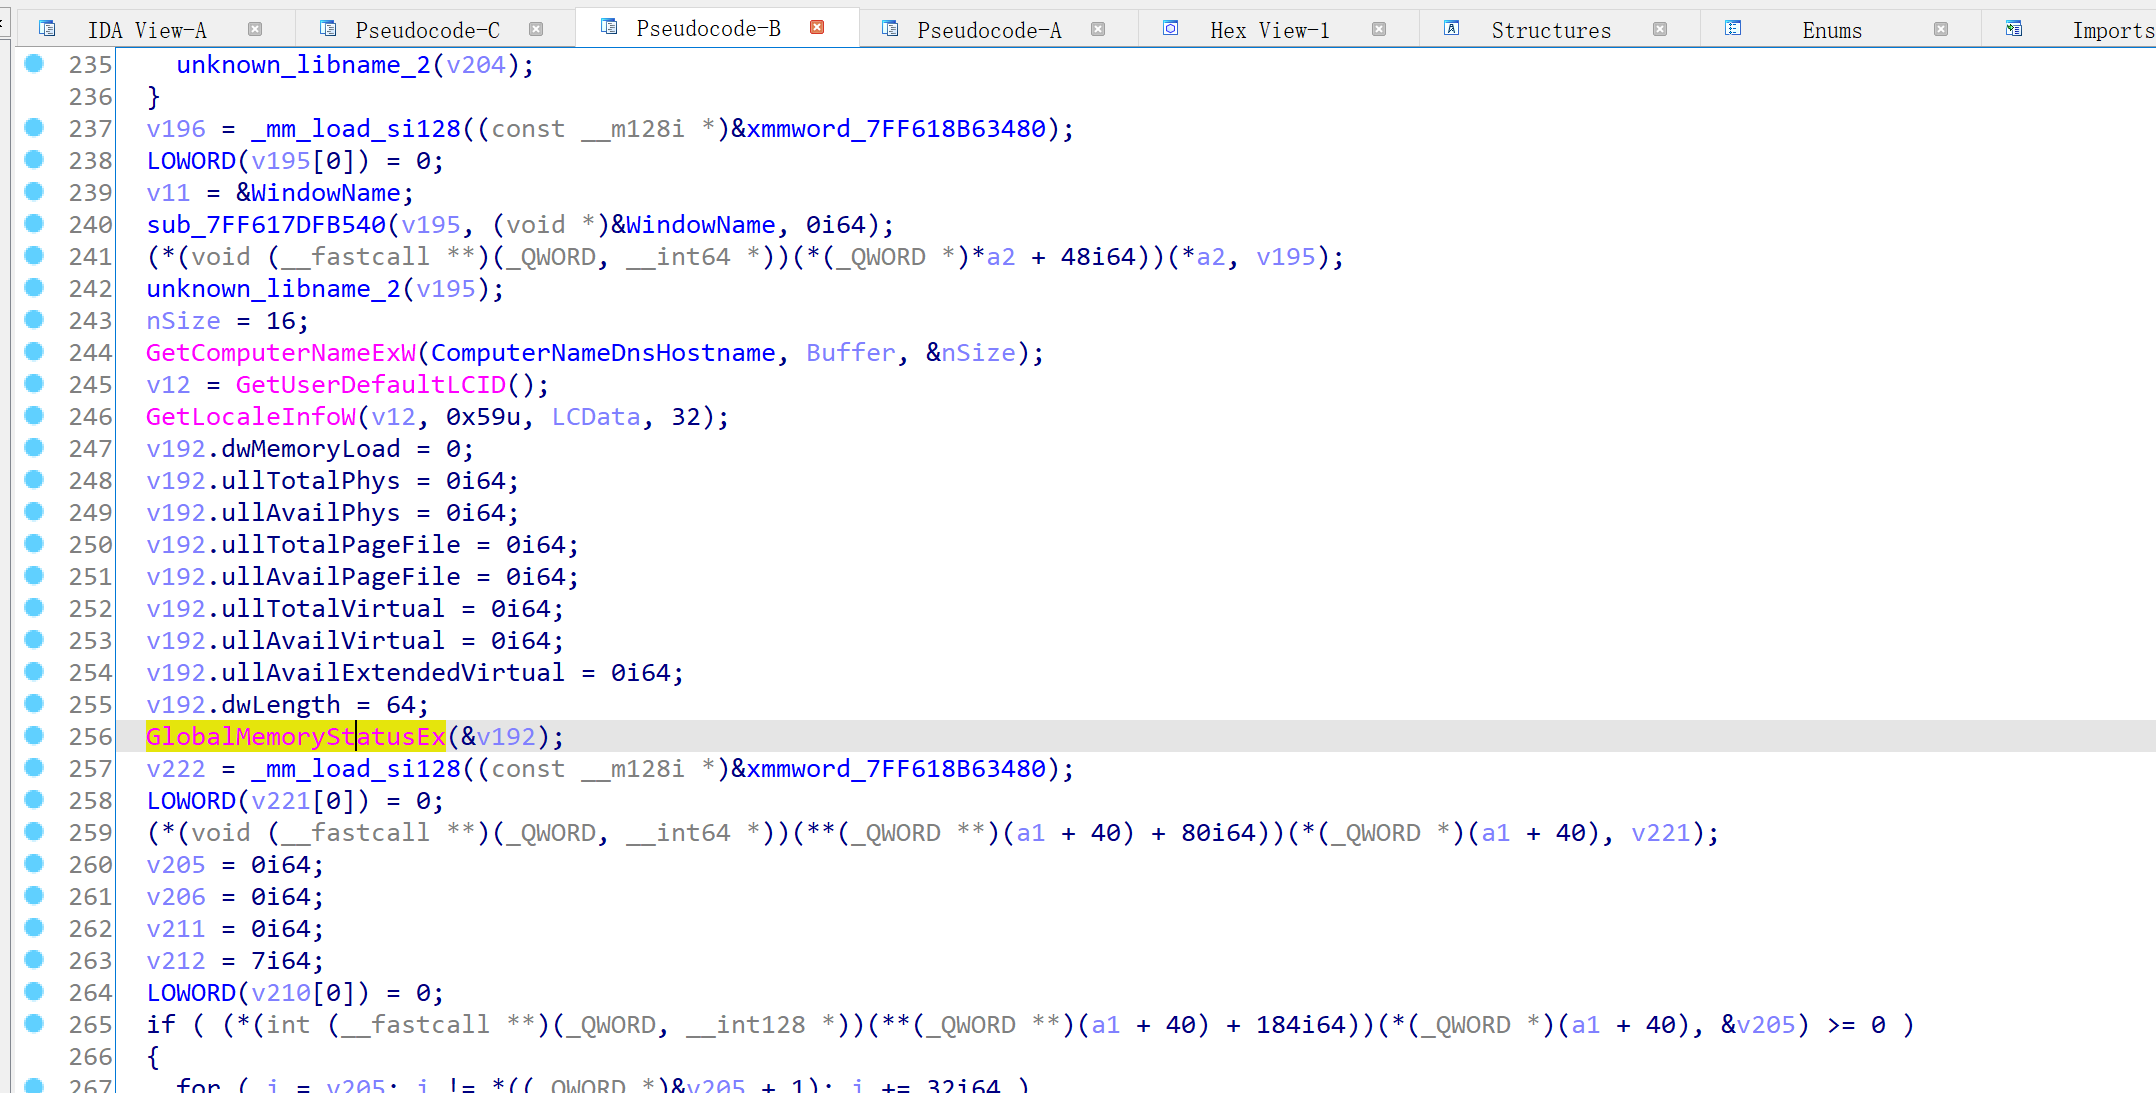
在 096E 位置获取了计算机名称、在 0974 位置获取了用户的 locale:
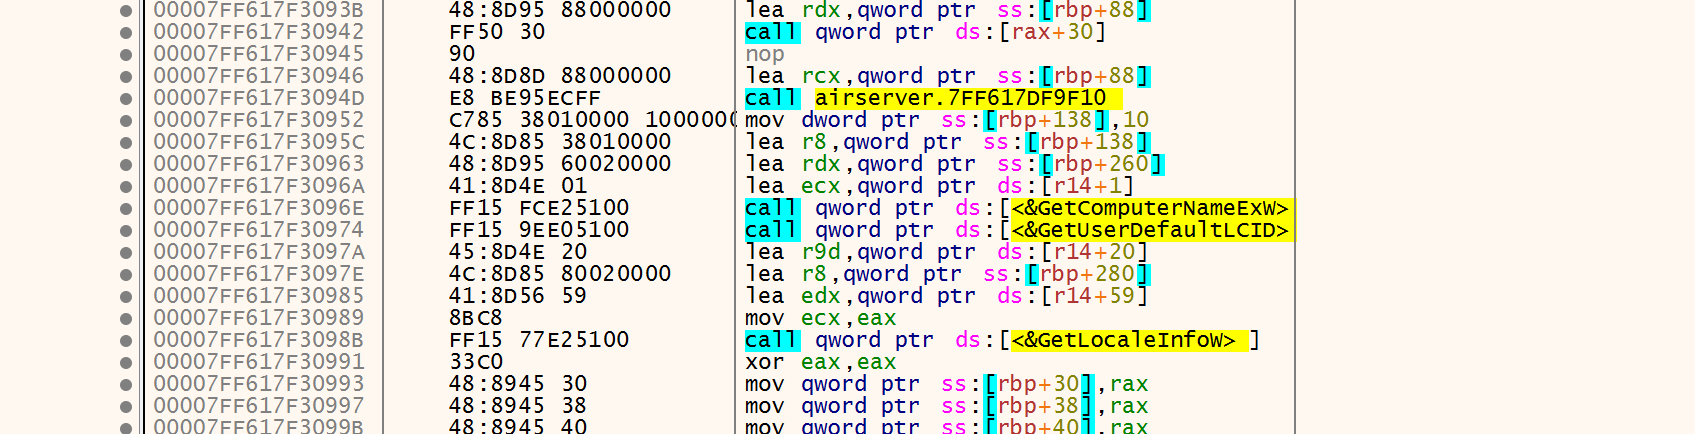
在 09BE 位置获取了内存信息:

于 0AFC 获取了 model 信息:

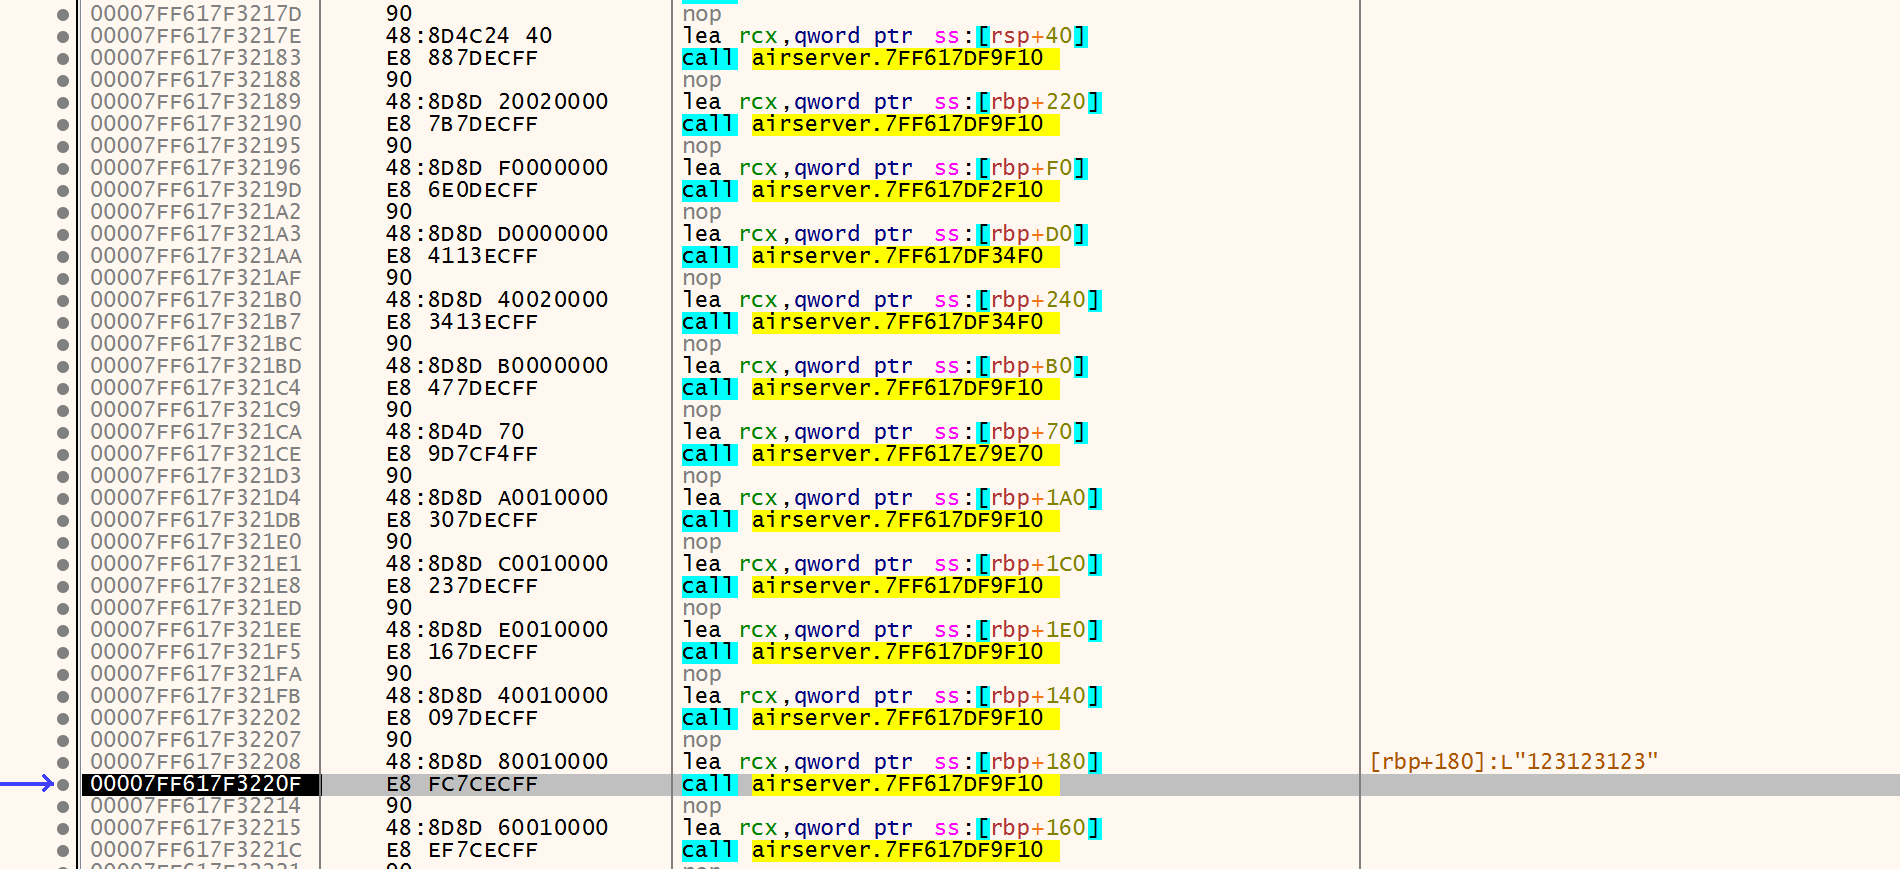
然后有一些繁琐的业务处理:


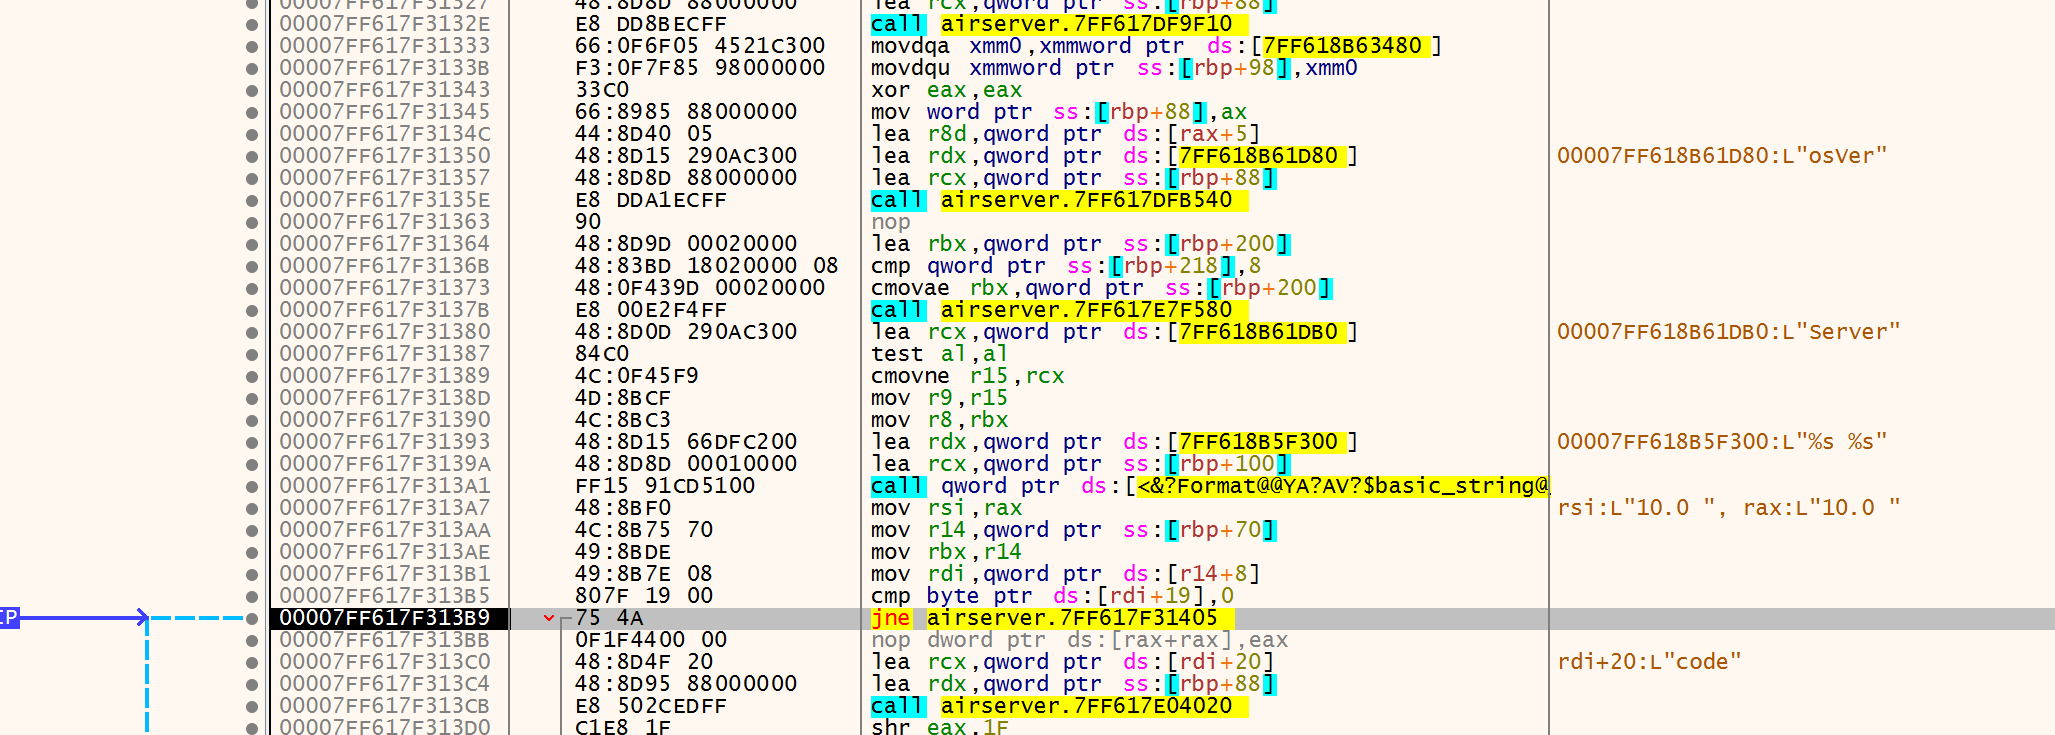
冗长的字符串处理结束之后,在 186C 做了一个 URL Encode:

事实上这个 URL Encode 会被运行多次,也许是用于拼接 POST data。接下来,在 1A5B 位置,开始用 & 把 POST data 参数拼接起来:
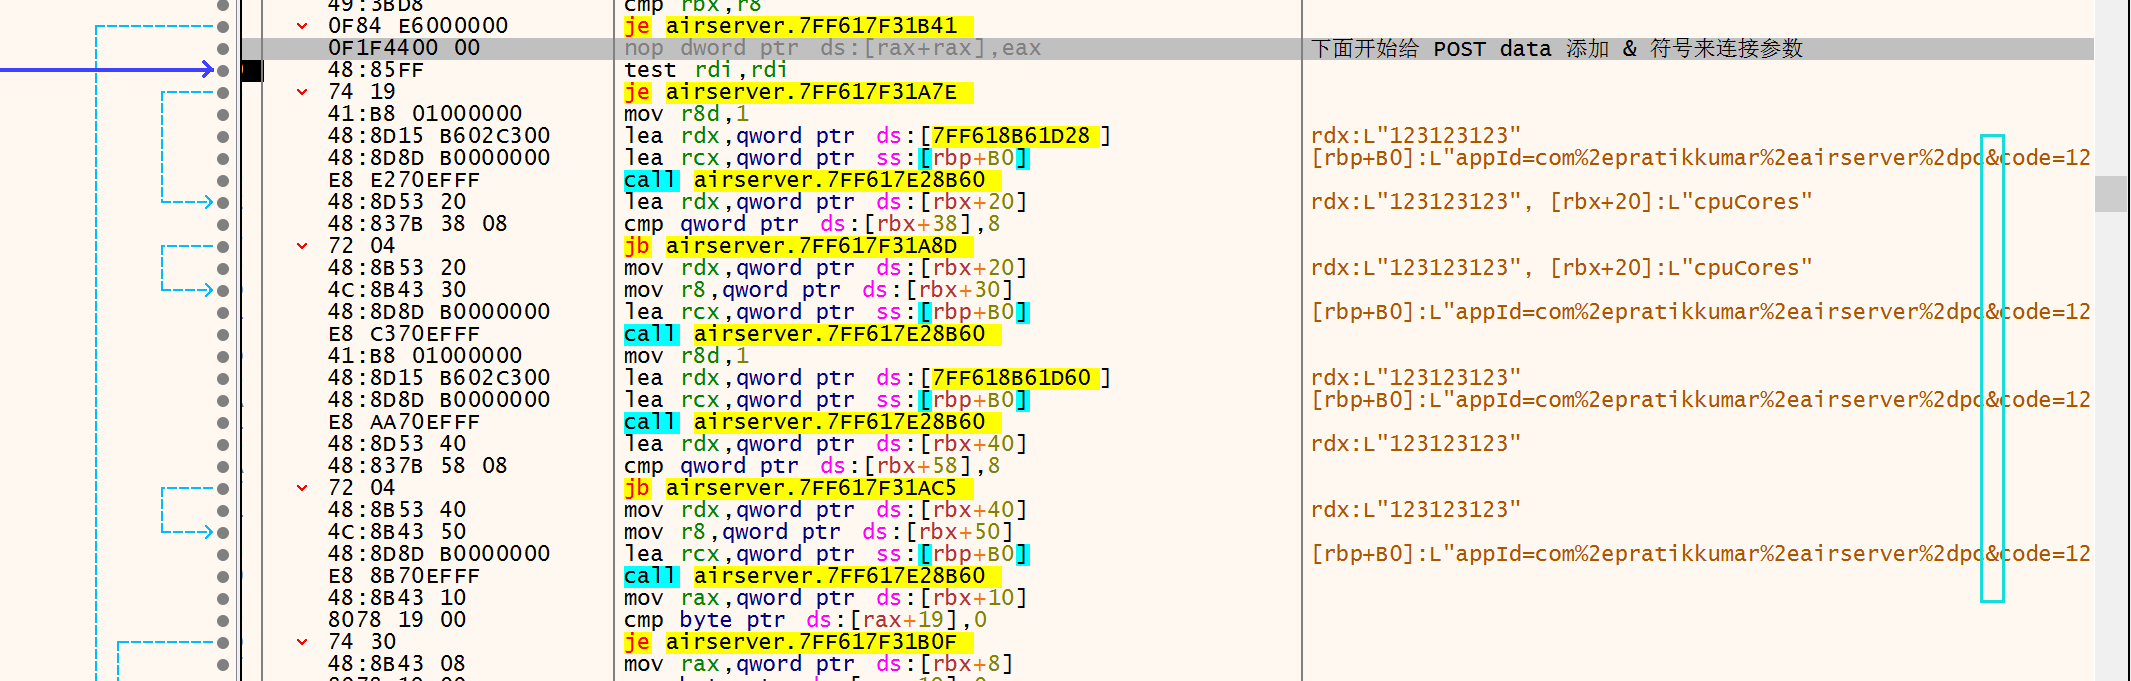
在 1B46 位置,准备发送请求:

完成 URL 拼接:
在 1C44 位置一个 call,发出了 HTTP 请求,结果字符串存放在 rbp+D0 位置。

接下来是非常冗长的字符串处理,似乎开发者 parse json 是手写的。
在 204E 位置的 call 会返回对 json 的解释,这个字符串会打在 GUI 上。

最后这一连串 call,每次都干掉一些字符串,应该都是在打扫卫生。
至此我们完成了具体注册函数 0860 的整体结构分析:
- 开电脑的户籍
- 拼接 HTTP 请求
- 在
1C44位置调用子函数,发起 HTTP 请求,获取结果 - 解析注册结果
- 清理空间
接下来,应该具体分析「解析请求」的这个过程。
0x04 注册请求结果处理
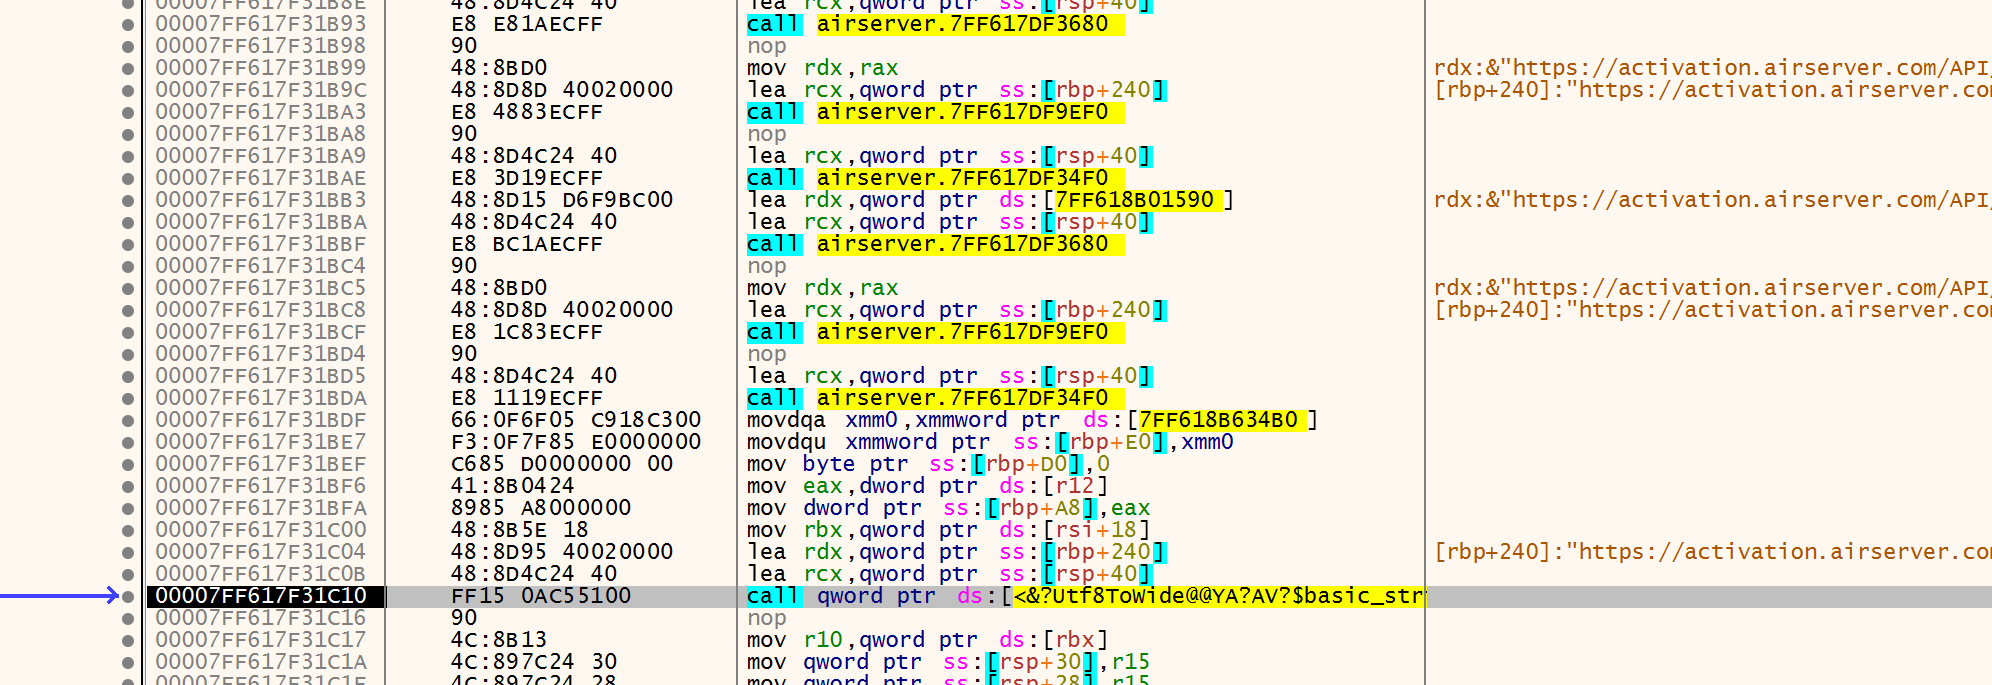
首先我们详细看看那个「发起 HTTP 请求」的函数。定位到 1C44,它的指令是 call ds:[r10+A8] ,我们看看它到底 call 了哪个函数:
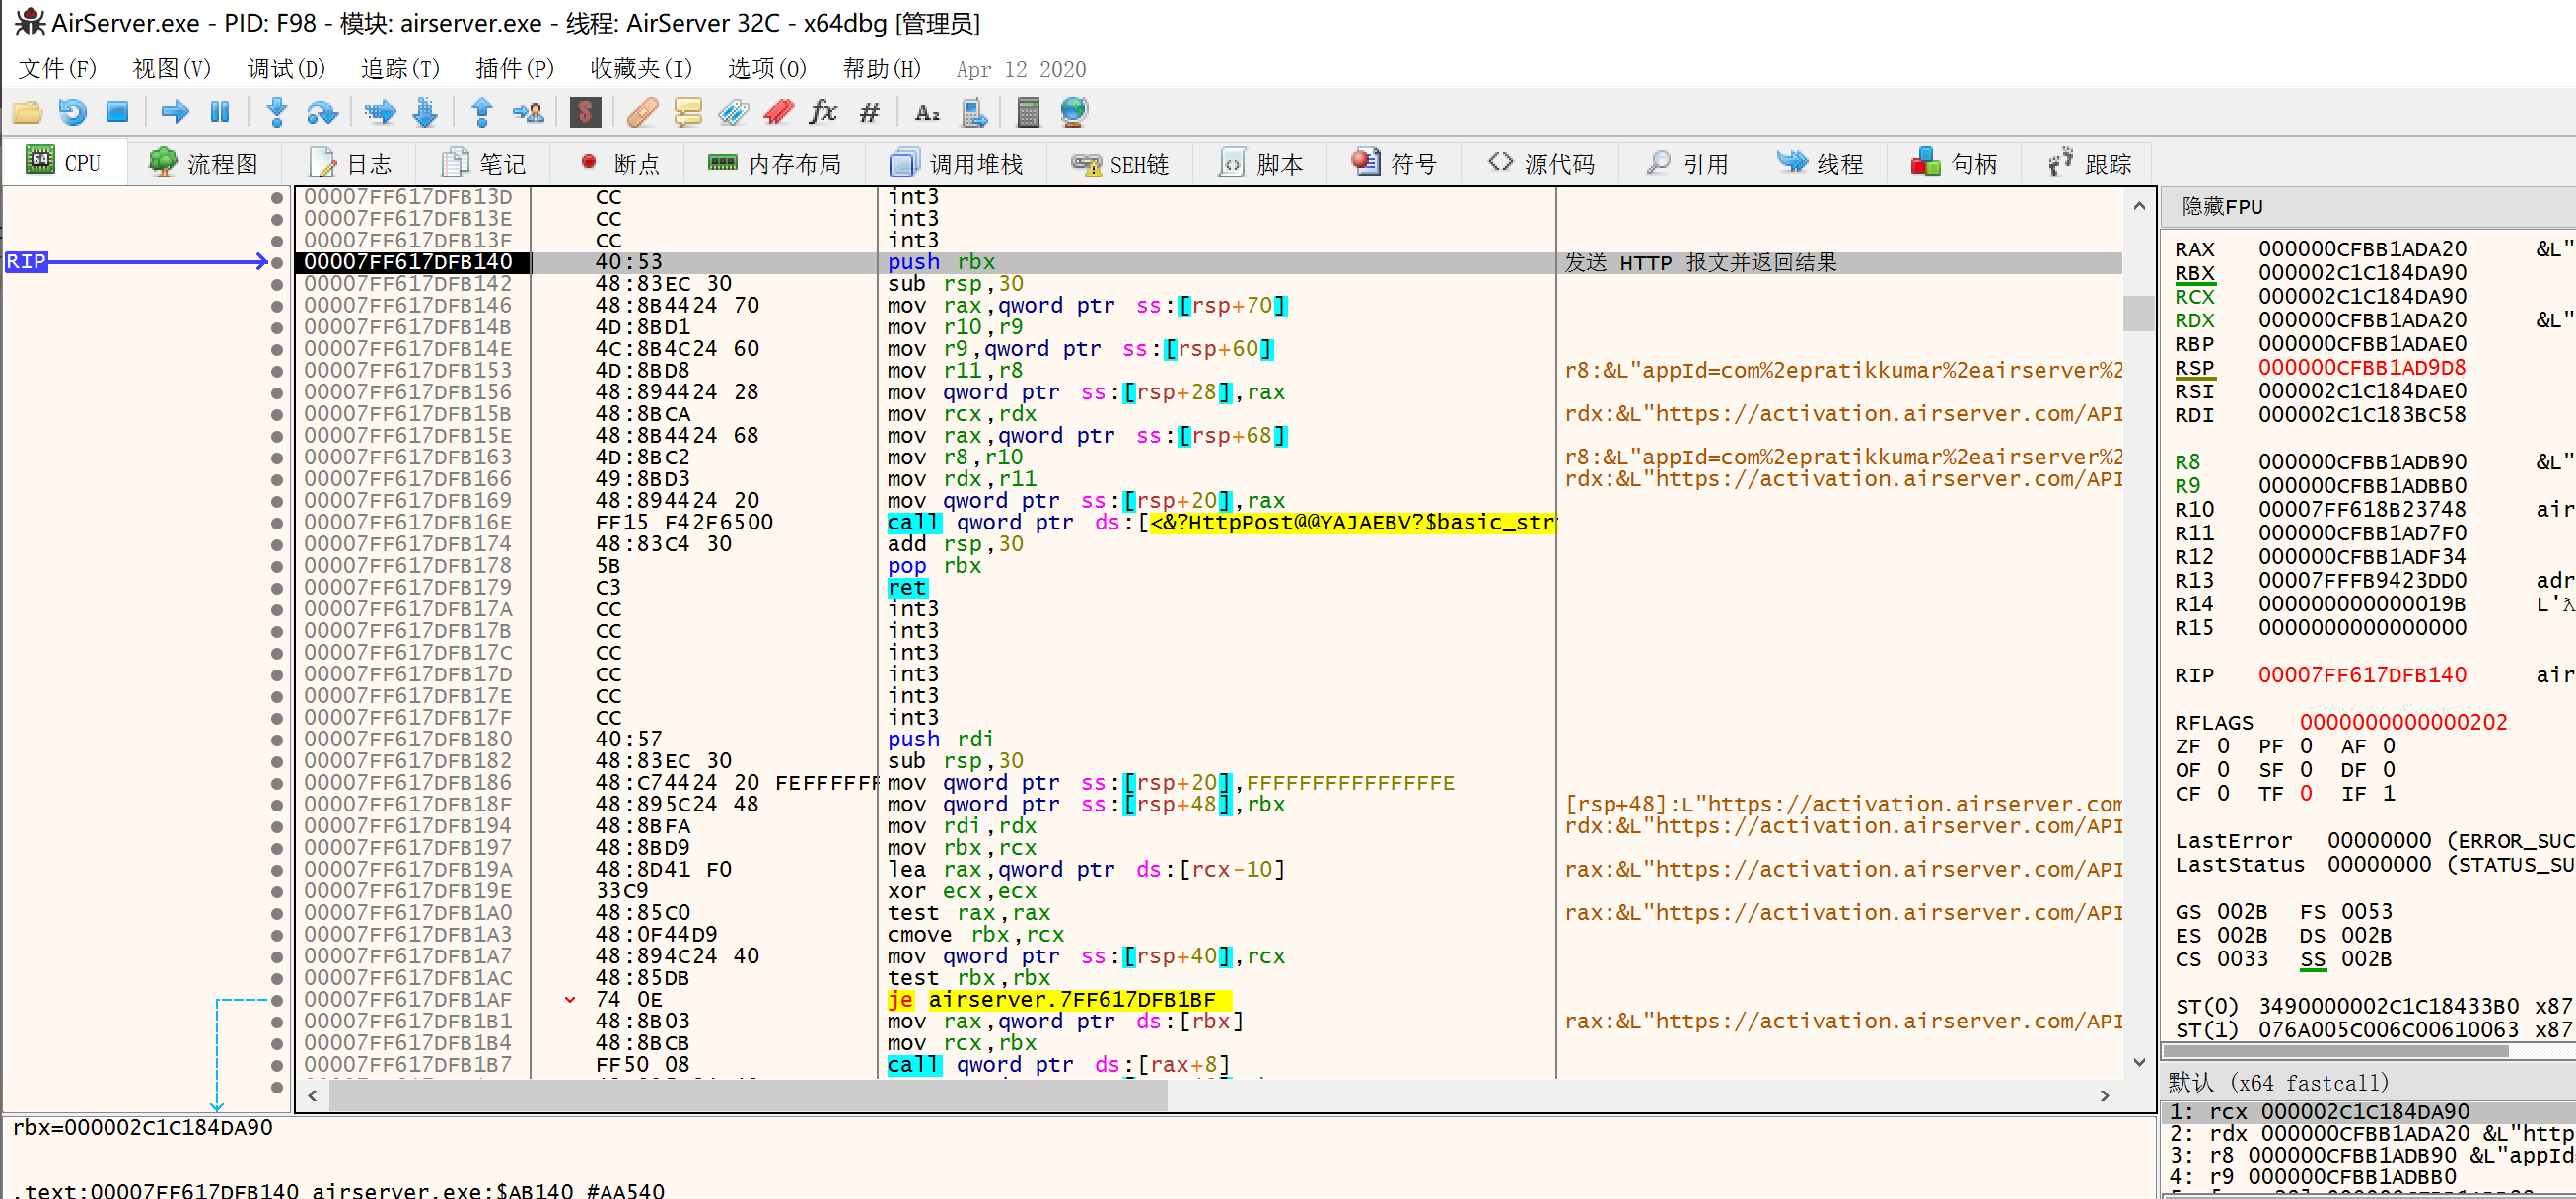
看一下 B140 的逻辑:

这就是 HttpPost API 的简单封装。这个 HttpPost 函数是 adruntime.dll 提供的,签名是:
long HttpPost(
  std::wstring const &,
  std::wstring const &,
  std::string &,
  uint &,
  void (*)(void *, std::wstring const &),
  void *
)
动态调试,进去看看逻辑。
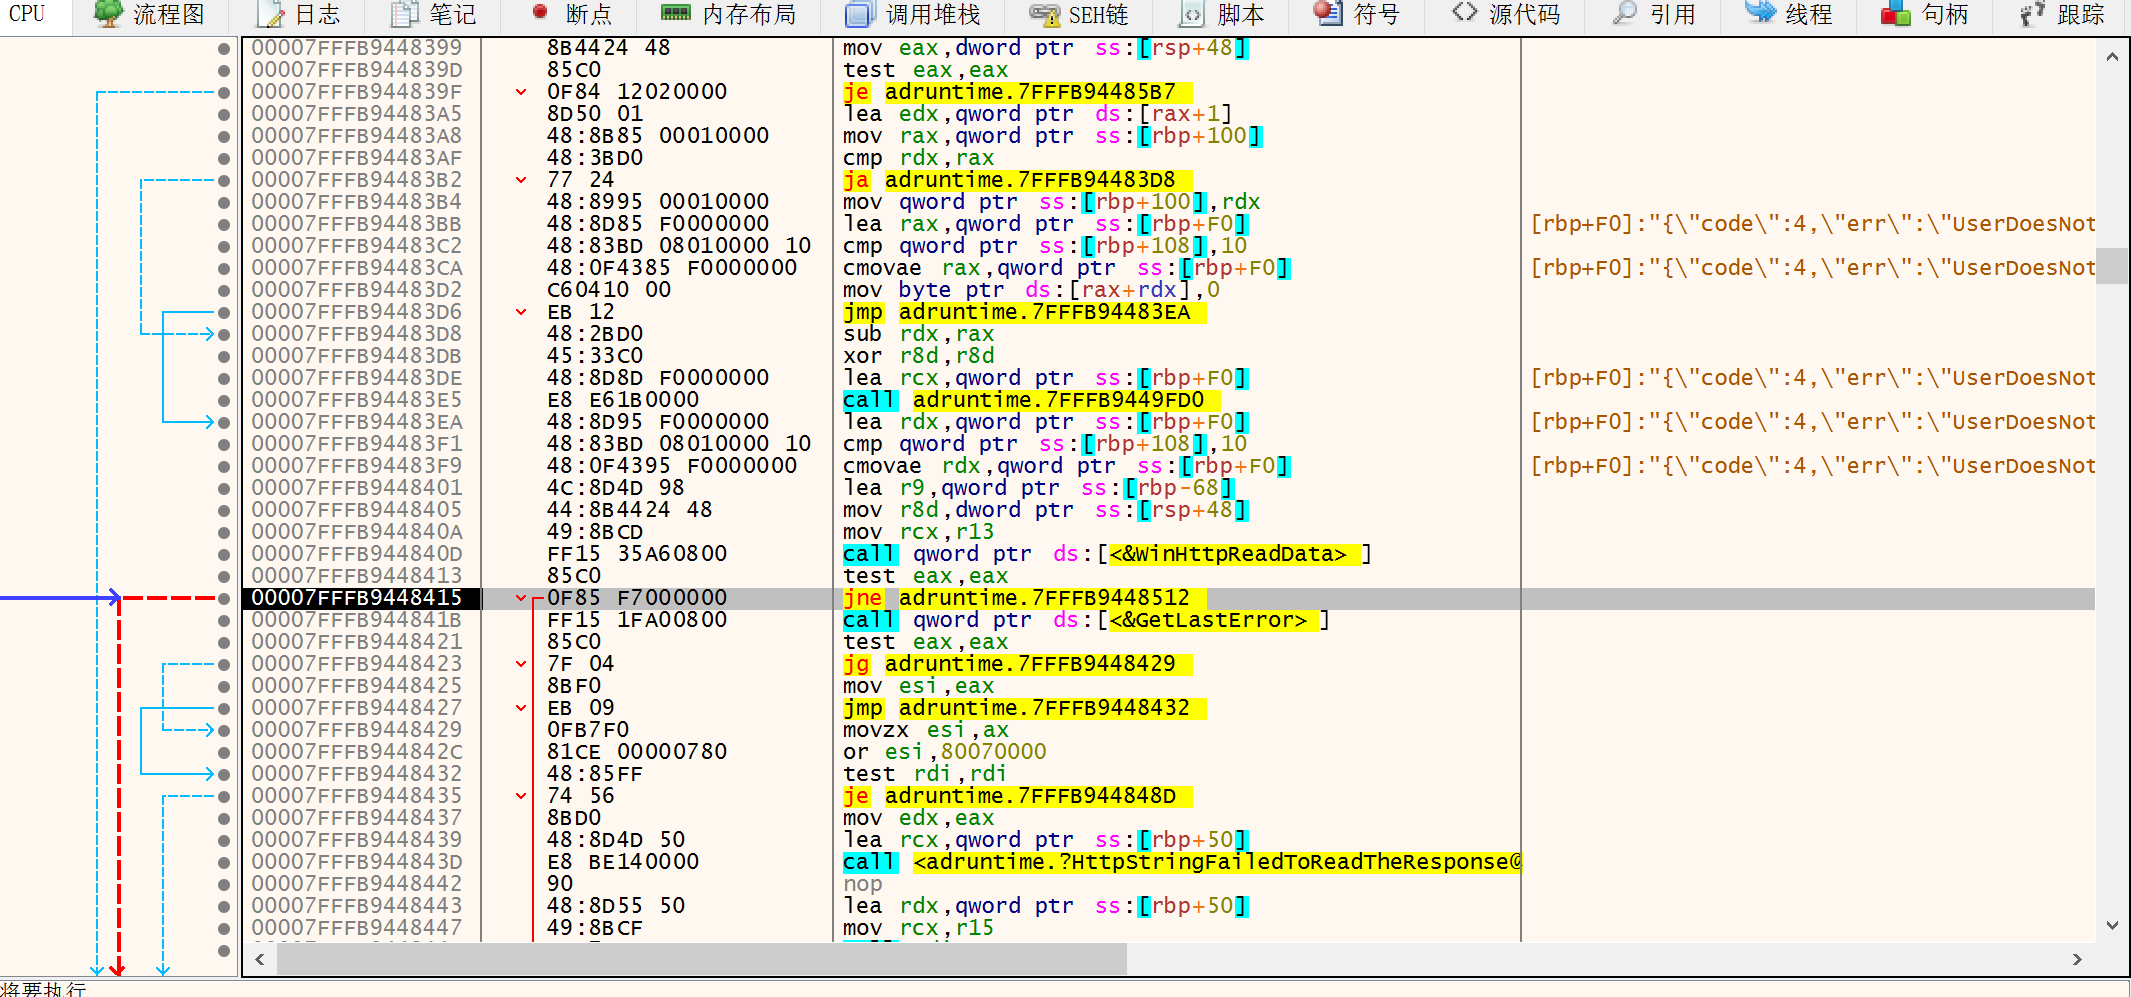
没有什么特殊的操作,就是一个普通的 https API。那么我们看一下传参过程。运行时, HttpPost 的参数列表如下:
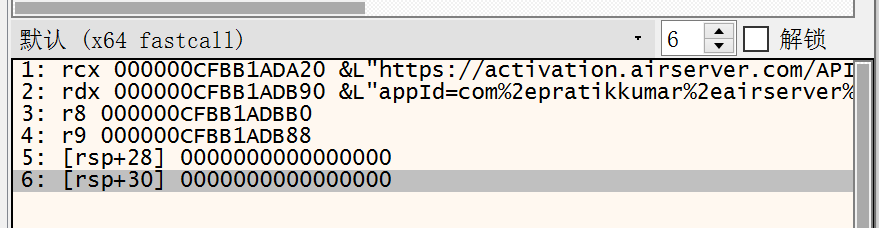
显然,第一个参数是 URL,第二个参数是 POST data,猜测第三个参数是结果储存地址、第四个参数是错误码。来验证一下,追踪 r8 所指向的内存:
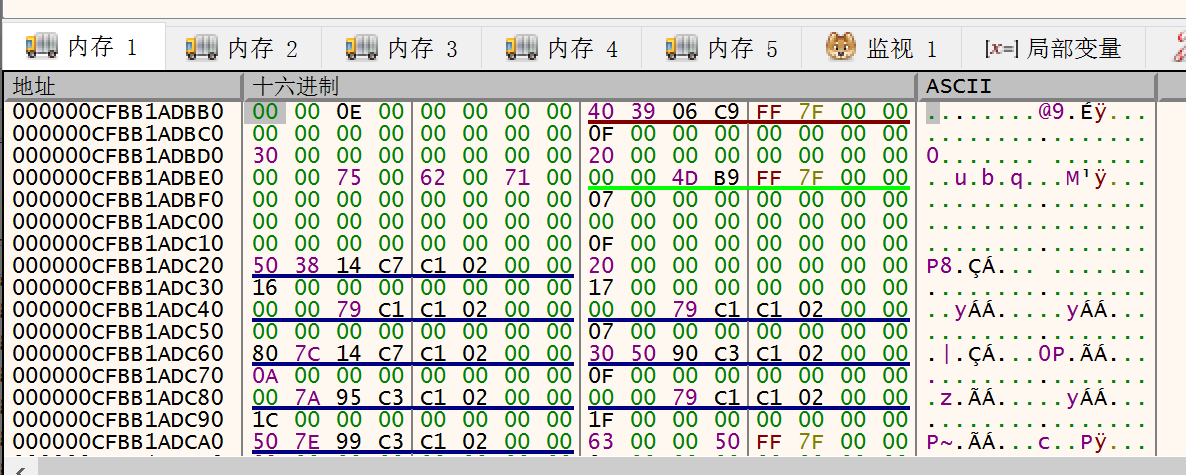
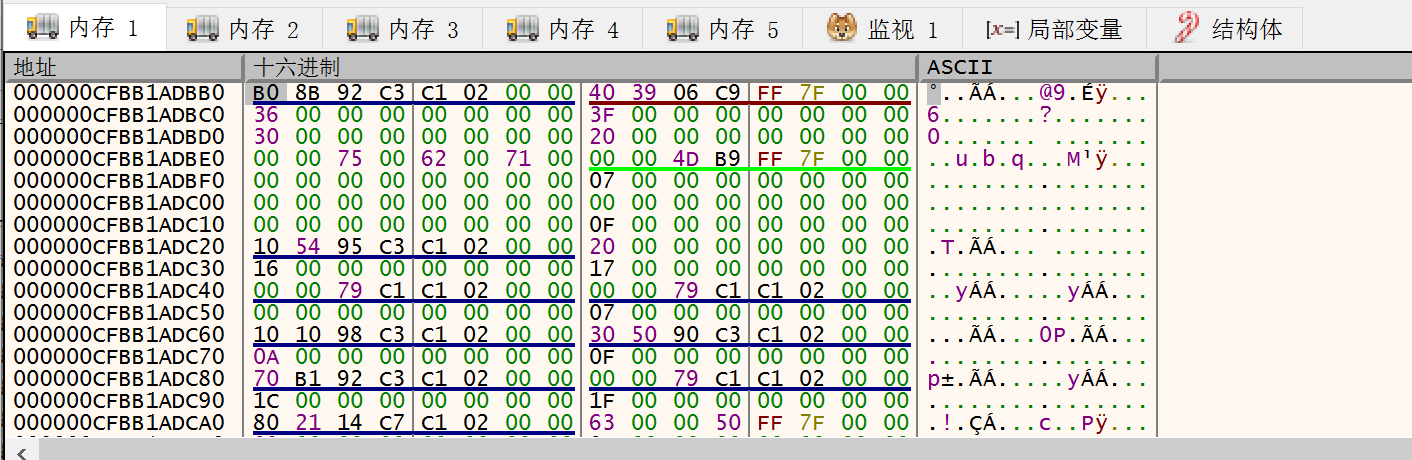
HttpPost 之前;右图:从 HttpPost 返回后 我们去看这个 QWORD 000002C1C3928BB0 所指向的内存:

可见这就是 HTTP response 的内容。现在我们来做一个小实验,把这个 "code":4 改成 "code":0,继续执行:
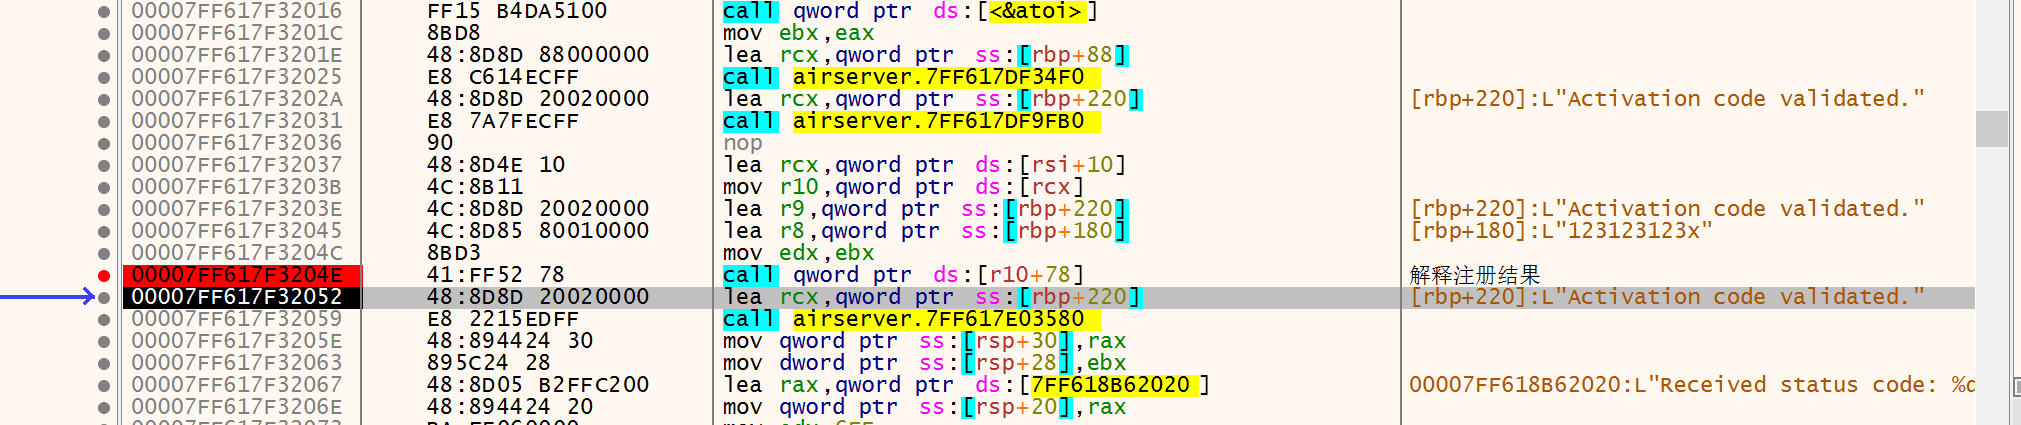
注册结果被解释成了 Activation code validated,继续运行程序:
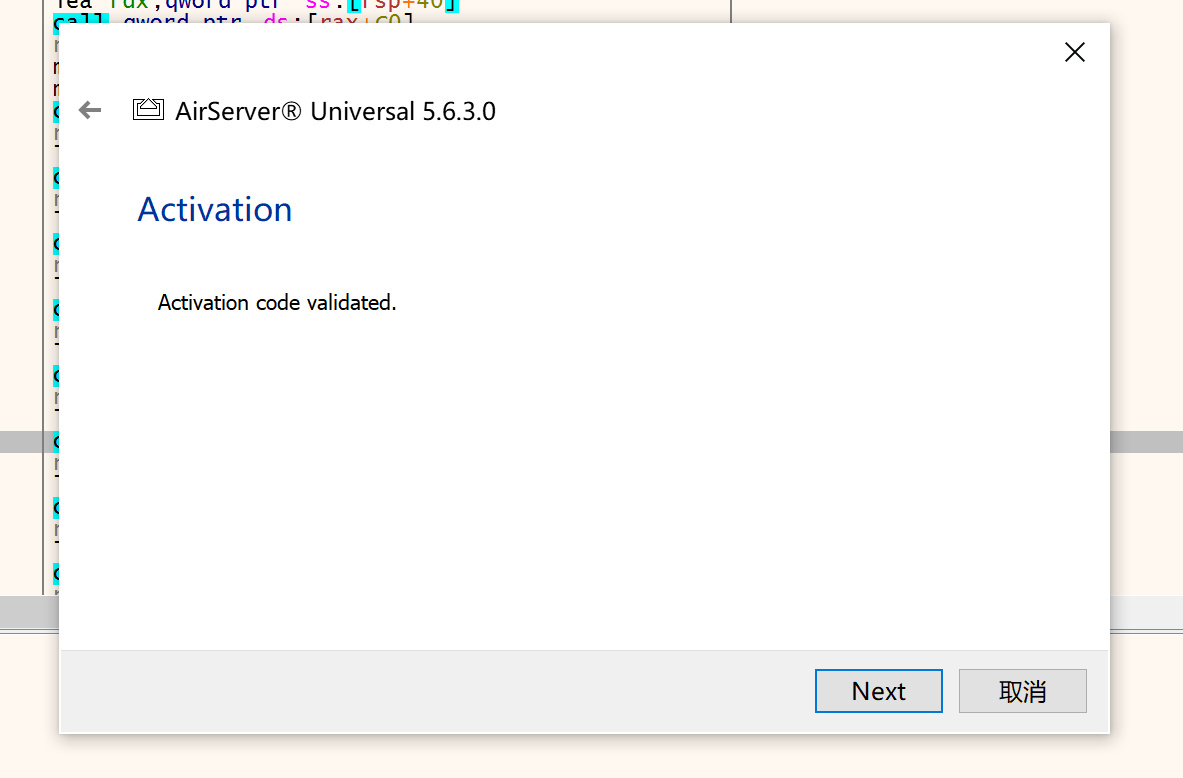
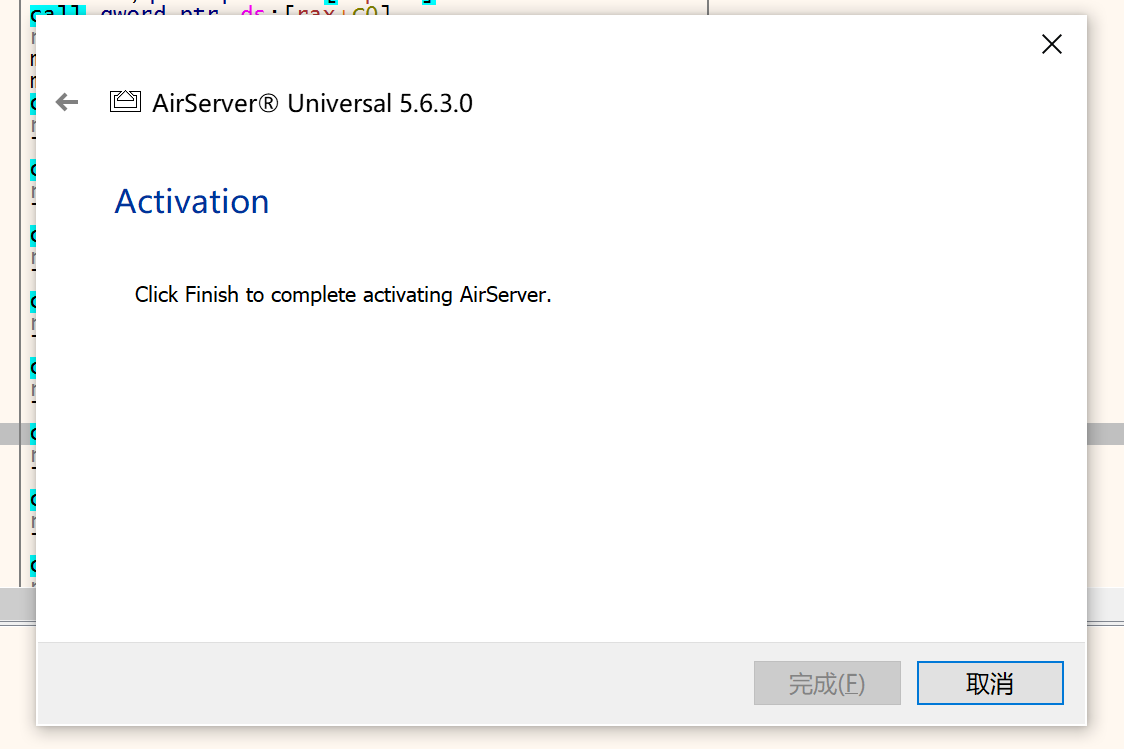
这个「完成」键按不了,重新运行程序,仍然需要注册。所以显然我们没有成功,仅仅修改 response code 是不行的。
那么,我们就应该去看看 response 是如何被解释的了。
0x05 跟进注册结果解释函数
204E 位置,通过 call ds:[r10+78] 来调用解释注册结果的函数。动态调试,跟进去看看,发现调用的函数位置是 00007FF617F32260 ,看看内部逻辑:
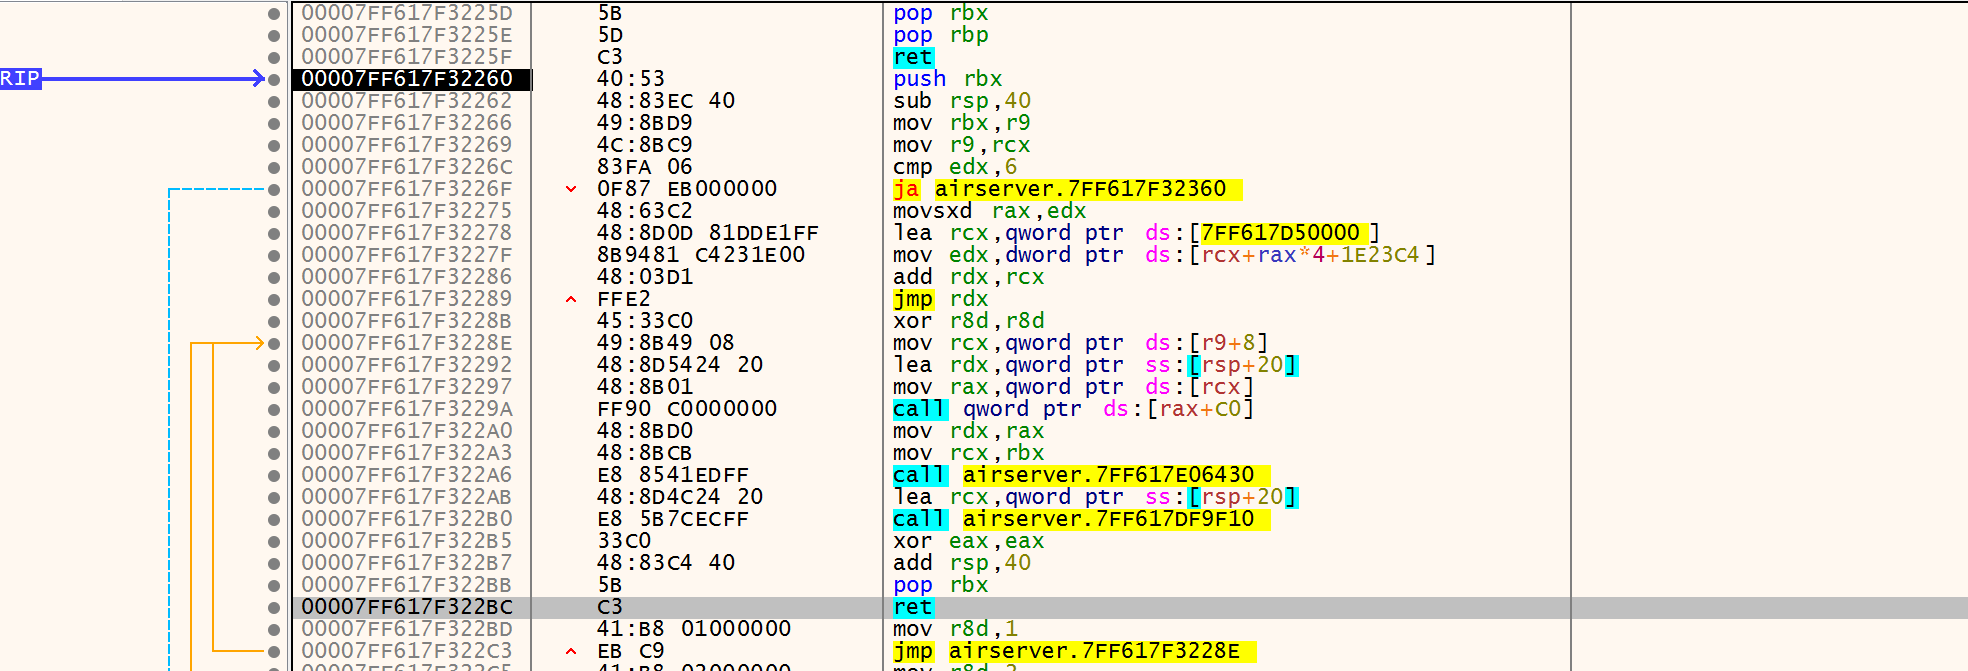
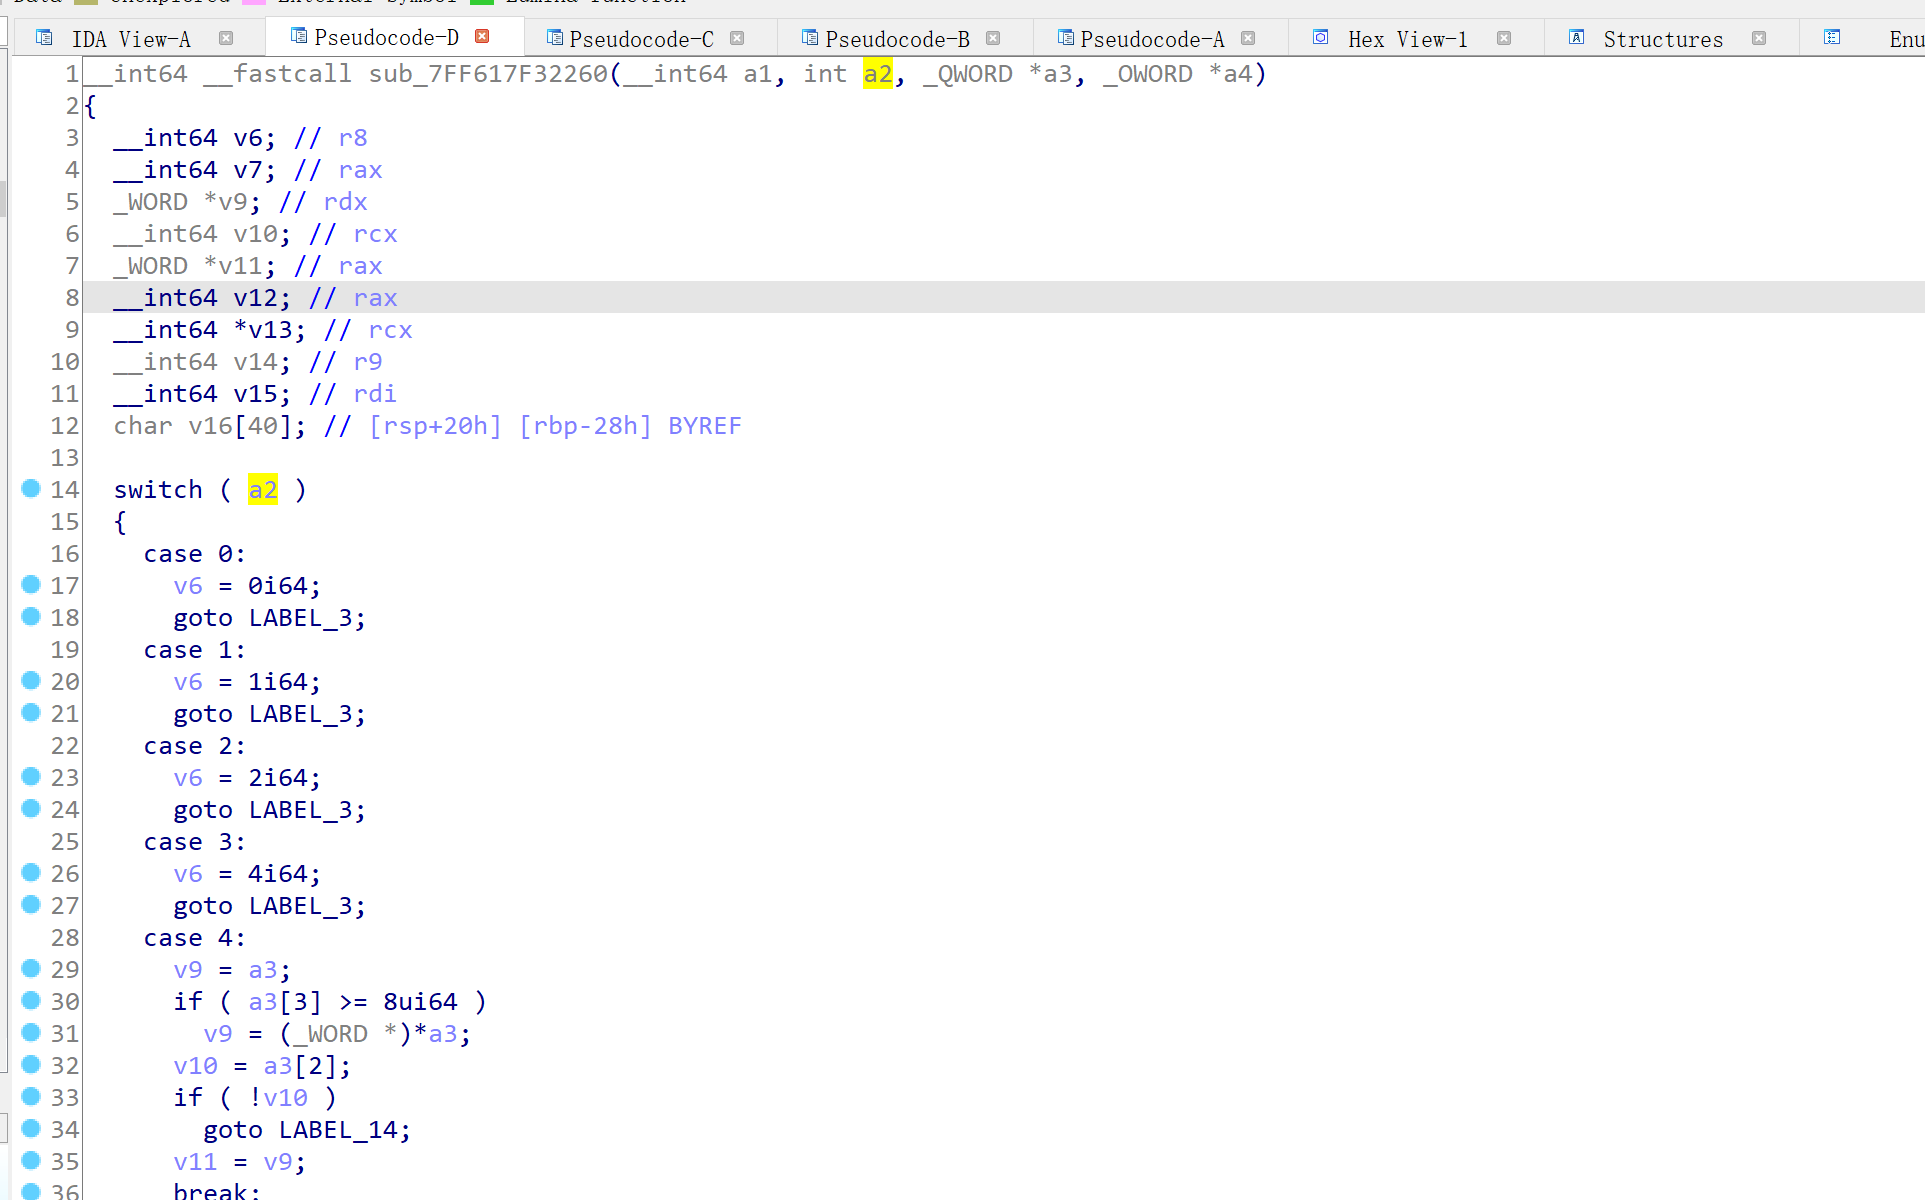
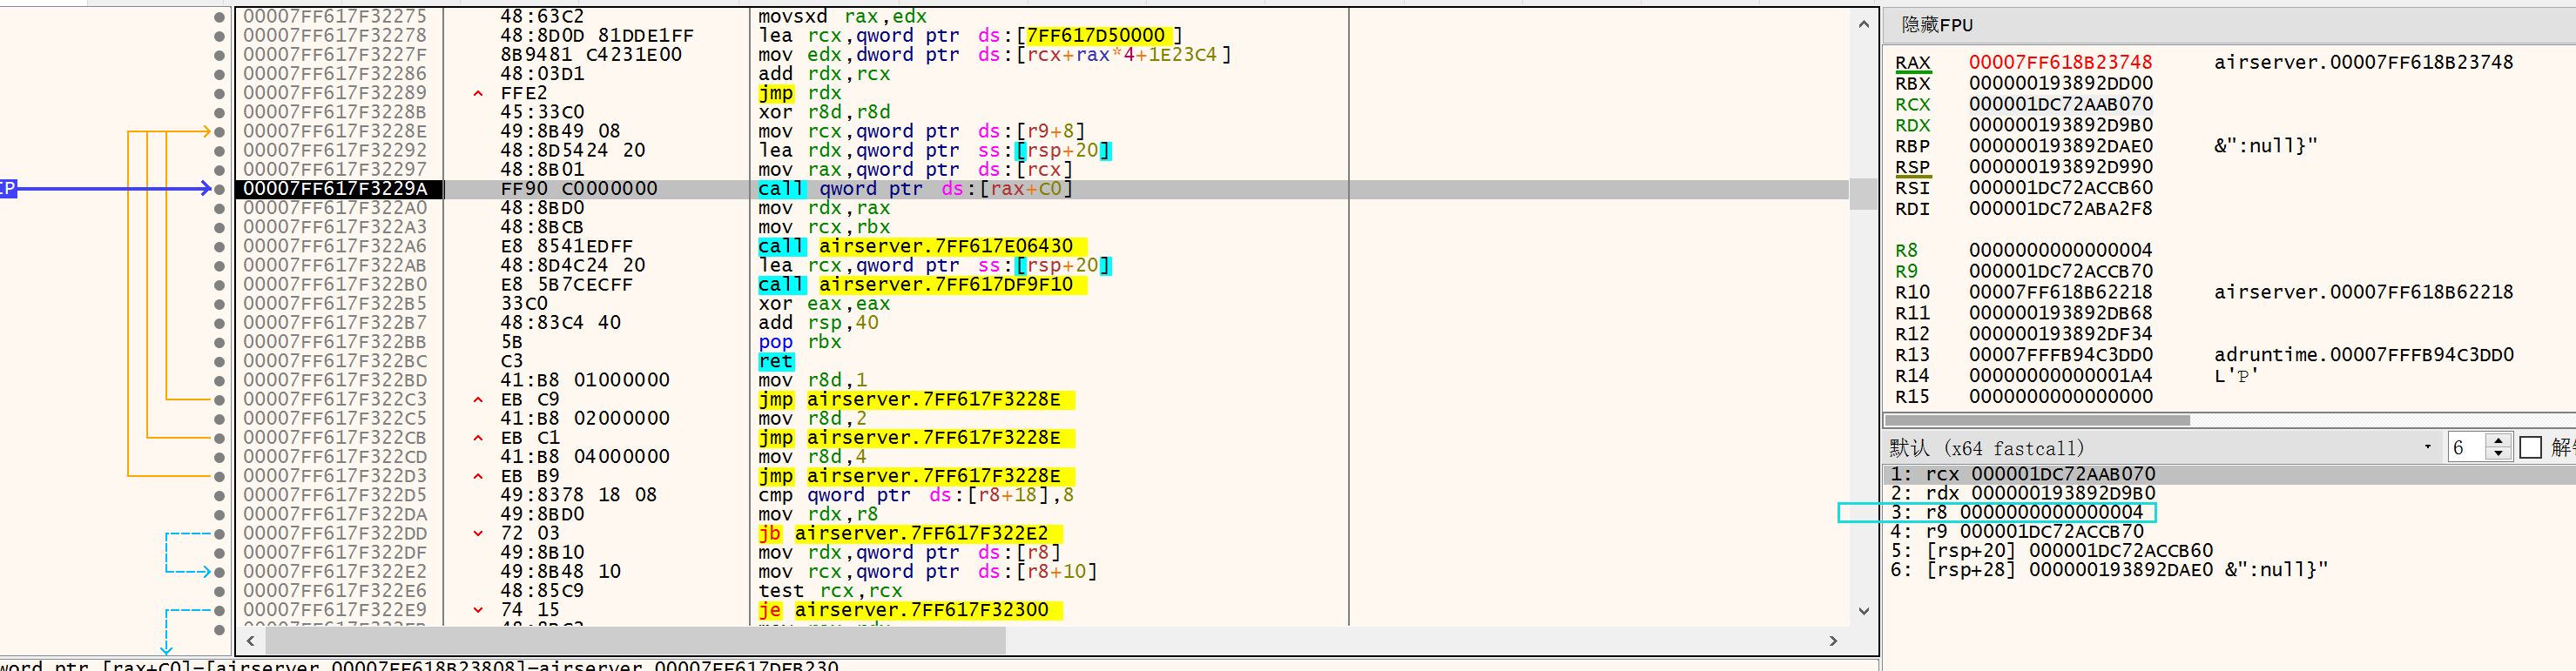
上来就是对 %edx 做了一个 switch。动态调试,看看传参:
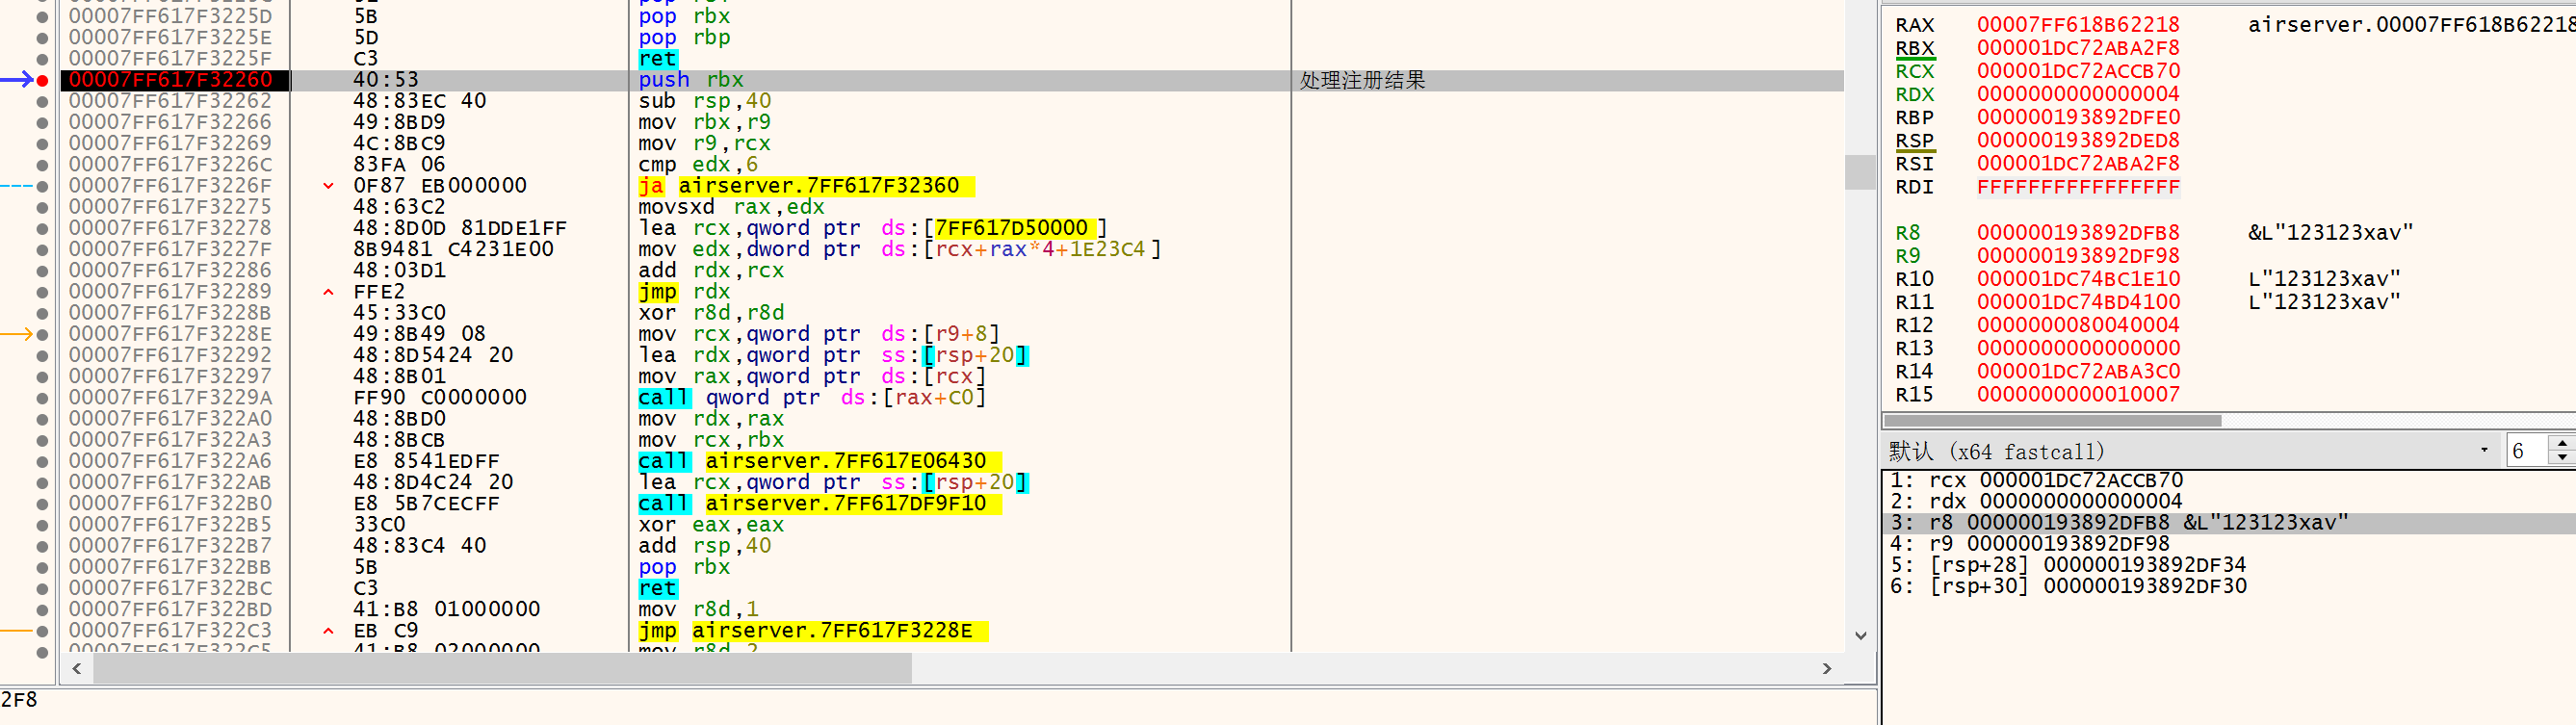
rdx=4 ,这是 response 中的 code 字段。 r8 指向的是我们输入的注册码。现在还有 rcx, r9 的语义不清楚。我们静态分析一下。
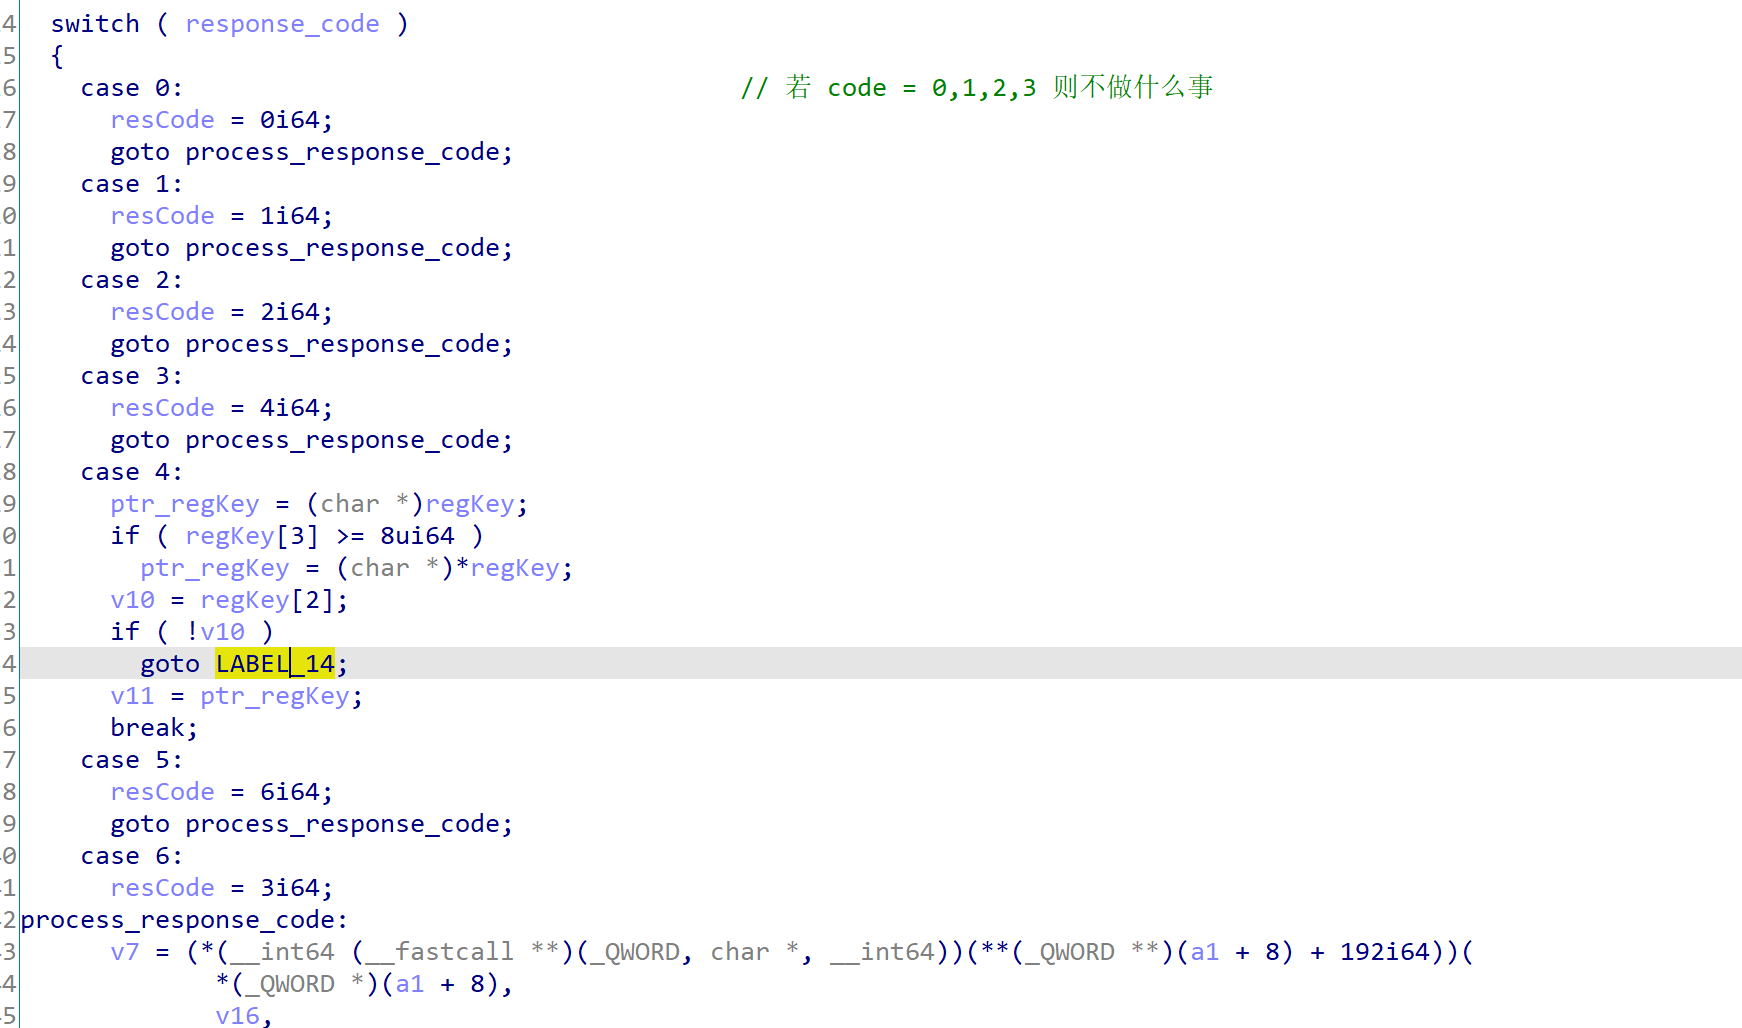
这个 case 4 属实让我眼前一亮。前文讲过,如果 code=3,那就是「激活设备数达到上限」;如果 code=4,那就是「错误的激活码」。但这里居然在 code=4 的条件下有后门,如果 key[3] >= 8 && key[2] == 0 ,就直接跳出这个 switch,进入后续的步骤。不知道这是不是开发者为大客户准备的。break 之后执行的代码从 65 行开始:
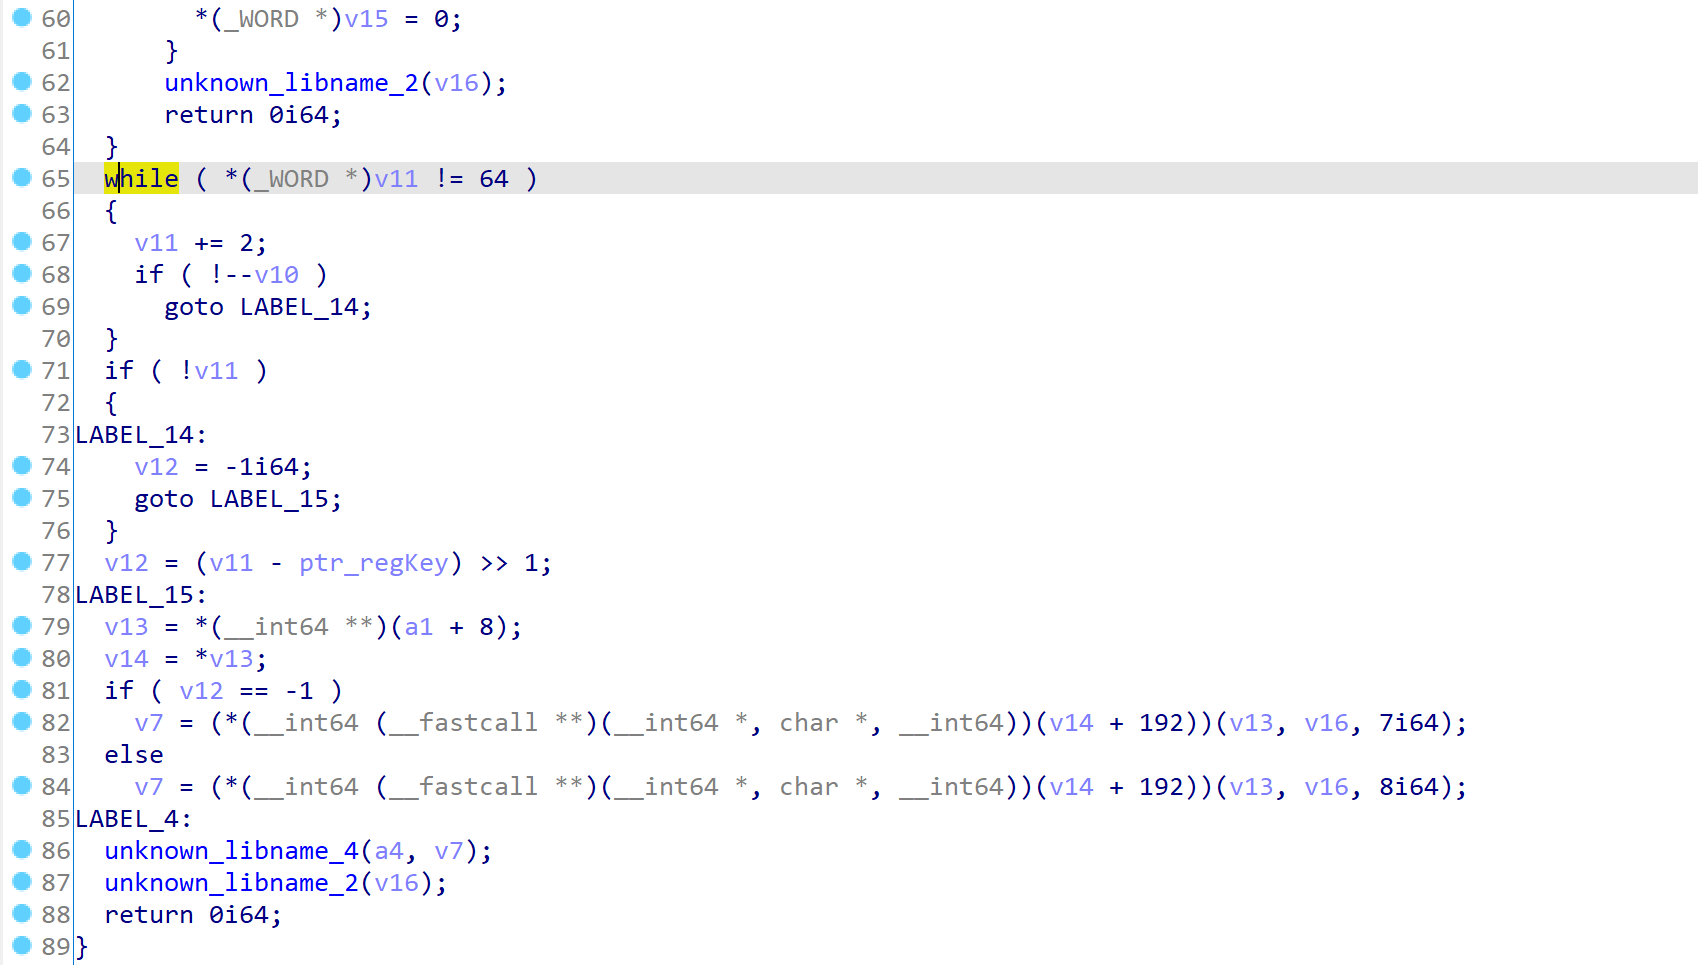
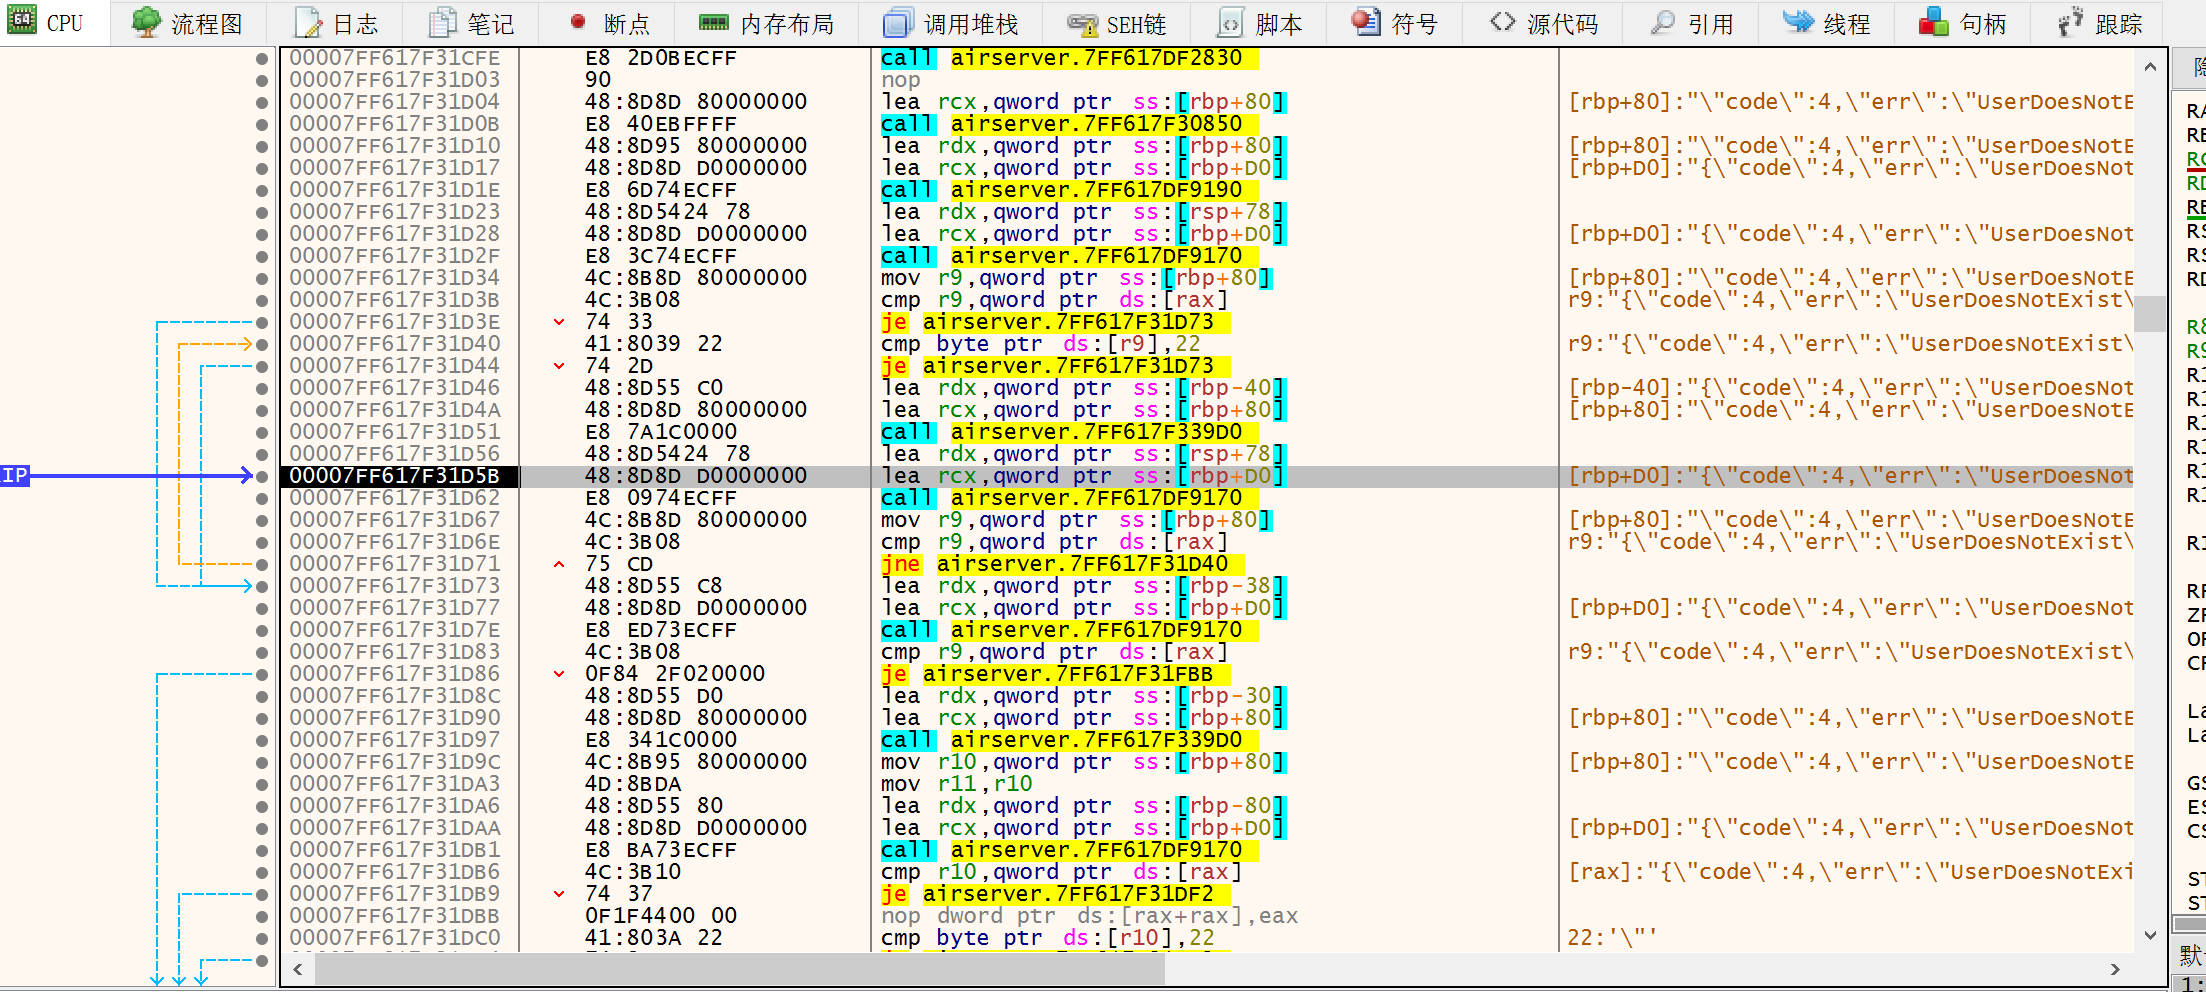
不过当务之急是理清逻辑,所以我们暂且不考虑 code=4。输入我们已有的注册码,让这个流程进入 case 3 看一看。这会使 resCode=4,跳转到 process_response_code。
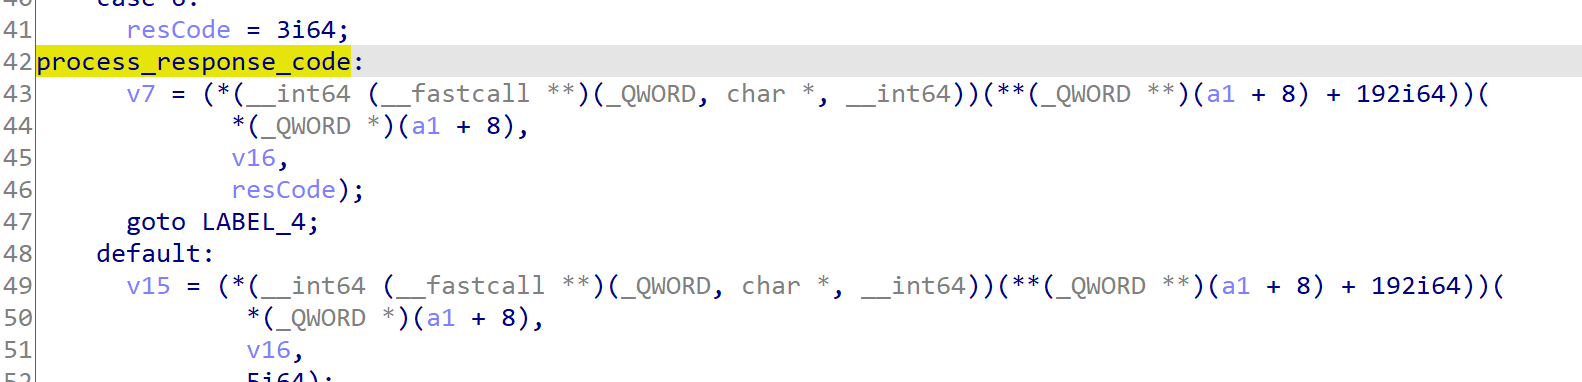
它会调用一个函数,参数有三个,分别是 a1+8, buffer, rescode ,其中 buffer 是开在栈上的 40 个字节的空间。动态执行到这里:
跟进去看看。
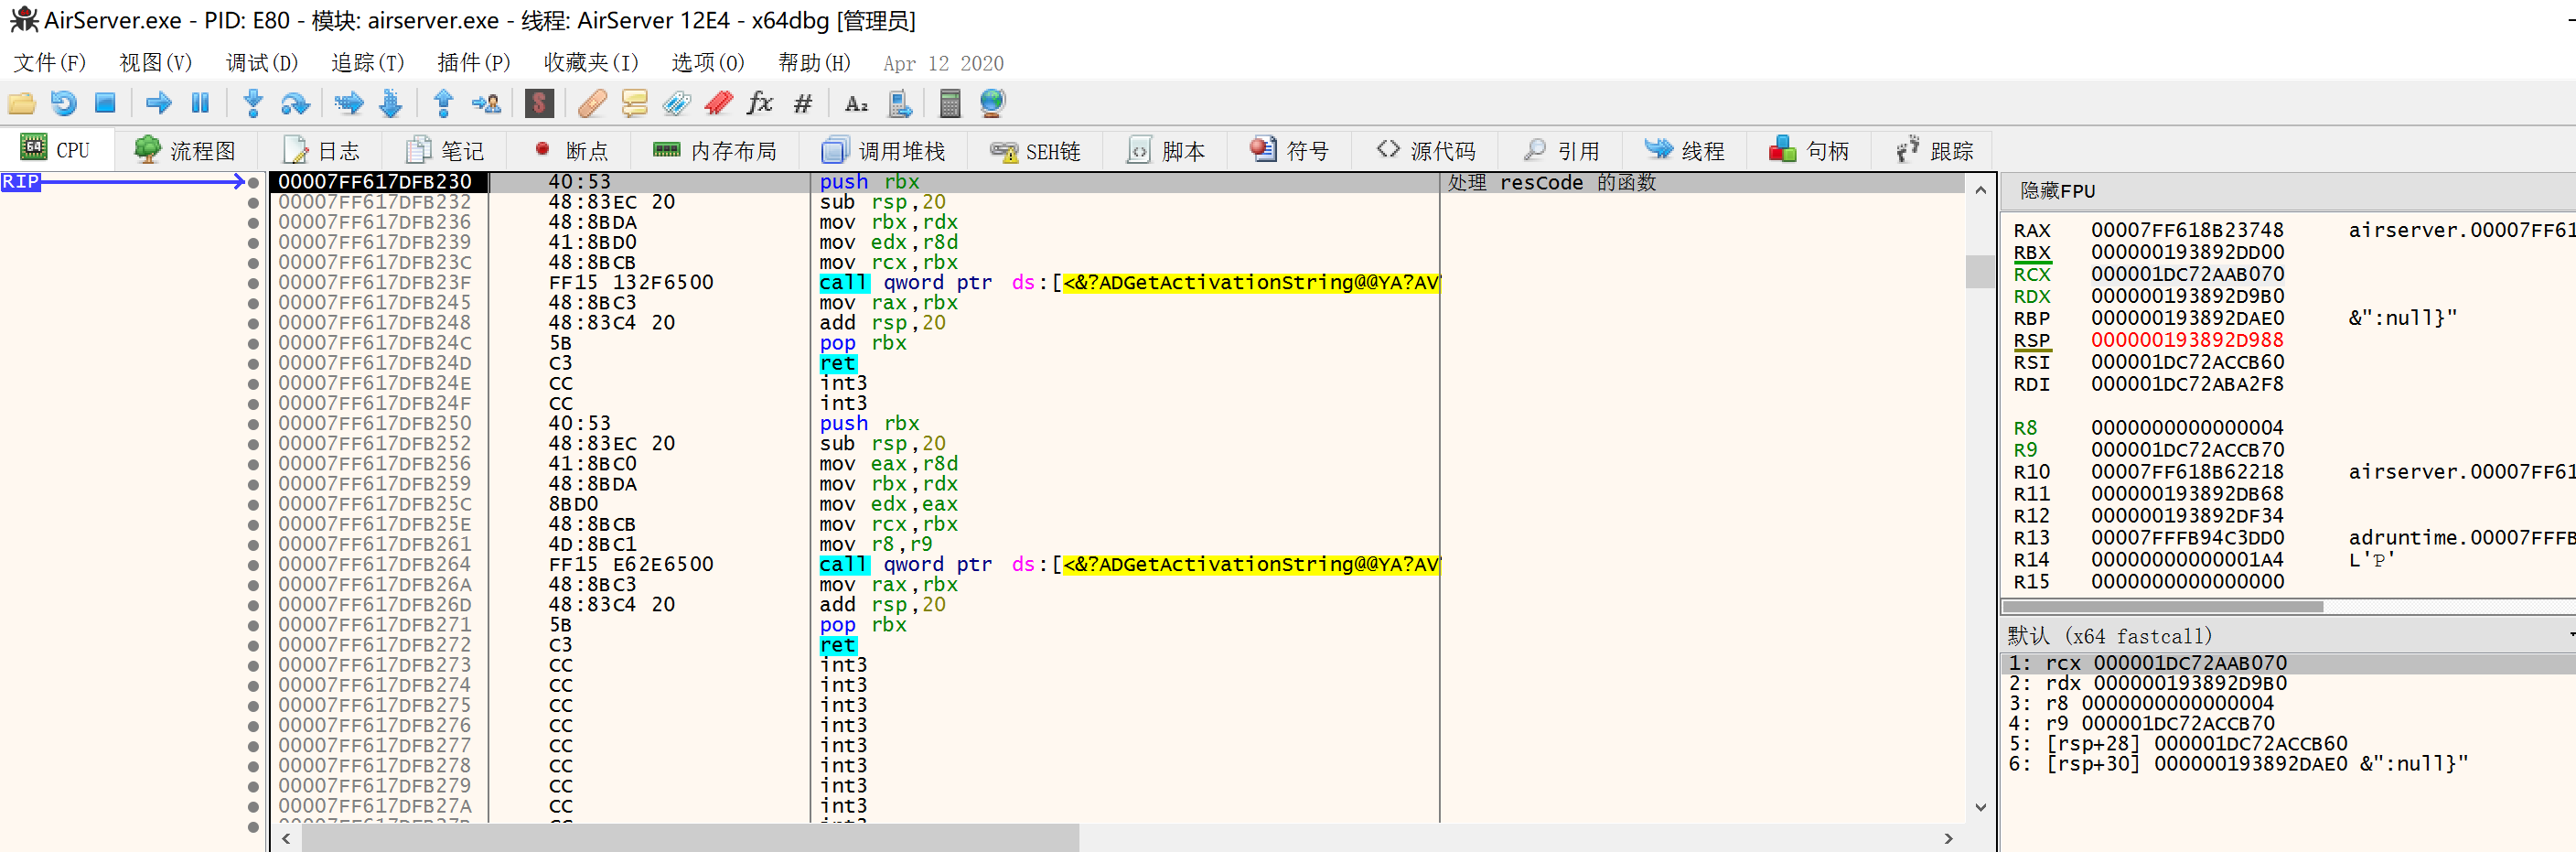
函数很简单,就是对 ADGetActivationString 的封装。跟进:
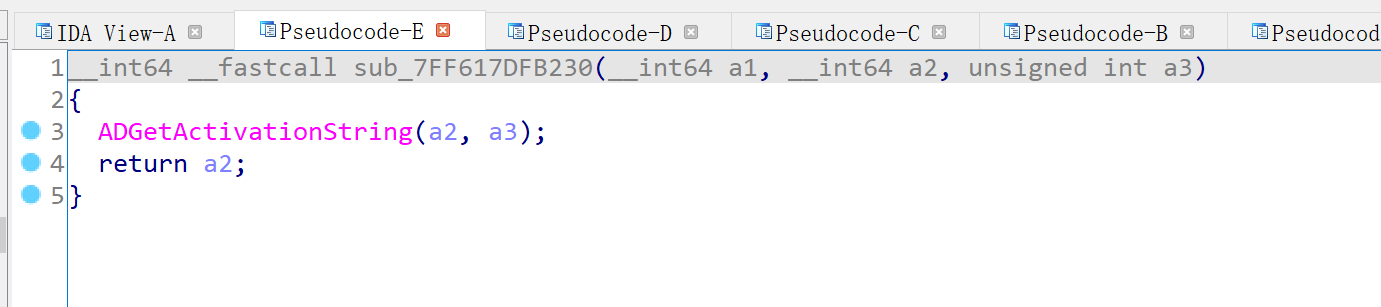
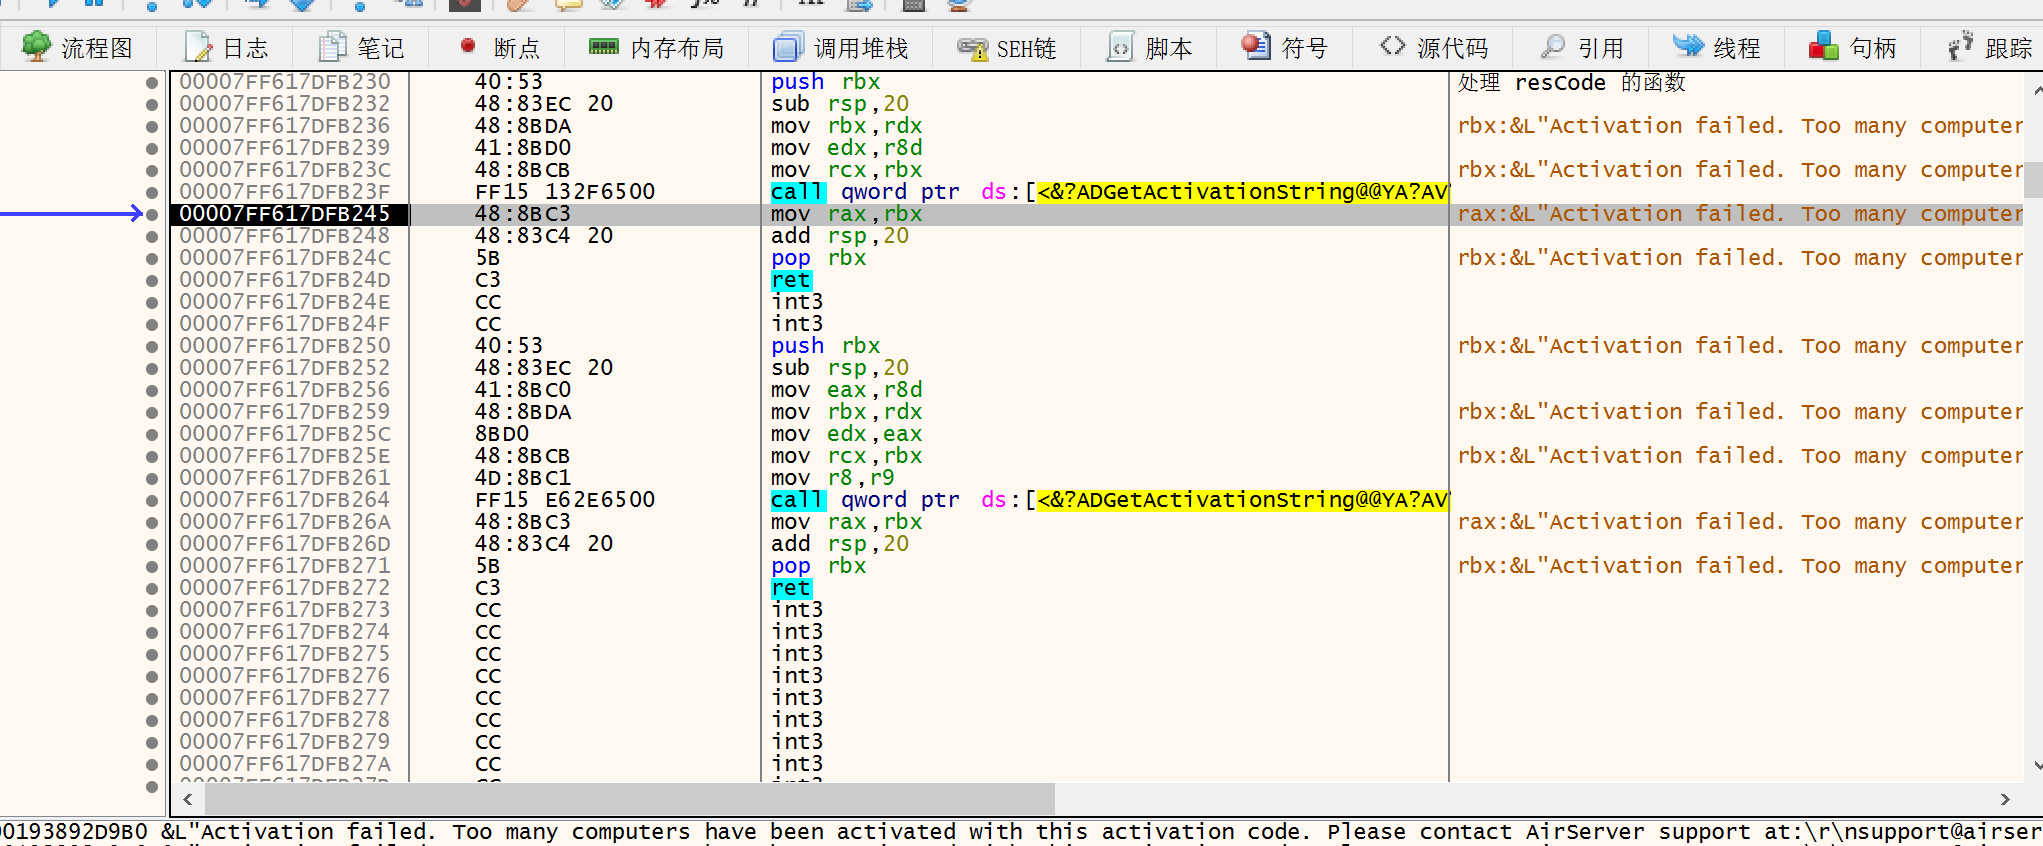
所以这个函数只是个查表,根据 resCode 读出提示信息。查表之后会跳转到 LABEL_4,我们转去看 LABEL_4 里面的处理,那里有两个不知名函数:

研究之后,认为 unk_libname_2 是开发者自己 debug 用的, unk_libname_4 应该也没啥特别的意义。
于是我们走进死胡同了。真正决定注册是否成功的关键跳转肯定不是这个「注册结果解释函数」,它仅仅负责查表。关键跳转应该在 HTTP 请求之后、注册结果解释之前。也就是说,我们应该回到 00007FF617F31C44 这个地方:
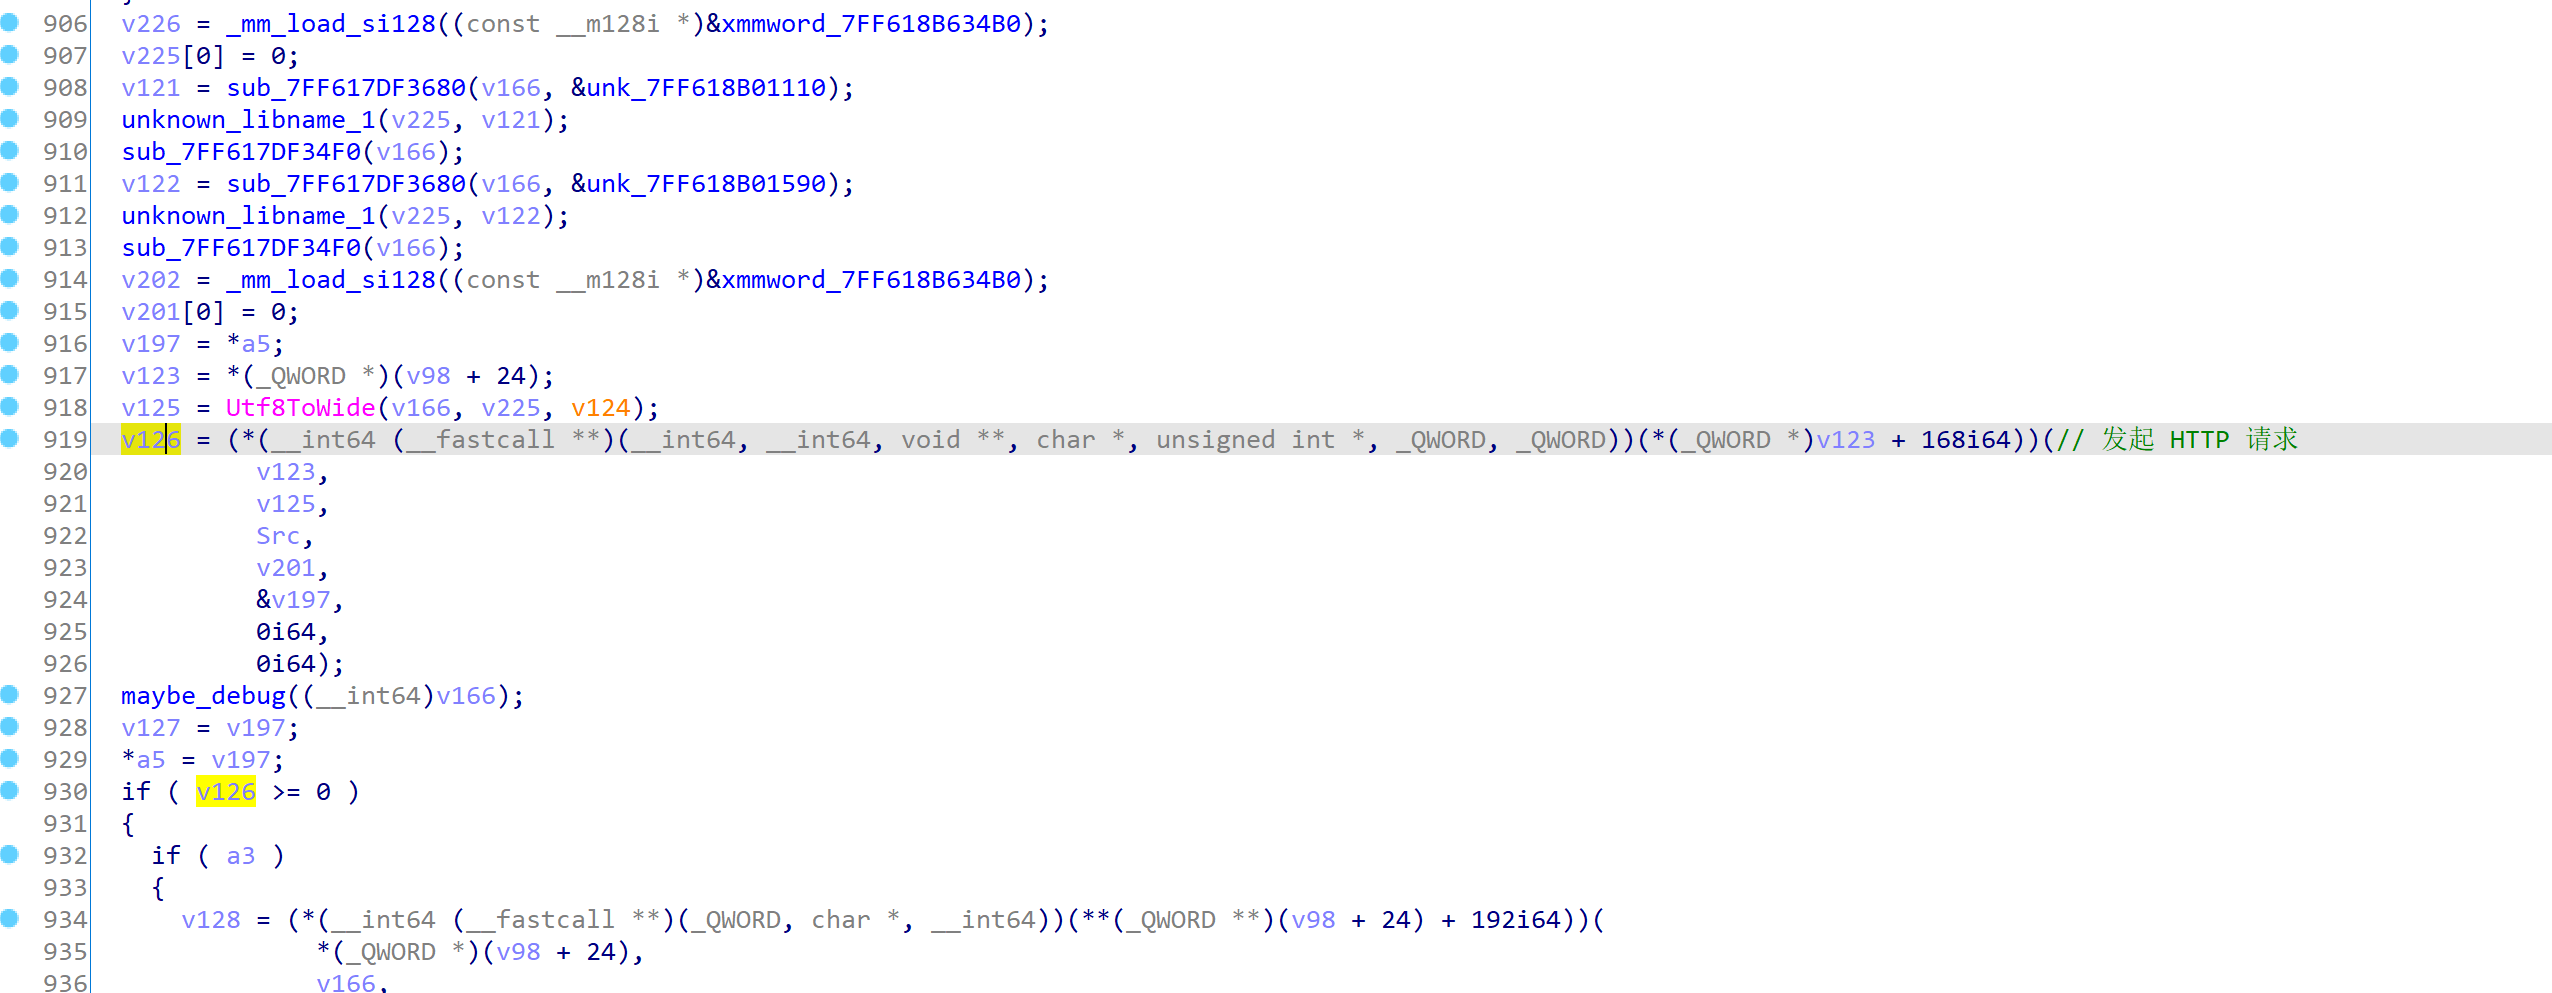
在继续逆向分析之前,我打算先伪造目标网站。具体而言,patch 程序,用我的网站域名取代 activation.airserver.com,这样我就能控制返回的报文。
0x06 伪造目标网站
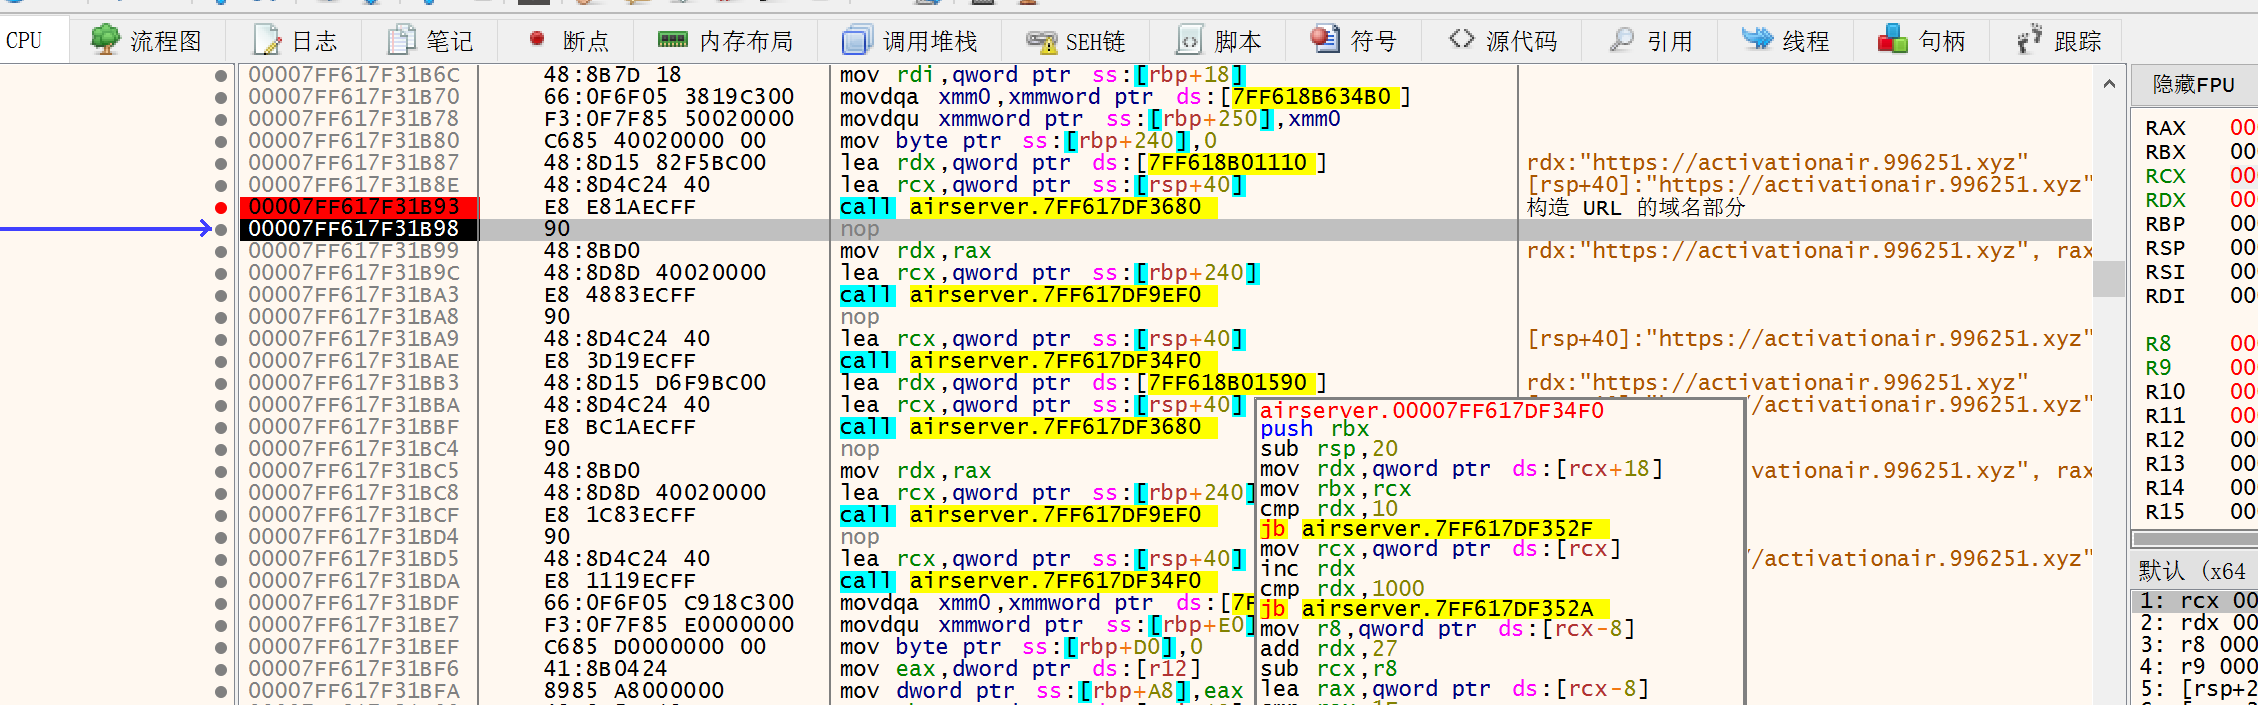
由于需要 https,我决定利用 Cloudflare Worker 来做这件事。另外,为了 patch 程序方便,我最好让我的域名与 activation.airserver.com 长度相等。我选择了 activationair.996251.xyz ,它们的长度都是 24 个字节。
首先让它永远返回 code 3,来验证我们是否成功 patch 了程序。

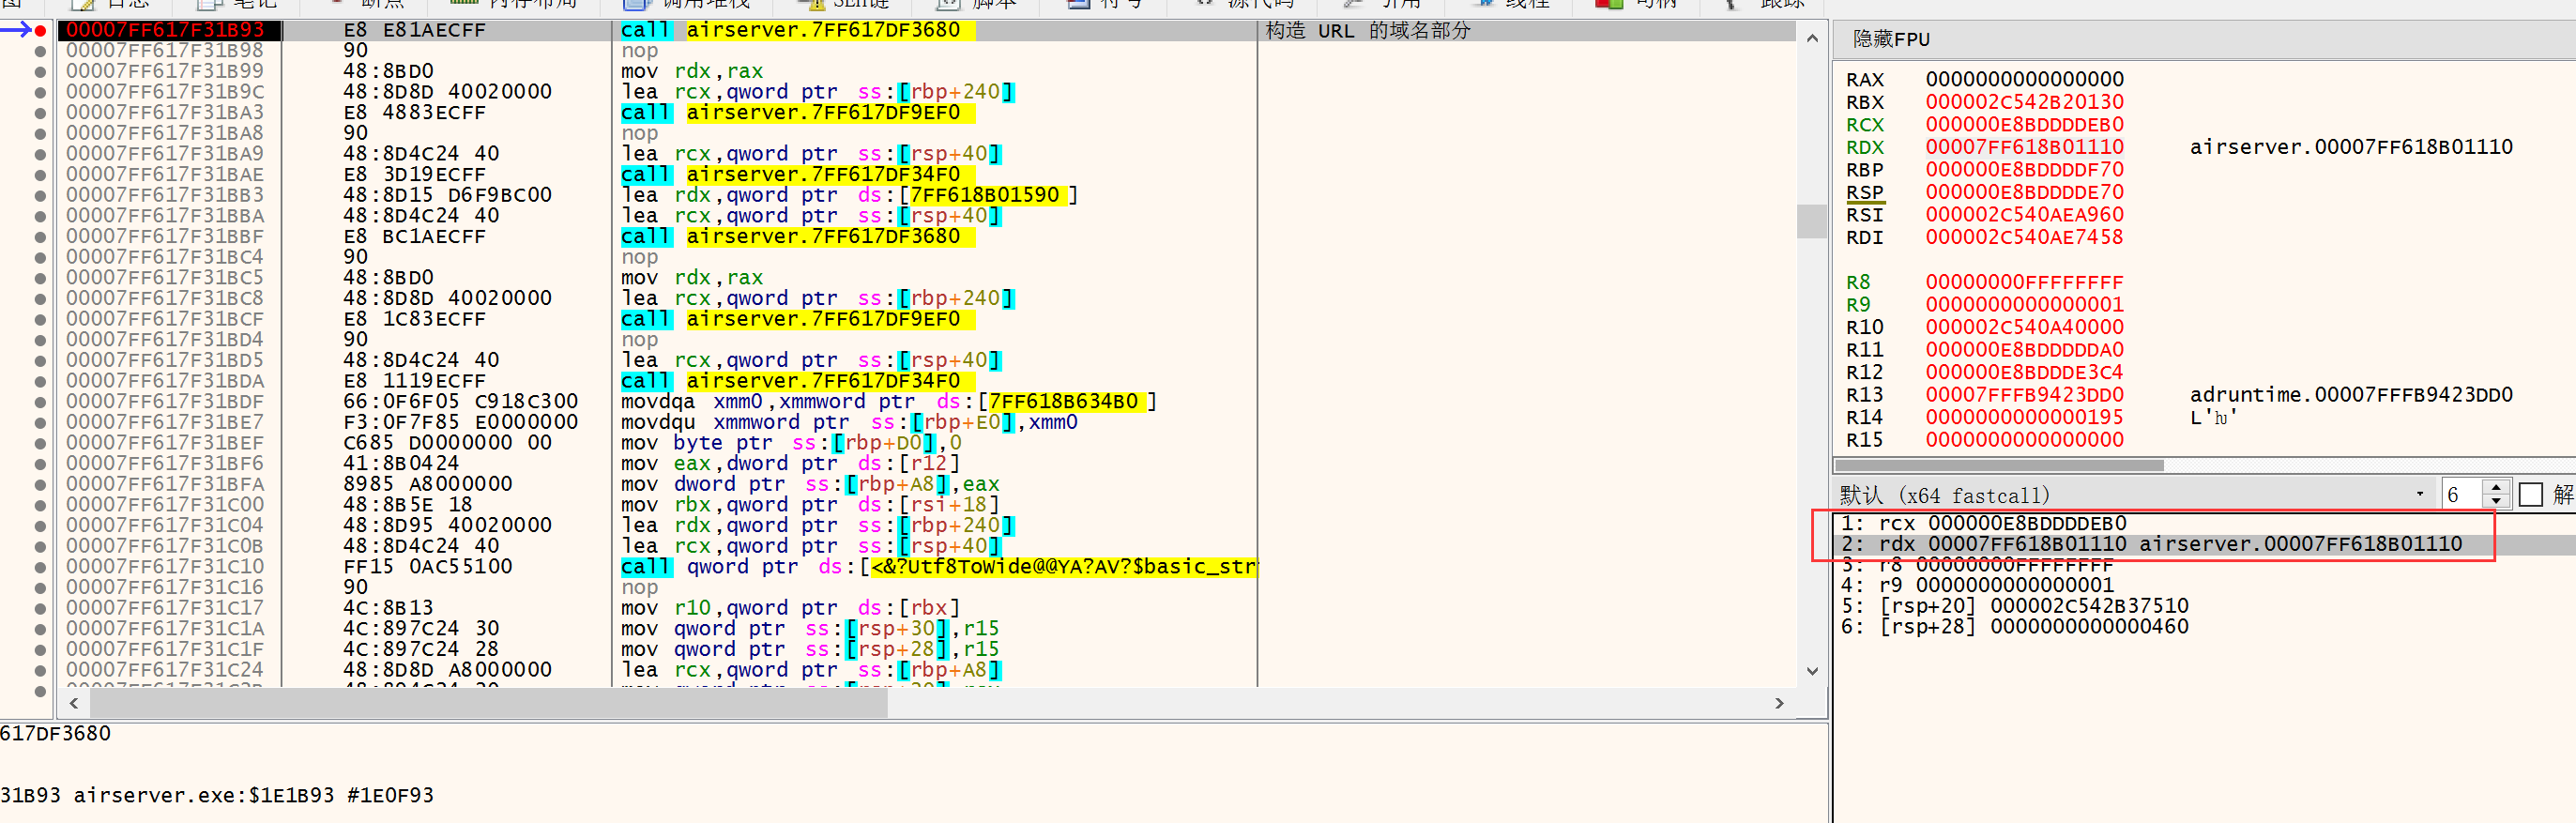
来找一找程序的哪个地方构造出了域名。很遗憾,直接在内存空间搜索域名字符串失败了。开发者应该做了某种隐藏。它肯定在发出 HTTP 请求之前,一番寻找之后,发现构造域名的 call 在 1B93 :
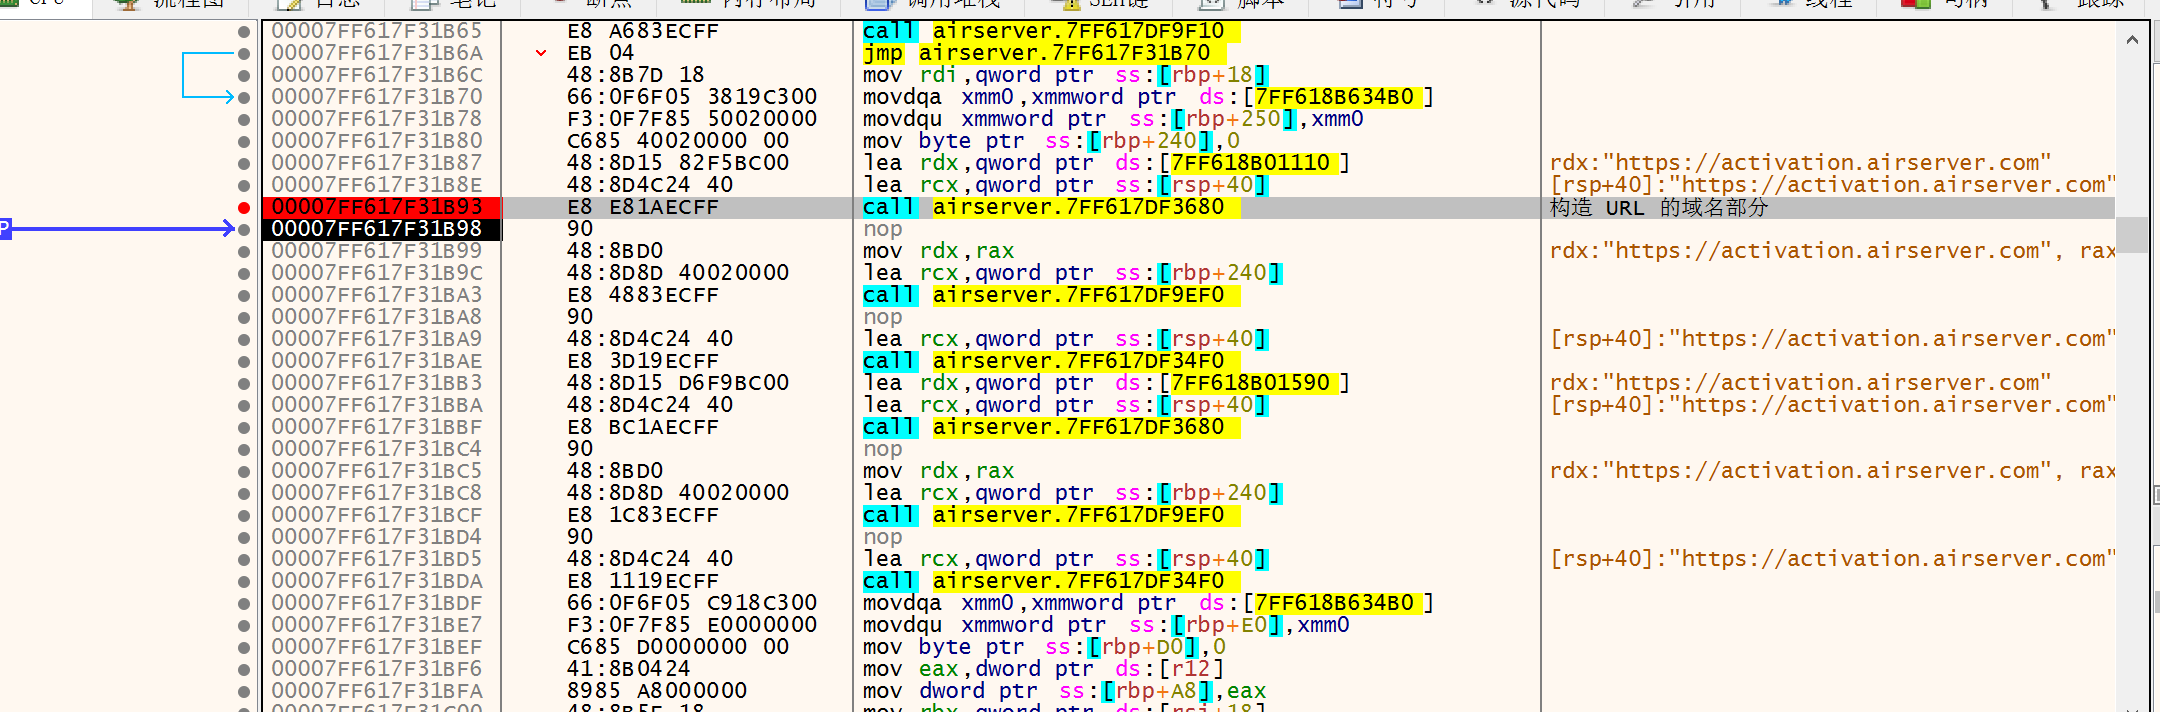
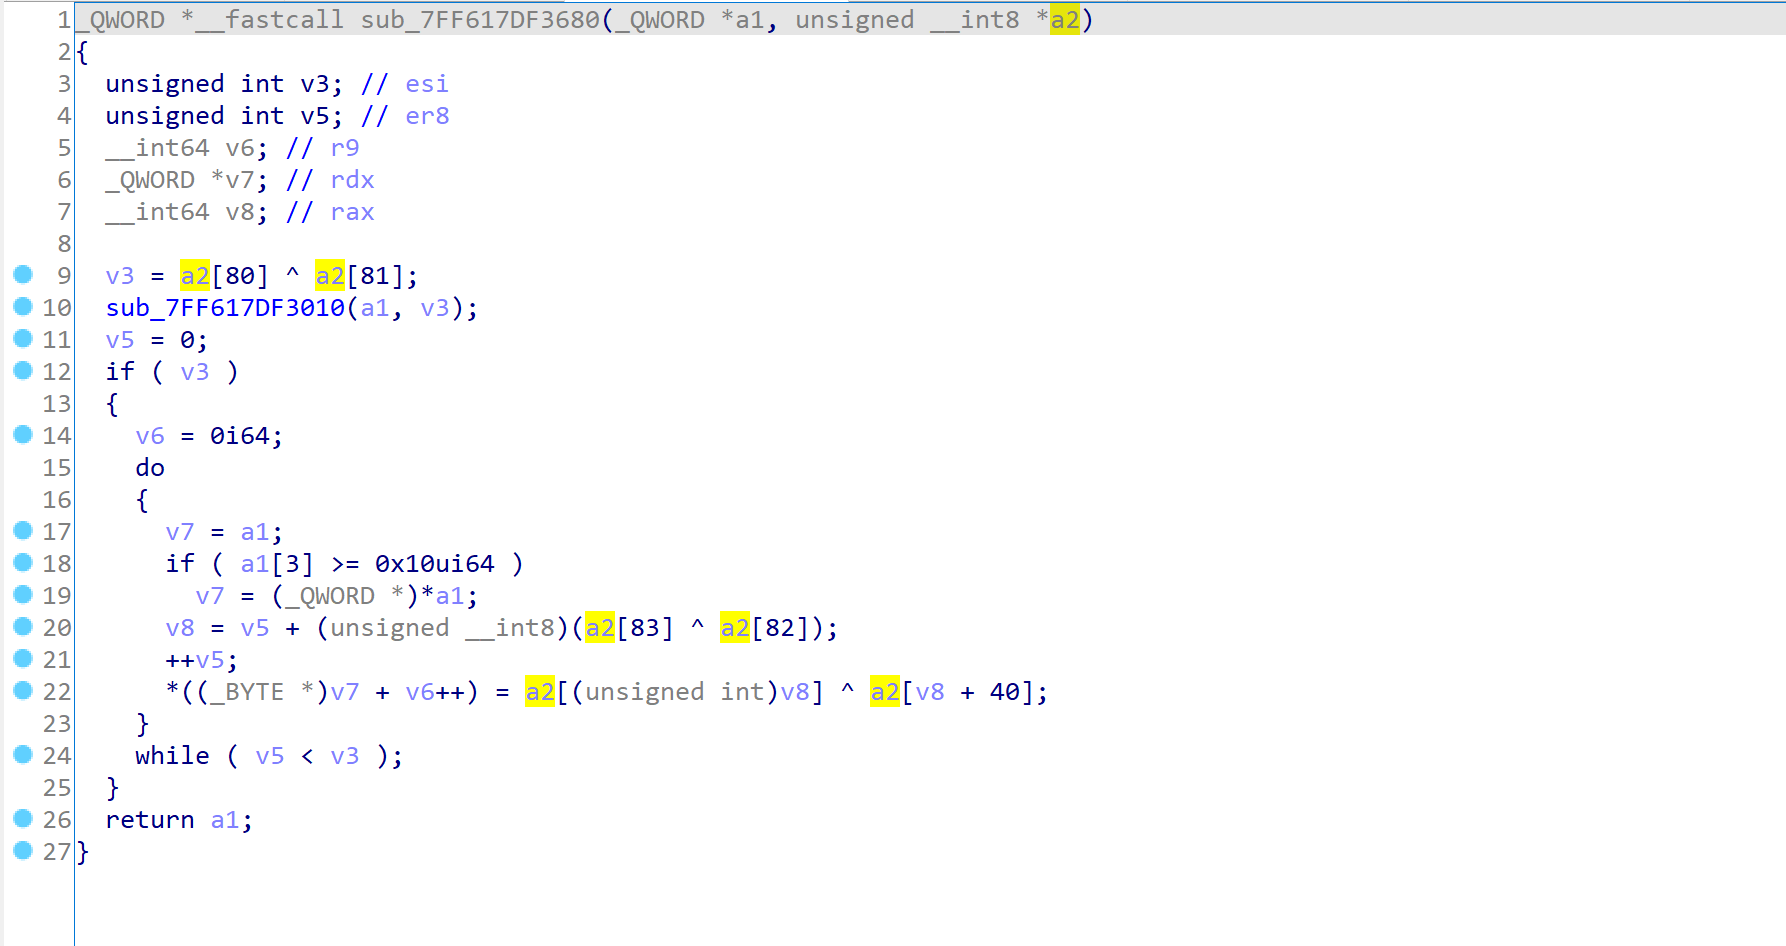
跟进去看一眼,发现是逐字节拼凑的 url。 3680 这个函数被调用很多次,不仅用于拼域名,还用于拼 path,应该是比较通用的类似 memcpy 的函数。
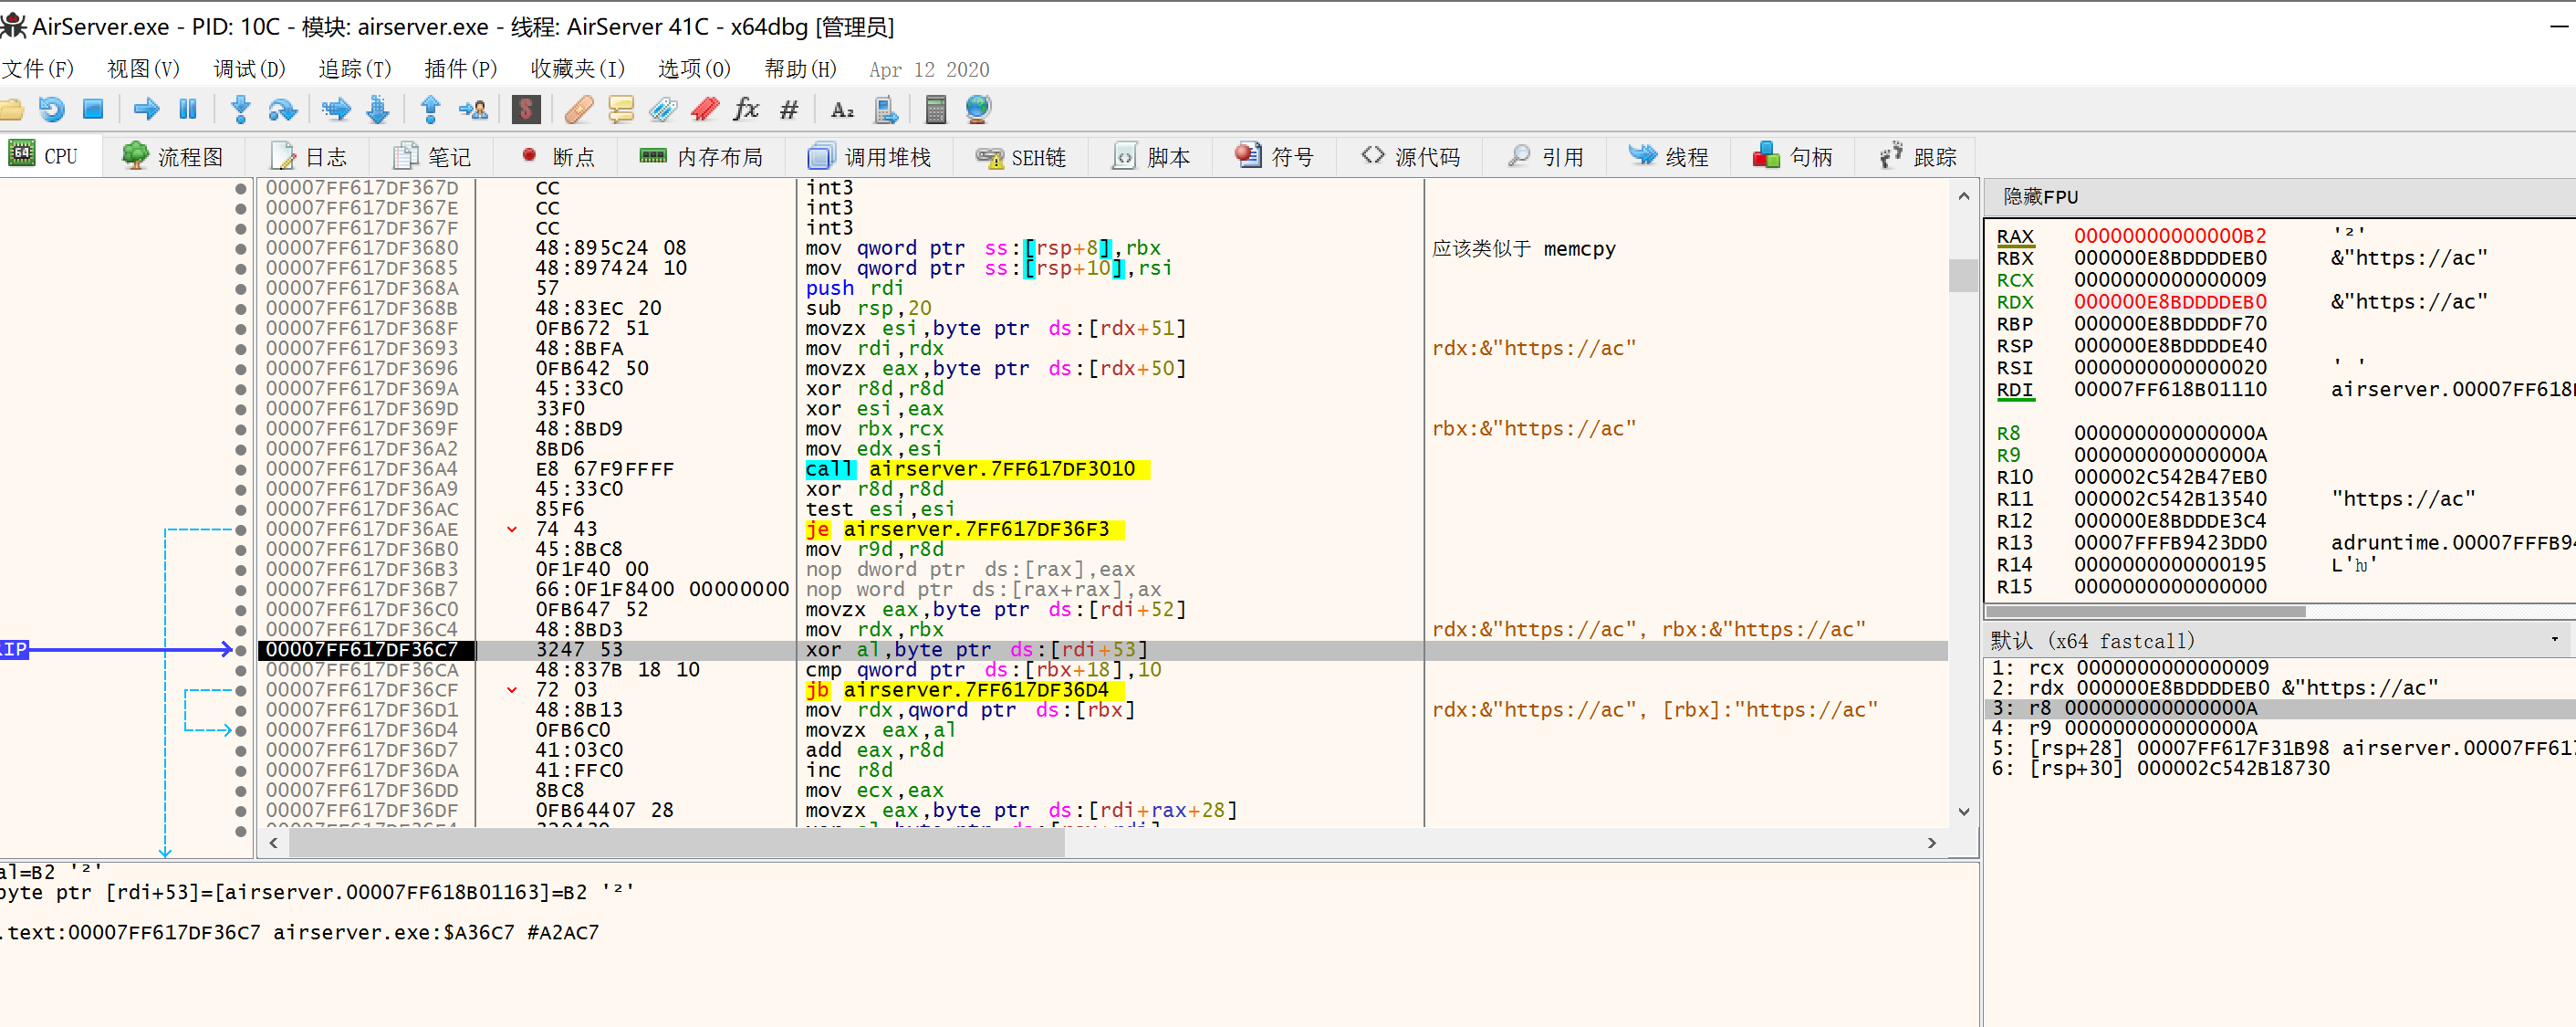
跟进去看看 3680 函数的逻辑。
它只有两个参数,我们动态调试看看:
然后发现这是一个比较巧妙的编码。请看下面的内存:
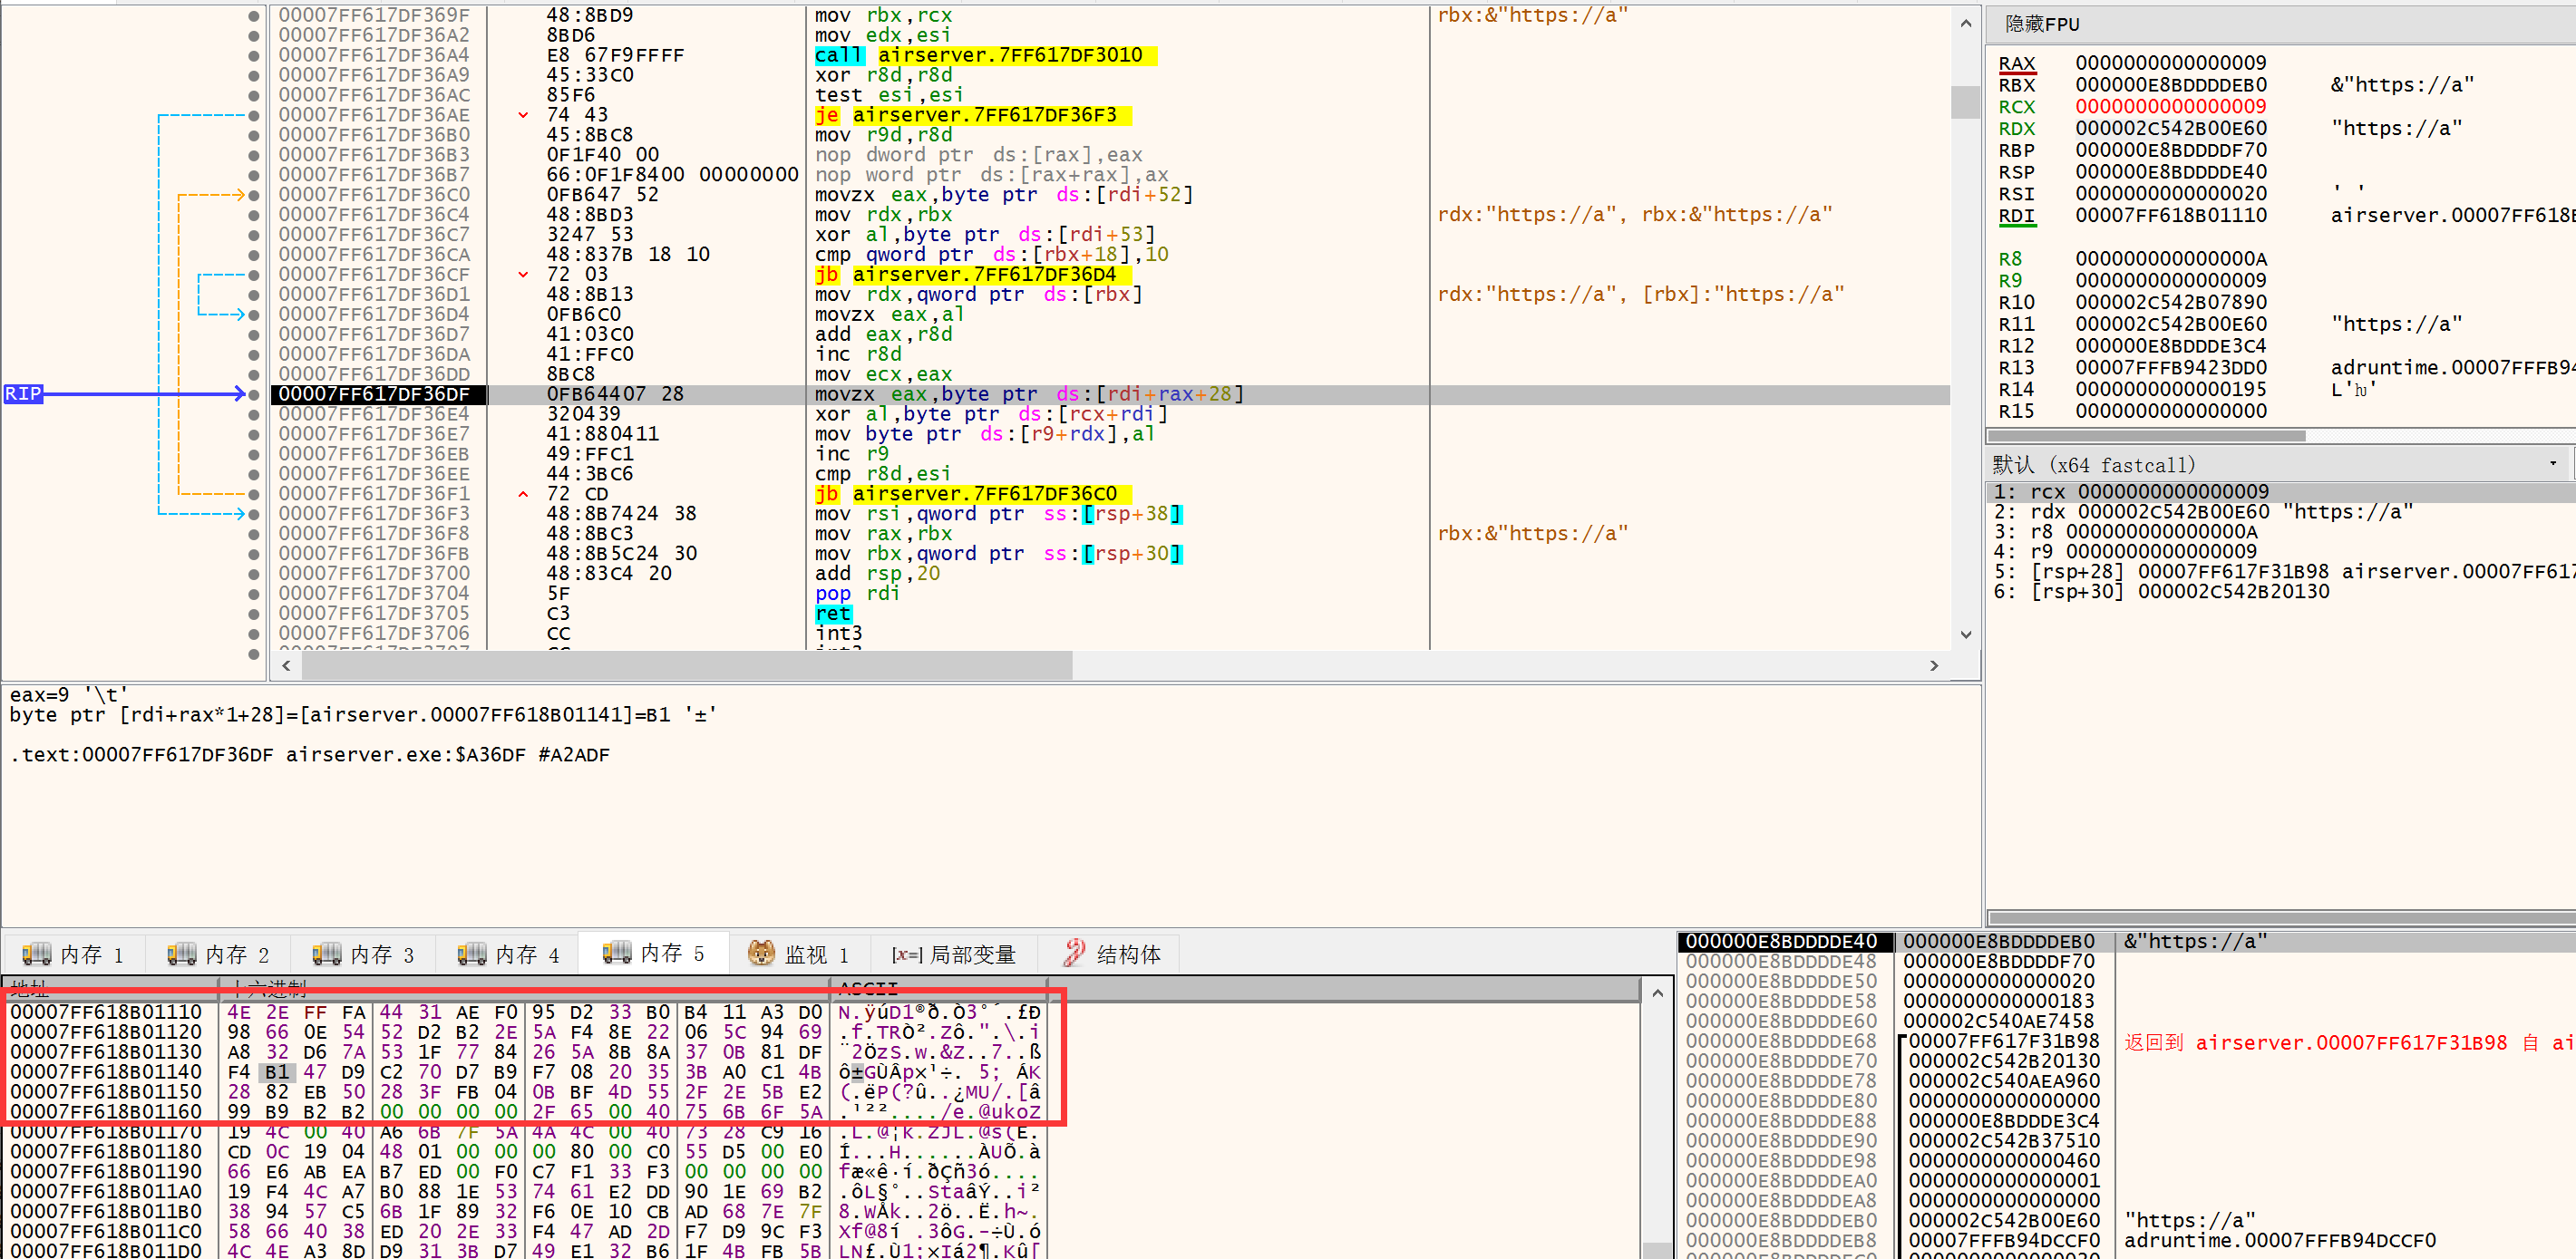
红框部分是 %rdi 指向的内存。这片内存事实上编码了网站域名,请看解码方法:

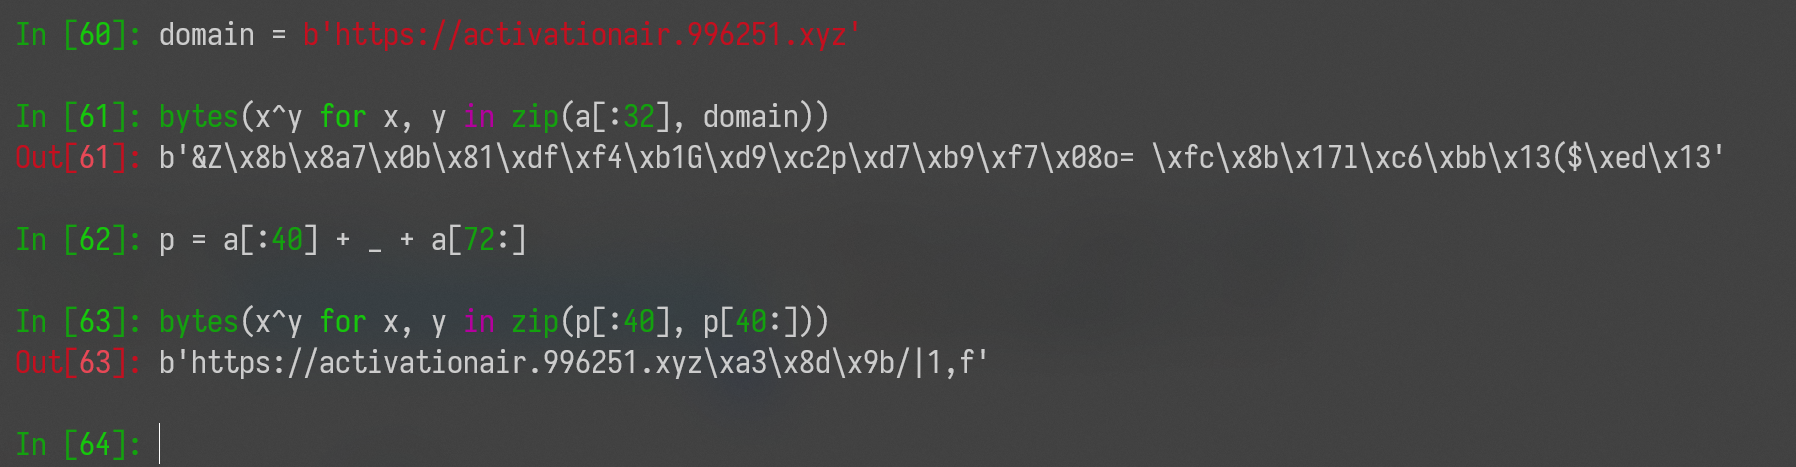
将对应位置的字节,与它后面第 40 个字节相异或,即可解码。那么回过头看这个函数的参数,参数 2 就是 encoded data,参数 1 是什么,我暂且看不出来。但无论如何,我们可以把域名 patch 掉了。
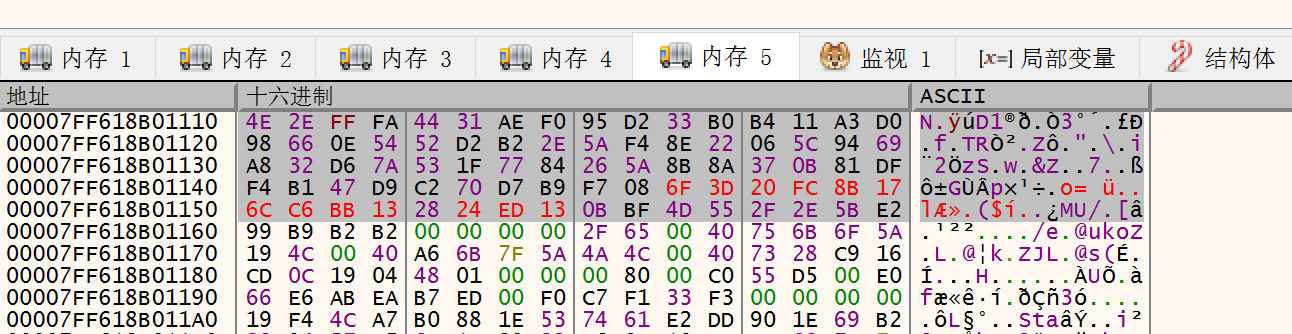
选择修改 encoded data 的 [40, 72) 字节。
去 patch 程序,修改 00007FF618B01110 段:
成功 patch。

成功返回。
总之,我们现在成功完成了对服务器的伪造。
0x07 重放验证报文
我在自己的笔记本电脑上重新注册了,报文如下:
POST https://activation.airserver.com/API/Activate HTTP/1.1
Cache-Control: no-cache
Connection: Keep-Alive
Pragma: no-cache
Content-Type: application/x-www-form-urlencoded;charset=utf-8
User-Agent: AirServer/5.6.3.0 (Windows; Windows NT 10.0; Win64; x64)
Content-Length: 531
Host: activation.airserver.com

appId=com%2epratikkumar%2eairserver%2dpc&code=5FPGY2RV7797V8GPFX&cpuCores=0&cpuMake=&cpuModel=0&cpuSpeed=0&firewalls=%e7%81%ab%e7%bb%92%e5%ae%89%e5%85%a8%e8%bd%af%e4%bb%b6%0a%e7%81%ab%e7%bb%92%e5%ae%89%e5%85%a8%e8%bd%af%e4%bb%b6&gpuMake=AMD%20Radeon(TM)%20Vega%208%20Graphics&gpuMem=253&gpuPP=true&hwRen=true&lang=zh&maxDirectX=10&maxPixelShader=3%2e0&maxVertexShader=3%2e0&mem=7103&minDirectX=9&model=HUAWEI%20HLY%2dWX9XX&name=rxzMagic&osVer=10%2e0%20&subq=26316&udid=1c58c5ee%2de0f0%2d46c9%2d829c%2d095ca3b04b62&ver=5%2e6%2e3%2e0


{"code":0,"err":null,"activation":"95011E0968B619CD0767E19548AD3F5DCB727ED3DE198CDDB0F4E20CC33E4E30351AB627503C74B4CB5B66AE6CD61254A1748FDEE99A4ADA2747E0899028755F3DE78051450A8045F7F670F794E4B0DF682FB7E173C820987CA8C7BB4EACF0C342D2913D0B306C06526E1C06016033682324A1CD7EB842DE42DDF2E9B94F031C6C313B402B78B44A8C6849151F7C4FFCCAF95864F40BAA4EC9488F7E58E535699ACEBC94C1294F46BB52FDED1E1111F3D707BD78C0D6D4E1C017CAD397CA01604597FDE487F93823364433C47F7C3235A95DEAECA9DB28BE9B1CB973D454DA307CCD4C215E043AFD753824BF7BD602EBCFD6536B33D1F8BDE5FC6581B05C141B"}
再来一次:
POST https://activation.airserver.com/API/Activate HTTP/1.1
Cache-Control: no-cache
Connection: Keep-Alive
Pragma: no-cache
Content-Type: application/x-www-form-urlencoded;charset=utf-8
User-Agent: AirServer/5.6.3.0 (Windows; Windows NT 10.0; Win64; x64)
Content-Length: 531
Host: activation.airserver.com

appId=com%2epratikkumar%2eairserver%2dpc&code=5FPGY2RV7797V8GPFX&cpuCores=0&cpuMake=&cpuModel=0&cpuSpeed=0&firewalls=%e7%81%ab%e7%bb%92%e5%ae%89%e5%85%a8%e8%bd%af%e4%bb%b6%0a%e7%81%ab%e7%bb%92%e5%ae%89%e5%85%a8%e8%bd%af%e4%bb%b6&gpuMake=AMD%20Radeon(TM)%20Vega%208%20Graphics&gpuMem=108&gpuPP=true&hwRen=true&lang=zh&maxDirectX=10&maxPixelShader=3%2e0&maxVertexShader=3%2e0&mem=7103&minDirectX=9&model=HUAWEI%20HLY%2dWX9XX&name=rxzMagic&osVer=10%2e0%20&subq=29121&udid=1c58c5ee%2de0f0%2d46c9%2d829c%2d095ca3b04b62&ver=5%2e6%2e3%2e0


{"code":0,"err":null,"activation":"6247A6B06F16A611BE94AD9245150D6D72E98F675F6695FC5BACBE5D8F549A538804A1088B8B0A5D19600A3311591F6CECCA0587B7256344D5764CF87C7234F80EC202844B983BE21C887B5501FF43545AC6FBF4B35671024644F9B9FA3321722498E31959ADFB36C4BA57826CC8FAD9F9A14DAB693E2D60DD622915F08F638B63367B09025361A7FDD1E6D9E2DFD9A90D17DB0999C5A4145610B6EAB385DE7B94E8B84EE5DAF1DC5000300EA4ABA2D6DC95EA6BF216C7D54BC923E9059E3F5B141EF83016910BA75ED4369F43B8566F883C38ECE40A2698904A9D2A313E3710A96D0105A6DEA1FEE7FD7D09458D512B493EB16A294889631D3D5E48B922CBC2"}
这两次返回的 activation 不相同。另外,监控注册表:
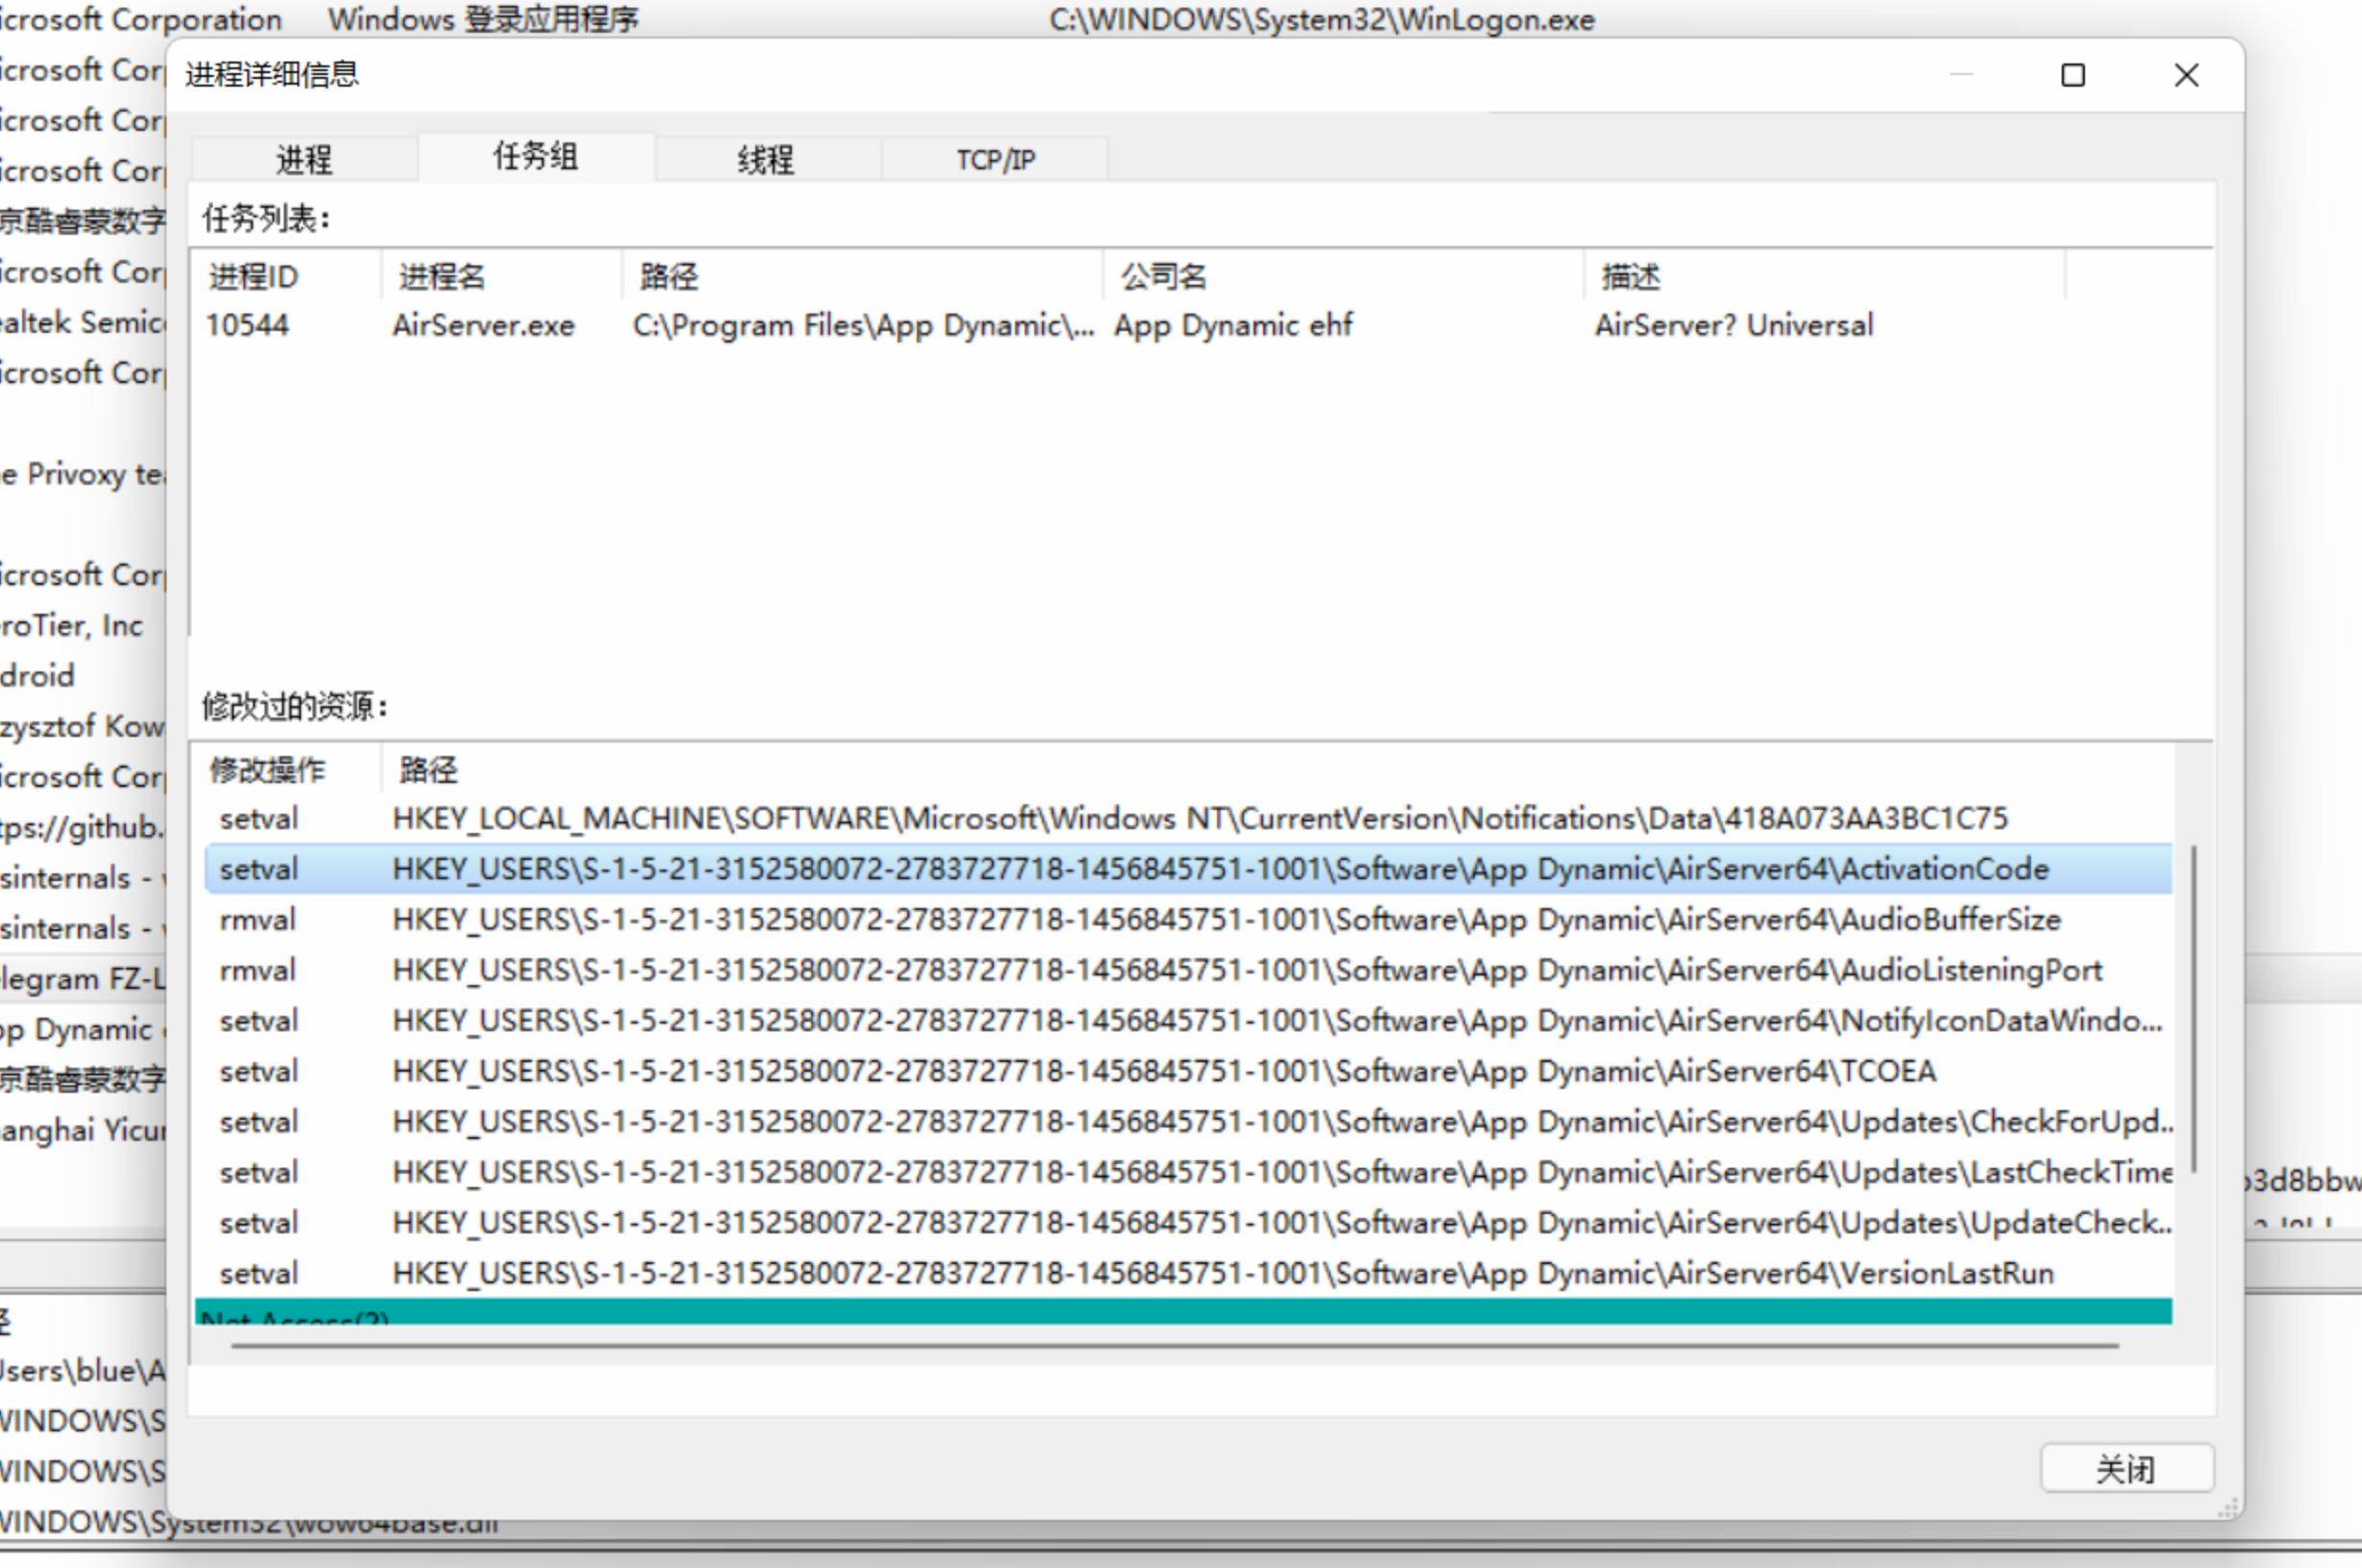
AirServer 把注册表里的 ActivationCode 改成了从服务器上获取的 activation 码。