

在前一篇文章中,我们详细阅读了 AFL 对程序插入的汇编码。简而言之,程序执行到入口点时,会初始化共享内存。而 shm id 则是环境变量中的 __AFL_SHM_ID。初始化 shm 之后,程序变成一个 fork server,通过管道与 afl-fuzz 通讯,有需要时则 fork 一个子进程,用来执行被 fuzz 程序。
接下来,我们得去看看 shm 中保存的覆盖度信息,是如何被利用的。由于 afl-fuzz.c 逻辑比较复杂,相对难以入手,我们可以去拣个软柿子捏——这就是 afl-tmin.c。它的功能如下:
afl-tmin is simple test case minimizer that takes an input file and tries to remove as much data as possible while keeping the binary in a crashing state or producing consistent instrumentation output (the mode is auto-selected based on initially observed behavior).
它拿到一个 input 文件,尝试删除其中尽可能多的内容,但同时保持覆盖度。根据 AFL Readme 文件,它有两个工作模式:
- non-crash 模式,目标程序必须被插桩。afl-tmin 在缩小 input 的过程中,维持覆盖度不变。
- crash 模式,目标程序可以被插桩,也可以不被插桩。afl-tmin 将保持程序 crash。
显然,我们既然想要研究「覆盖度信息的利用方式」,那就应当关注 non-crash 模式。现在来写一个程序,验证 afl-tmin 的功能:
#include <stdio.h>
#include <stdlib.h>

int main(void) {
    char a[50];
    scanf("%s", a);

    if(a[0] != 'x') {
        return 0;
    }

    int pos = 0;
    while(a[++pos] == 'a');

    if(a[pos] == '$') {
        puts("nice");
    }

    return 0;
}
这个程序在接收到 xa*$ 字符串时,输出一句 nice;否则什么也不做。现在来运行 afl-tmin:
root@worklab ~/w/A/example [1]# ../afl-tmin -i in -o out -- ./work
afl-tmin 2.57b by <lcamtuf@google.com>

[+] Read 41 bytes from 'in'.
[*] Performing dry run (mem limit = 50 MB, timeout = 1000 ms)...
[+] Program terminates normally, minimizing in instrumented mode.
[*] Stage #0: One-time block normalization...
[+] Block normalization complete, 0 bytes replaced.
[*] --- Pass #1 ---
[*] Stage #1: Removing blocks of data...
    Block length = 2, remaining size = 41
    Block length = 1, remaining size = 3
[+] Block removal complete, 39 bytes deleted.
[*] Stage #2: Minimizing symbols (2 code points)...
[+] Symbol minimization finished, 0 symbols (0 bytes) replaced.
[*] Stage #3: Character minimization...
[+] Character minimization done, 0 bytes replaced.
[*] --- Pass #2 ---
[*] Stage #1: Removing blocks of data...
    Block length = 1, remaining size = 2
[+] Block removal complete, 0 bytes deleted.

     File size reduced by : 95.12% (to 2 bytes)
    Characters simplified : 0.00%
     Number of execs done : 42
          Fruitless execs : path=21 crash=0 hang=0

[*] Writing output to 'out'...
[+] We're done here. Have a nice day!

# in:  xaaaaaaaaaaaaaaaaaaaaaaaaaaaaaaaaaaaaaaa$
# out: x$
可见,afl-tmin 首先 dry-run 了一遍程序,发现目标程序是插了桩的。接着,它开始试图删除一些块、搞「symbol minimize」和「character minimize」。运行一轮之后,只剩下 2 个字节;再运行一轮,发现没有可优化的地方了,结束程序。
不难观察到一个很有趣的事实:原始 input 的循环是执行了很多次的,但最小化的 input 并没有执行循环,因此它们的路径应该是本质不同的。但为什么 afl-tmin 仍然将其优化掉了呢?
来看一眼汇编:
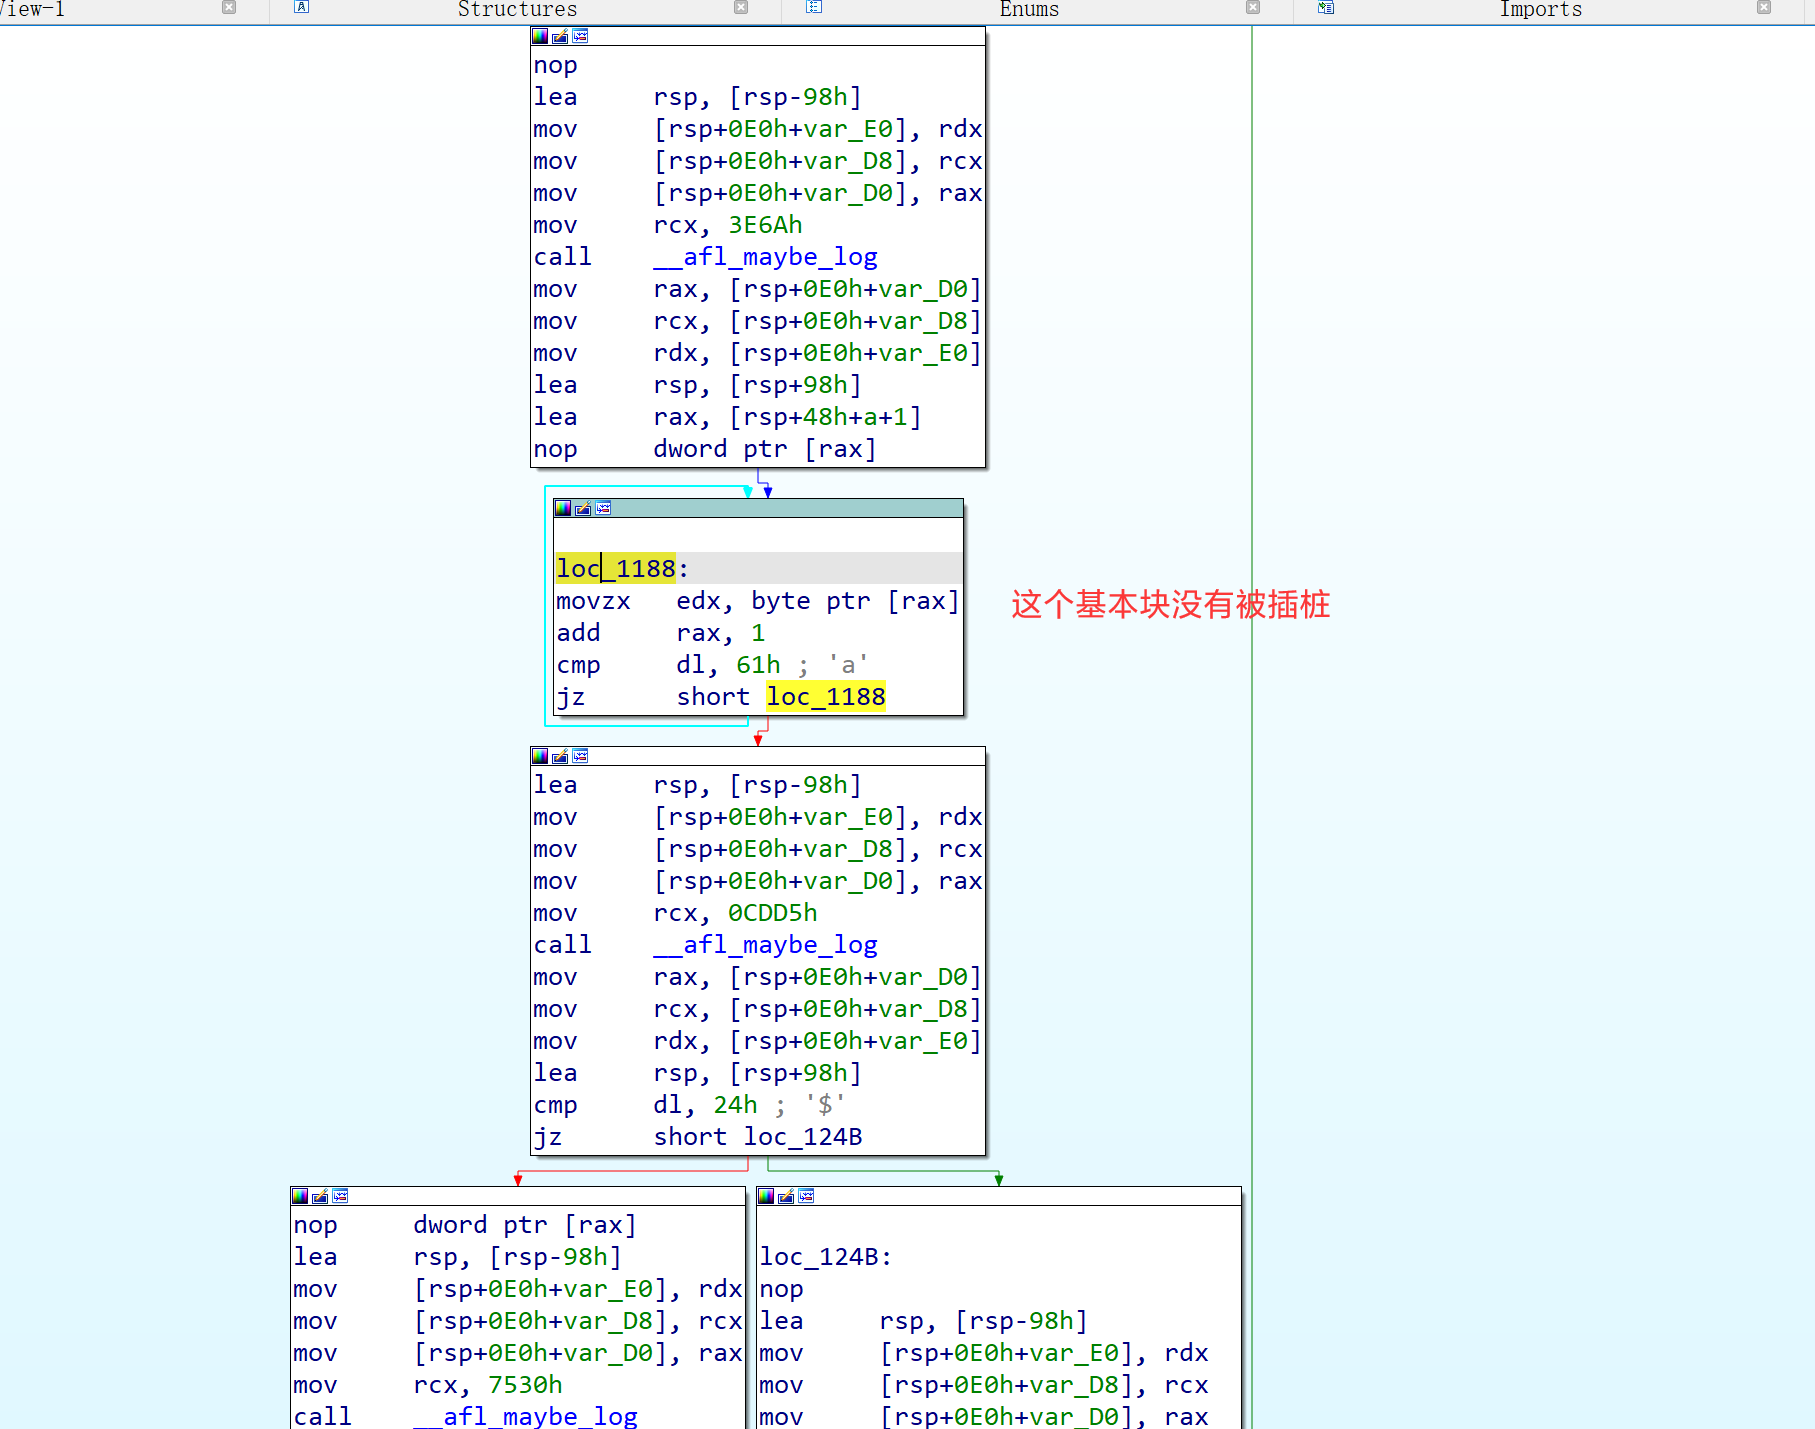
显然,afl-as 根本没有往循环体所在的基本块插桩!所以,无论循环被执行多少次,桩代码都不会更改 shm。因此,优化后的 input 所产生的 shm,与原始 input 的 shm 确实是一致的。
接下来,我们读一遍 afl-tmin 源代码,它共有 1174 行。
0x01 main 函数
afl-tmin 的 main 函数主要是 parse 一下输入参数,并做一些初始化工作。
/* Main entry point */

int main(int argc, char** argv) {

  s32 opt;
  u8  mem_limit_given = 0, timeout_given = 0, qemu_mode = 0;
  char** use_argv;

  doc_path = access(DOC_PATH, F_OK) ? "docs" : DOC_PATH;

  SAYF(cCYA "afl-tmin " cBRI VERSION cRST " by <lcamtuf@google.com>\n");

  while ((opt = getopt(argc,argv,"+i:o:f:m:t:B:xeQV")) > 0)

    switch (opt) {

      case 'i':

        if (in_file) FATAL("Multiple -i options not supported");
        in_file = optarg;
        break;

      case 'o':

        if (out_file) FATAL("Multiple -o options not supported");
        out_file = optarg;
        break;

      case 'f':

        if (prog_in) FATAL("Multiple -f options not supported");
        use_stdin = 0;
        prog_in   = optarg;
        break;

      case 'e':

        if (edges_only) FATAL("Multiple -e options not supported");
        edges_only = 1;
        break;

      case 'x':

        if (exit_crash) FATAL("Multiple -x options not supported");
        exit_crash = 1;
        break;

      case 'm': {

          u8 suffix = 'M';

          if (mem_limit_given) FATAL("Multiple -m options not supported");
          mem_limit_given = 1;

          if (!strcmp(optarg, "none")) {

            mem_limit = 0;
            break;

          }

          if (sscanf(optarg, "%llu%c", &mem_limit, &suffix) < 1 ||
              optarg[0] == '-') FATAL("Bad syntax used for -m");

          switch (suffix) {

            case 'T': mem_limit *= 1024 * 1024; break;
            case 'G': mem_limit *= 1024; break;
            case 'k': mem_limit /= 1024; break;
            case 'M': break;

            default:  FATAL("Unsupported suffix or bad syntax for -m");

          }

          if (mem_limit < 5) FATAL("Dangerously low value of -m");

          if (sizeof(rlim_t) == 4 && mem_limit > 2000)
            FATAL("Value of -m out of range on 32-bit systems");

        }

        break;

      case 't':

        if (timeout_given) FATAL("Multiple -t options not supported");
        timeout_given = 1;

        exec_tmout = atoi(optarg);

        if (exec_tmout < 10 || optarg[0] == '-')
          FATAL("Dangerously low value of -t");

        break;

      case 'Q':

        if (qemu_mode) FATAL("Multiple -Q options not supported");
        if (!mem_limit_given) mem_limit = MEM_LIMIT_QEMU;

        qemu_mode = 1;
        break;

      case 'B': /* load bitmap */

        /* This is a secret undocumented option! It is speculated to be useful
           if you have a baseline "boring" input file and another "interesting"
           file you want to minimize.

           You can dump a binary bitmap for the boring file using
           afl-showmap -b, and then load it into afl-tmin via -B. The minimizer
           will then minimize to preserve only the edges that are unique to
           the interesting input file, but ignoring everything from the
           original map.

           The option may be extended and made more official if it proves
           to be useful. */

        if (mask_bitmap) FATAL("Multiple -B options not supported");
        mask_bitmap = ck_alloc(MAP_SIZE);
        read_bitmap(optarg);
        break;

      case 'V': /* Show version number */

        /* Version number has been printed already, just quit. */
        exit(0);

      default:

        usage(argv[0]);

    }

  if (optind == argc || !in_file || !out_file) usage(argv[0]);

  setup_shm();
  setup_signal_handlers();

  set_up_environment();

  find_binary(argv[optind]);
  detect_file_args(argv + optind);

  if (qemu_mode)
    use_argv = get_qemu_argv(argv[0], argv + optind, argc - optind);
  else
    use_argv = argv + optind;

  exact_mode = !!getenv("AFL_TMIN_EXACT");

  SAYF("\n");

  read_initial_file();

  ACTF("Performing dry run (mem limit = %llu MB, timeout = %u ms%s)...",
       mem_limit, exec_tmout, edges_only ? ", edges only" : "");

  run_target(use_argv, in_data, in_len, 1);

  if (child_timed_out)
    FATAL("Target binary times out (adjusting -t may help).");

  if (!crash_mode) {

     OKF("Program terminates normally, minimizing in "
         cCYA "instrumented" cRST " mode.");

     if (!anything_set()) FATAL("No instrumentation detected.");

  } else {

     OKF("Program exits with a signal, minimizing in " cMGN "%scrash" cRST
         " mode.", exact_mode ? "EXACT " : "");

  }

  minimize(use_argv);

  ACTF("Writing output to '%s'...", out_file);

  unlink(prog_in);
  prog_in = NULL;

  close(write_to_file(out_file, in_data, in_len));

  OKF("We're done here. Have a nice day!\n");

  exit(0);

} 可见,main 函数干的事情如下:
- 根据 argv,设置变量。这包括原始 input 位置、优化结果的输出位置、目标程序运行时的输入文件该放在哪里(如果不是从 stdin 输入的话)、是否只考虑 edge 覆盖率而不考虑 hit count、是否将非 0 返回码视为 crash、程序内存限制、程序运行时间限制、是否使用 qemu 模式,以及一个神秘的
-B选项,具体用途见注释。 - 初始化 shm。
- 设置几个 signal handler,例如当用户按下 Ctrl+C 时,要优雅地结束程序。
- 处理环境变量。这逻辑包括:若用户没有指定
-f,那就去TMPDIR找个地方,存放将要输入给程序的文件(文件位置记录在全局变量prog_in中);设置 ASAN 和 MSAN 相关的环境变量;若存在环境变量 AFL_PRELOAD,则设置 LD_PRELOAD。 - 分析我们将要传递给目标程序的 argv(也就是 afl-tmin 自己的命令行中,
--之后的那部分);如果有@@,则把它覆写为输入文件位置prog_in。 - 设置 qemu 相关参数。与我们无关。
- 看一眼初始 input 文件。如果大于 10MB,就喷我们一句「Input file is too large」。
- 调用
run_target()进行一次 dry run。主要看是否超时、是否 crash。 - 调用
minimize()执行优化。 - 删除
prog_in文件并输出优化结果。
其中,比较重要的部分已经用粗体标出。我们接下来详细阅读这些逻辑。
0x02 初始化 shm
之前的文章提到过,目标程序中的桩代码,会从环境变量 __AFL_SHM_ID 取出 shm id,调用 shmat(shmid, 0, 0),映射到自己进程的地址空间中。也就是说,共享内存并不是由桩代码创建的,而是由外部程序(例如 afl-fuzz)创建;桩代码只是将其拿来用。
现在来看 afl-tmin 程序是如何初始化这一块 shm 的:
/* Configure shared memory. */

static void setup_shm(void) {
  u8* shm_str;

  // 创建 shm
  shm_id = shmget(IPC_PRIVATE, MAP_SIZE, IPC_CREAT | IPC_EXCL | 0600);
  if (shm_id < 0) PFATAL("shmget() failed");

  // 程序退出时,将 shm 删除掉
  atexit(remove_shm);

  // 把 shm id 写入环境变量 __AFL_SHM_ID 中
  shm_str = alloc_printf("%d", shm_id);
  setenv(SHM_ENV_VAR, shm_str, 1);

  ck_free(shm_str);

  // 挂载 shm,由全局变量 trace_bits 指向共享内存区域
  trace_bits = shmat(shm_id, NULL, 0);

  if (trace_bits == (void *)-1) PFATAL("shmat() failed");
}
这里唯一重要的一行是 shmget 函数。查阅 Linux 手册,得知:
- key 为
IPC_PRIVATE,表示创建一块新的共享内存。 - size 为
MAP_SIZE,它被预设为(1 << 16),即 65536 字节。 - shmflg 为
IPC_CREAT | IPC_EXCL | 0600,其中IPC_CREAT表示新建一段共享内存;IPC_EXCL表示如果 key 对应的共享内存已存在则报错(实际上这是冗余的,因为 key 为IPC_PRIVATE而非某个特定的 key)。而0600表示权限,这个字段的语义与 Linux 文件的权限位相同,即对 owner 授予 read、write 权限,group 和 others 则无权限。 - 共享内存创建时,会初始化为 0。因此无需手动对其进行初始化。
因此,这个函数的作用即为:创建一块初始内存,将 shm id 写入环境变量,供桩代码使用。
0x03 run_target 函数
上文提到,afl-tmin 会 dry run 一遍目标程序,观察它是否超时或崩溃。执行的语句为:
run_target(argv=use_argv, mem=in_data, len=in_len, first_run=1) 这里 use_argv 是目标程序的 argv;in_data 是刚刚通过 read_initial_file() 读进来的初始 input;len 是初始 input 的长度。来阅读 run_target 函数,它的主要结构如下:
/* Execute target application. Returns 0 if the changes are a dud, or
   1 if they should be kept. */

static u8 run_target(char** argv, u8* mem, u32 len, u8 first_run) {

  // ... 运行前的准备 ...

  child_pid = fork();

  if (child_pid < 0) PFATAL("fork() failed");

  if (!child_pid) {
    // ... 子进程干活 ...
  }

  // ... 等待子进程结束或超时 ...
  if (waitpid(child_pid, &status, 0) <= 0) FATAL("waitpid() failed");

  // ... 分析 trace_bits ...
  cksum = hash32(trace_bits, MAP_SIZE, HASH_CONST);
}
先看 fork 之前的准备:
static struct itimerval it;
int status = 0;

s32 prog_in_fd;
u32 cksum;

memset(trace_bits, 0, MAP_SIZE);
MEM_BARRIER();

prog_in_fd = write_to_file(prog_in, mem, len);

child_pid = fork();

if (child_pid < 0) PFATAL("fork() failed");

if (!child_pid) {
  // ... 子进程代码
}
这里的 trace_bits 就是共享内存区域。首先把 shm 清零,然后将 input 内容写进 prog_in 文件中,记录 fd。由于父子进程共享 fd,故子进程也可以使用这个 fd。这段代码调用了 write_to_file 函数,它的作用是删除prog_in 文件、重新创建prog_in 文件并以 rw 模式打开,所以父进程写入、子进程读取是没问题的。
上面的代码中有一句 MEM_BARRIER(),它是一个宏,被展开为以下代码:
__asm__ volatile("" ::: "memory") 查阅资料,得知这一句话是告知编译器「not re-order memory accesses across the barrier」。这大概是作者在某次实验中,发现编译器的激进优化违反了自己意图(默认条件下是 -O3 编译的),故加这一句话来约束编译器。
现在看 fork 之后的逻辑。子进程执行的代码如下:
if (!child_pid) {

  struct rlimit r;

  // stdin 指向输入文件、stdout 和 stderr 指向 /dev/null
  if (dup2(use_stdin ? prog_in_fd : dev_null_fd, 0) < 0 ||
      dup2(dev_null_fd, 1) < 0 ||
      dup2(dev_null_fd, 2) < 0) {

    *(u32*)trace_bits = EXEC_FAIL_SIG;
    PFATAL("dup2() failed");
  }

  close(dev_null_fd);
  close(prog_in_fd);

  setsid();

  // 设置内存限制
  if (mem_limit) {

    r.rlim_max = r.rlim_cur = ((rlim_t)mem_limit) << 20;

#ifdef RLIMIT_AS

    setrlimit(RLIMIT_AS, &r); /* Ignore errors */

#else

    setrlimit(RLIMIT_DATA, &r); /* Ignore errors */

#endif /* ^RLIMIT_AS */

  }

  r.rlim_max = r.rlim_cur = 0;
  setrlimit(RLIMIT_CORE, &r); /* Ignore errors */

  // execv 目标程序
  execv(target_path, argv);

  // 如果程序运行到了这里,说明 execv 失败了,把 shm 前四个字节设为 0xfee1dead
  *(u32*)trace_bits = EXEC_FAIL_SIG;
  exit(0);

}
这段代码比较简单:
- 如果目标程序是吃 stdin 输入的,则将 stdin 重定向到
prog_in_fd,否则将 stdin 重定向到/dev/null。
另外,将 stdout 和 stderr 重定向到/dev/null。 - 创建新的进程组,自己为 leader。
- 设置内存限制。
- execv 到目标程序。
- 若 execv 调用失败,则把 shm 的前四个字节设为
0xfee1dead并退出。
于是,父进程只需要监控子进程的退出状态,即可知道目标程序是否崩溃;另外,从 shm 的前 4 字节,能得知 execv 调用是否失败。现在,我们来看父进程执行的代码:
close(prog_in_fd);

// 设置 timeout
child_timed_out = 0;
it.it_value.tv_sec = (exec_tmout / 1000);
it.it_value.tv_usec = (exec_tmout % 1000) * 1000;

// SIGALRM 的 handler 此前已被设为「kill 掉 child_pid」
setitimer(ITIMER_REAL, &it, NULL);

// 等待子进程
if (waitpid(child_pid, &status, 0) <= 0) FATAL("waitpid() failed");

// 取消定时器
child_pid = 0;
it.it_value.tv_sec = 0;
it.it_value.tv_usec = 0;
setitimer(ITIMER_REAL, &it, NULL);

MEM_BARRIER();

// 接下来分析 shm

// execv 是否成功
if (*(u32*)trace_bits == EXEC_FAIL_SIG)
  FATAL("Unable to execute '%s'", argv[0]);

// 对 hit count 分桶
classify_counts(trace_bits);
apply_mask((u32*)trace_bits, (u32*)mask_bitmap);
total_execs++;

if (stop_soon) {
  SAYF(cRST cLRD "\n+++ Minimization aborted by user +++\n" cRST);
  close(write_to_file(out_file, in_data, in_len));
  exit(1);
}

// 如果执行超时,则返回 0,表示这个 input 应该忽略
/* Always discard inputs that time out. */
if (child_timed_out) {
  missed_hangs++;
  return 0;
}


if (WIFSIGNALED(status) ||
    (WIFEXITED(status) && WEXITSTATUS(status) == MSAN_ERROR) ||
    (WIFEXITED(status) && WEXITSTATUS(status) && exit_crash)) {
  // 若发现目标程序 crash

  // 如果是初次运行就 crash,说明该使用 crash mode
  if (first_run) crash_mode = 1;

  if (crash_mode) {
    // 如果是 crash mode,且不要求 crash 路径与原 input 相同,则立即报告 input 有效,该保留
    if (!exact_mode) return 1;
  } else {
    // 是 non-crash mode,但现在 crash 了,说明这个 input 与原 input 路径不同,该丢弃
    missed_crashes++;
    return 0;
  }

} else if (crash_mode) {
  // 发现目标程序没有 crash,而目前处于 crash mode,则本 input 与原 input 路径不同,该丢弃
  missed_paths++;
  return 0;
}

// 对 shm 计算 hash,注意这里的 shm 已经是 hit count 分桶处理之后的了
cksum = hash32(trace_bits, MAP_SIZE, HASH_CONST);

if (first_run) orig_cksum = cksum;

// 若本 input 的 shm hash 与原始 input 相同,则本 input 有效,予以保留
if (orig_cksum == cksum) return 1;

missed_paths++;
return 0;
简而言之,父进程做的事情是:
- 给子进程定时,并等待子进程结束。
- 对 hit count 分桶,并计算 hash,与原始 input 的运行 hash 比对。若一致,则本 input 有效。
比较关键的几行代码是:
classify_counts(trace_bits);
apply_mask((u32*)trace_bits, (u32*)mask_bitmap);

// ...

cksum = hash32(trace_bits, MAP_SIZE, HASH_CONST);
上述代码计算出了运行 hash。先看 classify_counts 函数,它负责将 hit count 分桶。
/* Classify tuple counts. This is a slow & naive version, but good enough here. */

static const u8 count_class_lookup[256] = {

  [0]           = 0,
  [1]           = 1,
  [2]           = 2,
  [3]           = 4,
  [4 ... 7]     = 8,
  [8 ... 15]    = 16,
  [16 ... 31]   = 32,
  [32 ... 127]  = 64,
  [128 ... 255] = 128

};

static void classify_counts(u8* mem) {
  u32 i = MAP_SIZE;

  if (edges_only) {
    // 若打开 -e 开关,则只要命中,无论命中多少次,都视为相同。
    while (i--) {
      if (*mem) *mem = 1;
      mem++;
    }
  } else {
    // 将 hit count 改为其所在的桶 id
    while (i--) {
      *mem = count_class_lookup[*mem];
      mem++;
    }
  }
}
想看懂以上代码的意图,需要先了解 AFL 的 hit count 分桶机制(可参考 AFL 白皮书)。假如我们现在要设计一个灰盒 fuzzer,现在有一个 input 走了某条边 100 次,另一个 input 走了 101 次,我们要不要认为这两个 input 的执行路径本质不同呢?如果认为这算是不同的路径,那么 corpus 数量立刻会爆炸——因为修改 input 有极大概率变更某个循环的执行次数,从而被认为与先前的 input 是本质不同的。另一方面,假如我们认为一条边只有「被走过」和「未被走过」两种状态,那么 fuzzer 将会严重丧失搜索能力。例如,假如目标程序中有一句 strcmp(input, "abcd"),则 fuzzer 能发现 a*** 是有趣的,但它变异出 ab** 之后,会认为它与前述输入路径相同,于是丢弃这个变异。只有等到该 fuzzer 变异出完整的 abcd,它才会认为这是有趣的——但这概率实在太低了。
因此,AFL 的思路是这两个方案的折中——既要避免 corpus 爆炸,又要在循环次数增加的过程中给一些奖励。所以,AFL 设计了 8 个 hit count 桶:
1, 2, 3, 4-7, 8-15, 16-31, 32-127, 128+如果对于两个 input,某条边的 hit count 在同一个桶内,则认为这两个 hit count 没有本质区别。因此,AFL 认为循环次数 0、1、2、3、4 是有本质区别的,7 次与 8 次也有本质区别,但 100 次与 101 次没有本质区别。
说到这里,classify_counts 函数的意图就很明确了:若没有打开 -e 开关,则将 hit count 分桶;若打开了 -e 开关,则只关心是否命中,不关心命中多少次。
classify_counts() 过程结束后,本质相同的 input,其生成的 shm 也相同了。接下来, apply_mask() 过程是配合 -B 开关用的,只留下我们所关心的那些 edge 的 hit count 信息。由于正常情况下,我们关心所有 edge,故 apply_mask() 对我们没有影响。
前文提到,shm 的大小是 65536 字节。如果将 shm 的全文都保留下来用于比较,会产生很大的开销(afl-fuzz 运行时,要把新 input 的运行路径与所有 corpus 的运行路径相比较)。因此,我们不妨用 shm 的「消息摘要」来代替它的全文。AFL 采用的 hash32() 是一个自创的简单算法,我们无需关心其细节。总之,它从 65536 字节的 shm 中,计算出 4 字节的消息摘要,用来代表这个 input 的执行路径。如果本 input 的 hash 与原始 input 相同,则本 input 是有效的;否则丢弃本 input。
至此,我们完成了 run_target 函数的分析。本文的目的——了解 AFL 如何初始化共享内存、如何给 hit count 分桶、如何计算 hash——已经达到了。下面,我们接着把 afl-tmin 的核心算法也分析一下。
0x04 minimize 函数
这个函数的结构如下:
/* Actually minimize! */

static void minimize(char** argv) {
  // ... BLOCK NORMALIZATION

next_pass:
  // ... BLOCK DELETION

  // ... ALPHABET MINIMIZATION

  // ... CHARACTER MINIMIZATION

  if (changed_any) goto next_pass;

finalize_all:

  // 输出结果
}
也就是说,先做一遍 block normalization,然后循环执行 block deletion、alphabet minimization、character minimization 三个优化,直到无法再进一步优化为止。
先来看 block normalization 过程。
  static u32 alpha_map[256];

  u8* tmp_buf = ck_alloc_nozero(in_len);
  u32 orig_len = in_len, stage_o_len;

  u32 del_len, set_len, del_pos, set_pos, i, alpha_size, cur_pass = 0;
  u32 syms_removed, alpha_del0 = 0, alpha_del1, alpha_del2, alpha_d_total = 0;
  u8  changed_any, prev_del;

  /***********************
   * BLOCK NORMALIZATION *
   ***********************/

  // next_p2(n) 是第一个不小于 n 的 2 的幂次;TMIN_SET_STEPS 被定义为 128
  set_len    = next_p2(in_len / TMIN_SET_STEPS);
  set_pos    = 0;

  // TMIN_SET_MIN_SIZE 被定义为 4
  if (set_len < TMIN_SET_MIN_SIZE) set_len = TMIN_SET_MIN_SIZE;

  ACTF(cBRI "Stage #0: " cRST "One-time block normalization...");

  while (set_pos < in_len) {

    u8  res;
    u32 use_len = MIN(set_len, in_len - set_pos);
    // in_data[set_pos: set_pos+use_len] 是一个块

    // 找到块内第一个不为 '0' 的位置
    for (i = 0; i < use_len; i++)
      if (in_data[set_pos + i] != '0') break;

    if (i != use_len) {
      // 若块内有非 '0' 的字符,则尝试将这整个块都设为 '0'
      memcpy(tmp_buf, in_data, in_len);
      memset(tmp_buf + set_pos, '0', use_len);

      res = run_target(argv, tmp_buf, in_len, 0);

      if (res) {
        // 若新 input 有效,则保持该修改
        memset(in_data + set_pos, '0', use_len);
        changed_any = 1;
        alpha_del0 += use_len;
      }
    }

    set_pos += set_len;
  }

  alpha_d_total += alpha_del0;

  OKF("Block normalization complete, %u byte%s replaced.", alpha_del0,
      alpha_del0 == 1 ? "" : "s");
首先,输入被划分为大约 128 个块(除了最后一个块外,块长度为 2 的幂次)。对于每个块,afl-tmin 尝试将其改为全 '0',若其运行路径与原始 input 相同,则保留该更改。
block normalization 的意义在于,如果 input 中有一部分内容是不敏感的(例如,一个负责报告 bmp 图片尺寸的程序,显然不会关心像素颜色),则这部分不敏感内容块会被以 '0' 代替。这对后续进行的优化有好处。
现在来看 block deletion 优化。
next_pass:

  ACTF(cYEL "--- " cBRI "Pass #%u " cYEL "---", ++cur_pass);
  changed_any = 0;

  /******************
   * BLOCK DELETION *
   ******************/

  // TRIM_START_STEPS 被定义为 16
  del_len = next_p2(in_len / TRIM_START_STEPS);
  stage_o_len = in_len;

  ACTF(cBRI "Stage #1: " cRST "Removing blocks of data...");

next_del_blksize:

  if (!del_len) del_len = 1;
  del_pos  = 0;
  prev_del = 1;

  SAYF(cGRA "    Block length = %u, remaining size = %u\n" cRST,
       del_len, in_len);

  while (del_pos < in_len) {

    u8  res;
    s32 tail_len;

    tail_len = in_len - del_pos - del_len;
    if (tail_len < 0) tail_len = 0;

    /* If we have processed at least one full block (initially, prev_del == 1),
       and we did so without deleting the previous one, and we aren't at the
       very end of the buffer (tail_len > 0), and the current block is the same
       as the previous one... skip this step as a no-op. */

    if (!prev_del && tail_len && !memcmp(in_data + del_pos - del_len,
        in_data + del_pos, del_len)) {

      del_pos += del_len;
      continue;

    }

    prev_del = 0;

    /* Head */
    memcpy(tmp_buf, in_data, del_pos);

    /* Tail */
    memcpy(tmp_buf + del_pos, in_data + del_pos + del_len, tail_len);

    res = run_target(argv, tmp_buf, del_pos + tail_len, 0);

    if (res) {

      memcpy(in_data, tmp_buf, del_pos + tail_len);
      prev_del = 1;
      in_len   = del_pos + tail_len;

      changed_any = 1;

    } else del_pos += del_len;

  }

  if (del_len > 1 && in_len >= 1) {

    del_len /= 2;
    goto next_del_blksize;

  }

  OKF("Block removal complete, %u bytes deleted.", stage_o_len - in_len);

  if (!in_len && changed_any)
    WARNF(cLRD "Down to zero bytes - check the command line and mem limit!" cRST);

  if (cur_pass > 1 && !changed_any) goto finalize_all;
上述优化过程中,首先将 input 分为 16 个块,然后从前往后尝试删除每一个块。结束一轮之后,将块大小减半,再尝试上述步骤,直到块大小为 1。
另外,有一个小小的加速逻辑:从前往后删除块的过程中,若前一个块不可删除,且这个块与前一个块一模一样,则直接推断这个块也不可删除,不必去实际运行程序。由于 block normalization 过程过程产生了大量的连续 '0',故这个加速逻辑是可以取得一定效果的。
block deletion 之后,就是 alphabet minimization 优化:
  /*************************
   * ALPHABET MINIMIZATION *
   *************************/

  alpha_size   = 0;
  alpha_del1   = 0;
  syms_removed = 0;

  memset(alpha_map, 0, 256 * sizeof(u32));

  for (i = 0; i < in_len; i++) {
    if (!alpha_map[in_data[i]]) alpha_size++;
    alpha_map[in_data[i]]++;
  }

  ACTF(cBRI "Stage #2: " cRST "Minimizing symbols (%u code point%s)...",
       alpha_size, alpha_size == 1 ? "" : "s");

  for (i = 0; i < 256; i++) {

    u32 r;
    u8 res;

    if (i == '0' || !alpha_map[i]) continue;

    memcpy(tmp_buf, in_data, in_len);

    for (r = 0; r < in_len; r++)
      if (tmp_buf[r] == i) tmp_buf[r] = '0';

    res = run_target(argv, tmp_buf, in_len, 0);

    if (res) {

      memcpy(in_data, tmp_buf, in_len);
      syms_removed++;
      alpha_del1 += alpha_map[i];
      changed_any = 1;

    }

  }

  alpha_d_total += alpha_del1;

  OKF("Symbol minimization finished, %u symbol%s (%u byte%s) replaced.",
      syms_removed, syms_removed == 1 ? "" : "s",
      alpha_del1, alpha_del1 == 1 ? "" : "s");
这是一个非常简单的优化,旨在缩小 input 文件的字符集。其逻辑是:对于每种字符(共有 256 种),尝试在 input 中将其替换为 '0'。
最后一个优化是 character minimization,代码如下:
  /**************************
   * CHARACTER MINIMIZATION *
   **************************/

  alpha_del2 = 0;

  ACTF(cBRI "Stage #3: " cRST "Character minimization...");

  memcpy(tmp_buf, in_data, in_len);

  for (i = 0; i < in_len; i++) {

    u8 res, orig = tmp_buf[i];

    if (orig == '0') continue;
    tmp_buf[i] = '0';

    res = run_target(argv, tmp_buf, in_len, 0);

    if (res) {

      in_data[i] = '0';
      alpha_del2++;
      changed_any = 1;

    } else tmp_buf[i] = orig;

  }

  alpha_d_total += alpha_del2;

  OKF("Character minimization done, %u byte%s replaced.",
      alpha_del2, alpha_del2 == 1 ? "" : "s");

  if (changed_any) goto next_pass;
这个优化比字符集优化更简单:从前往后扫描 input 中的每个字节,尝试将其替换为 '0'。
上述三个优化会循环执行,直到三个优化都无效为止。回顾我们文章一开始写的那个程序,原始输入 xaaaaaaaaaaaaaaaaaaaaaaaaaaaaaaaaaaaaaaa$ 只经过 block deletion 便优化到了 x$,再无优化空间,故在第二轮优化时未取得任何成果,结束 afl-tmin 流程。
以上,我们分析完了 afl-tmin 程序。下一篇文章将会讨论 afl-analyze.c、 afl-showmap.c 等 AFL 的「周边」程序,这些都结束后,再进入 afl-fuzz.c 的源码阅读。