

前一篇文章阅读了 afl-tmin 这一个小工具。那么现在,我们继续阅读其他的两个小工具:afl-showmap 和 afl-analyze。
我们一直在故意推迟阅读 afl-fuzz.c 这份核心代码。这是因为,AFL 的代码结构并不好——它并没有按功能划分各个模块,而是把主要的逻辑全部杂乱地堆在了 afl-fuzz.c 这一个文件中。另外,AFL 的代码复用,常常是 copy-paste 的(例如,读者马上将会看到 afl-showmap.c 与 afl-tmin.c 有很多重复代码)。在上述情形下,直接冲进 afl-fuzz.c,可能会看得云山雾罩,不得要领。因此我们选择了一条迂回的路:先阅读插桩逻辑,搞明白桩代码是如何收集覆盖度的;再阅读一些小工具,掌握一些 AFL 源码内的知识;最后再去看 afl-fuzz.c。这就如同爬岳麓山,直接冲往顶峰是很艰难的;沿着盘山公路走,虽然路程远了些,但坡度较缓,便可轻松登顶。
站在半山腰,回顾一下我们阅读 AFL 代码的历程:
现在,我们来看 afl-showmap 和 afl-analyze 工具。前者用于输出 hit count;后者用于分析一个输入文件的各个部分。
afl-showmap 工具
afl-showmap 用于运行一遍目标程序,并以「人类可读的方式」展示 hit count。看过前一篇文章的读者,会对 afl-showmap.c 中的一些内容感到非常熟悉:例如,find_binary 这个工具函数的代码是一模一样的。
写一个小程序实验一下。
#include <stdio.h>
#include <unistd.h>

int main(void) {
    char s[50];
    read(0, s, 100);

    int len = -1;

    do {
        len++;
    } while(s[len] == 'a');

    printf("%d\n", len);

    return 0;
}

// 编译指令:AFL_DONT_OPTIMIZE=1 ../afl-gcc app.c -o app -g运行 afl-showmap:
echo 'aaaaaaabbbc' > in
afl-showmap -o trace -- ./app < in
# afl-showmap 2.57b by <lcamtuf@google.com>
# [*] Executing './app'...
#
# -- Program output begins --
# 7
# -- Program output ends --
# [+] Captured 4 tuples in 'trace'.
输出如下:
013027:1
018293:4
033578:1
037237:1
我们现在可以来验证一下这个输出是否符合我们的预期。trace 指出,id 为「18293」的这条边命中了多次,显然这条边是 while 循环的回跳。看汇编:
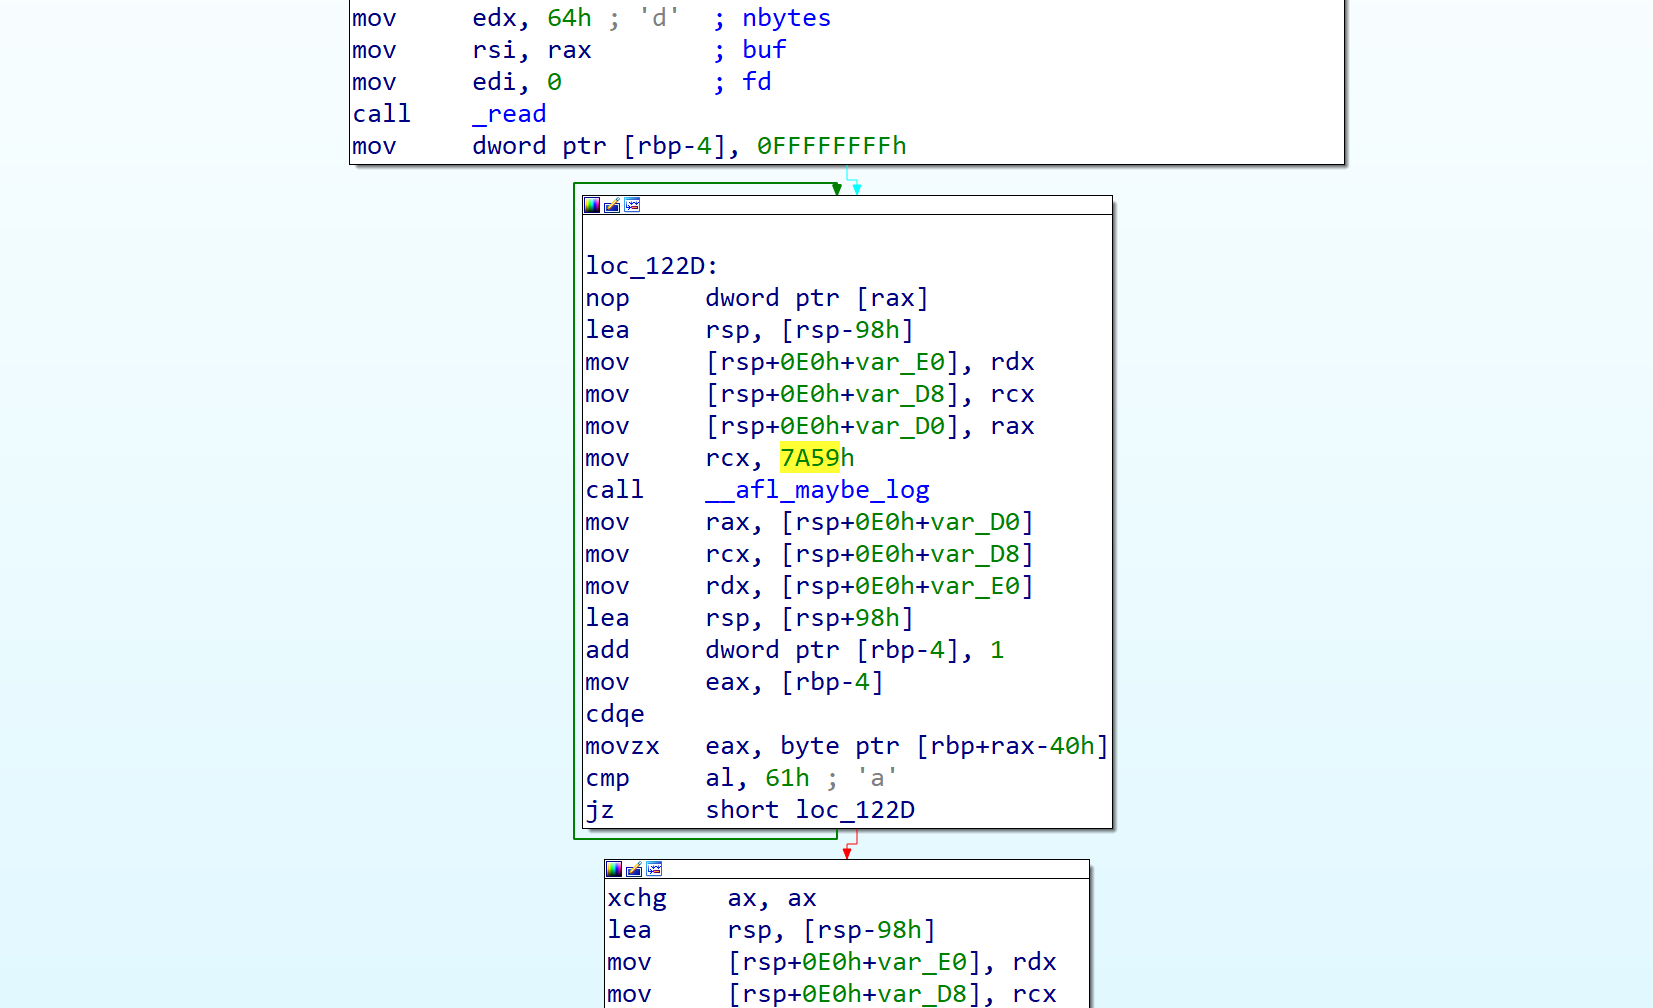
我们在 AFL 源码阅读的第一篇文章中讨论过,afl-as 插入的每条桩代码都有一个 id,它在编译器随机生成。而「前一个 id」与「后一个 id」的组合,即可代表一条边。hit count 更新方法如下:
cur_location = <COMPILE_TIME_RANDOM>;
shared_mem[cur_location ^ prev_location]++;
prev_location = cur_location >> 1;
现在,这个循环体中的桩代码 id 为 0x7a59,按上面的逻辑计算一下:
In [2]: 0x7A59 ^ (0x7A59 >> 1)
Out[2]: 18293
可见 18293 确实是指的这一条回跳边。但为什么 trace 中,这条边的数据是「4」而非实际的跳转次数 7 次呢?这得等到看代码的时候才能明白。
main 函数
看一眼 main 函数:
/* Main entry point */

int main(int argc, char** argv) {

  s32 opt;
  u8  mem_limit_given = 0, timeout_given = 0, qemu_mode = 0;
  u32 tcnt;
  char** use_argv;

  doc_path = access(DOC_PATH, F_OK) ? "docs" : DOC_PATH;

  while ((opt = getopt(argc,argv,"+o:m:t:A:eqZQbcV")) > 0)
    switch (opt) {
      // ... argv 处理,略
    }

  if (optind == argc || !out_file) usage(argv[0]);

  setup_shm();
  setup_signal_handlers();

  set_up_environment();

  find_binary(argv[optind]);

  if (!quiet_mode) {
    show_banner();
    ACTF("Executing '%s'...\n", target_path);
  }

  detect_file_args(argv + optind);

  if (qemu_mode)
    use_argv = get_qemu_argv(argv[0], argv + optind, argc - optind);
  else
    use_argv = argv + optind;

  run_target(use_argv);

  tcnt = write_results();

  if (!quiet_mode) {

    if (!tcnt) FATAL("No instrumentation detected" cRST);
    OKF("Captured %u tuples in '%s'." cRST, tcnt, out_file);

  }

  exit(child_crashed * 2 + child_timed_out);

}
可见它的流程比 afl-tmin 更简单:先设置 shm 和一些环境变量,调用 run_target 执行一遍目标程序,再调用 write_results 把结果写进文件。
hit count 分桶
afl-showmap 的大部分函数与 afl-tmin 中的几乎一样,不过 run_target 过程中,给 hit count 分桶的逻辑有细微区别:
/* Classify tuple counts. Instead of mapping to individual bits, as in
   afl-fuzz.c, we map to more user-friendly numbers between 1 and 8. */

static const u8 count_class_human[256] = {

  [0]           = 0,
  [1]           = 1,
  [2]           = 2,
  [3]           = 3,
  [4 ... 7]     = 4,
  [8 ... 15]    = 5,
  [16 ... 31]   = 6,
  [32 ... 127]  = 7,
  [128 ... 255] = 8

};

static const u8 count_class_binary[256] = {

  [0]           = 0,
  [1]           = 1,
  [2]           = 2,
  [3]           = 4,
  [4 ... 7]     = 8,
  [8 ... 15]    = 16,
  [16 ... 31]   = 32,
  [32 ... 127]  = 64,
  [128 ... 255] = 128

};

static void classify_counts(u8* mem, const u8* map) {

  u32 i = MAP_SIZE;

  if (edges_only) {

    while (i--) {
      if (*mem) *mem = 1;
      mem++;
    }

  } else {

    while (i--) {
      *mem = map[*mem];
      mem++;
    }

  }

}
可见,在分桶时,有两种分桶方案:binary mode 下,桶 id 与 afl-tmin 是一致的;人类可读模式下,桶 id 是从 0 到 8 的自然数。因此,我们刚刚实验中遇到的问题——为什么那条边的 trace 数据是 4 而不是 7——便得到解答了。hit count 为 7 次时,它的桶 id 是 4。若循环被执行 8 次,那桶 id 就该是 5 了。
至于为什么在人类可读模式下输出这样的 id,推测作者是希望保证输出中每一行的长度都相等。
write_results 函数
来接着看 write_results 函数:
static u32 write_results(void) {

  s32 fd;
  u32 i, ret = 0;

  u8  cco = !!getenv("AFL_CMIN_CRASHES_ONLY"),
      caa = !!getenv("AFL_CMIN_ALLOW_ANY");

  // 打开输出文件
  if (!strncmp(out_file, "/dev/", 5)) {
    fd = open(out_file, O_WRONLY, 0600);
    if (fd < 0) PFATAL("Unable to open '%s'", out_file);
  } else if (!strcmp(out_file, "-")) {
    fd = dup(1);
    if (fd < 0) PFATAL("Unable to open stdout");
  } else {
    unlink(out_file); /* Ignore errors */
    fd = open(out_file, O_WRONLY | O_CREAT | O_EXCL, 0600);
    if (fd < 0) PFATAL("Unable to create '%s'", out_file);
  }

  // 若为 binary mode,直接原样输出 65536 字节的 shm
  if (binary_mode) {
    for (i = 0; i < MAP_SIZE; i++)
      if (trace_bits[i]) ret++;

    ck_write(fd, trace_bits, MAP_SIZE, out_file);
    close(fd);
  } else {
    FILE* f = fdopen(fd, "w");
    if (!f) PFATAL("fdopen() failed");

    for (i = 0; i < MAP_SIZE; i++) {
      if (!trace_bits[i]) continue;
      ret++;

      if (cmin_mode) {
        if (child_timed_out) break;
        if (!caa && child_crashed != cco) break;

        fprintf(f, "%u%u\n", trace_bits[i], i);
      } else fprintf(f, "%06u:%u\n", i, trace_bits[i]);
    }
    fclose(f);
  }

  return ret;

}
逻辑很简单,把所有命中过的边都输出。这里作者使用了 %06u:%u 占位符,印证了我们刚刚的猜测。所以 afl-showmap 的输出文件,其每一行长度都是 8 个字节。这不仅便于人类阅读,也便于机器阅读。
读者可能会有疑问,既然每条边的 hit count 只占用一个 shm 中的一个字节,那如果某条边的 hit count 从 255 再加一,岂不是就要变成 0 了?这样的话,AFL 会认为这条边没有被命中过(实验结果也正是如此)。事实上 AFL 作者在白皮书中提到过这个问题。他认为,这种情况比较罕见,所以可以牺牲掉,来换取速度提升。
以上,我们完成了对 afl-showmap 的分析。下面来看 afl-analyze。
afl-analyze 工具
afl-analyze 的用途是分析一个输入文件,猜测它各个部分的语义——例如 magic number、checksum、length 等。我们提到过,AFL 面对 magic number 和 checksum 比较无力,因此找到这些特殊结构有助于我们进一步 fuzz。
为做实验,先来设计一个文件格式。

一个合法的文件必须满足:
- 头部 4 个字节为
haha - 接下来 4 个字节为小端序的 uint32 数据,表示数据长度
- 接下来 len 个字节,为用户数据
- 接下来 4 个字节为
done - 接下来 4 个字节为用户数据的 checksum,文件到此为止
显然,这是一个很严格的格式,灰盒 fuzzer 不太可能凭空变异出符合要求的文件。现在为这个文件格式写一个 parser:
#include <stdio.h>
#include <stdlib.h>
#include <string.h>
#include <unistd.h>

int main(void) {
    char s[300];
    int file_len = read(0, s, 400);

    if(strncmp(s, "haha", 4)) {
        puts("header error");
        exit(0);
    }

    int len = *(unsigned int*)(&s[4]);

    if(file_len != len + 16) {
        puts("len error");
        exit(0);
    }

    unsigned int sum=0;
    for(int i=0; i<len; i++) {
        sum += (unsigned char)s[8 + i];
    }

    if(strncmp(s + 8 + len, "done", 4)) {
        puts("header error");
        exit(0);
    }

    if(*(unsigned int*)(&s[12 + len]) != sum) {
        puts("checksum error");
        exit(0);
    }

    puts("accepted");

    return 0;
}
造一个合法输入,并运行 afl-analyze。
python -c 'open("in", "wb").write(b"haha" + b"\x50\x00\x00\x00" + b"a" * 0x50 + b"done\x50\x1e\x00\x00")'

afl-analyze -i in -- ./check
结果如下:
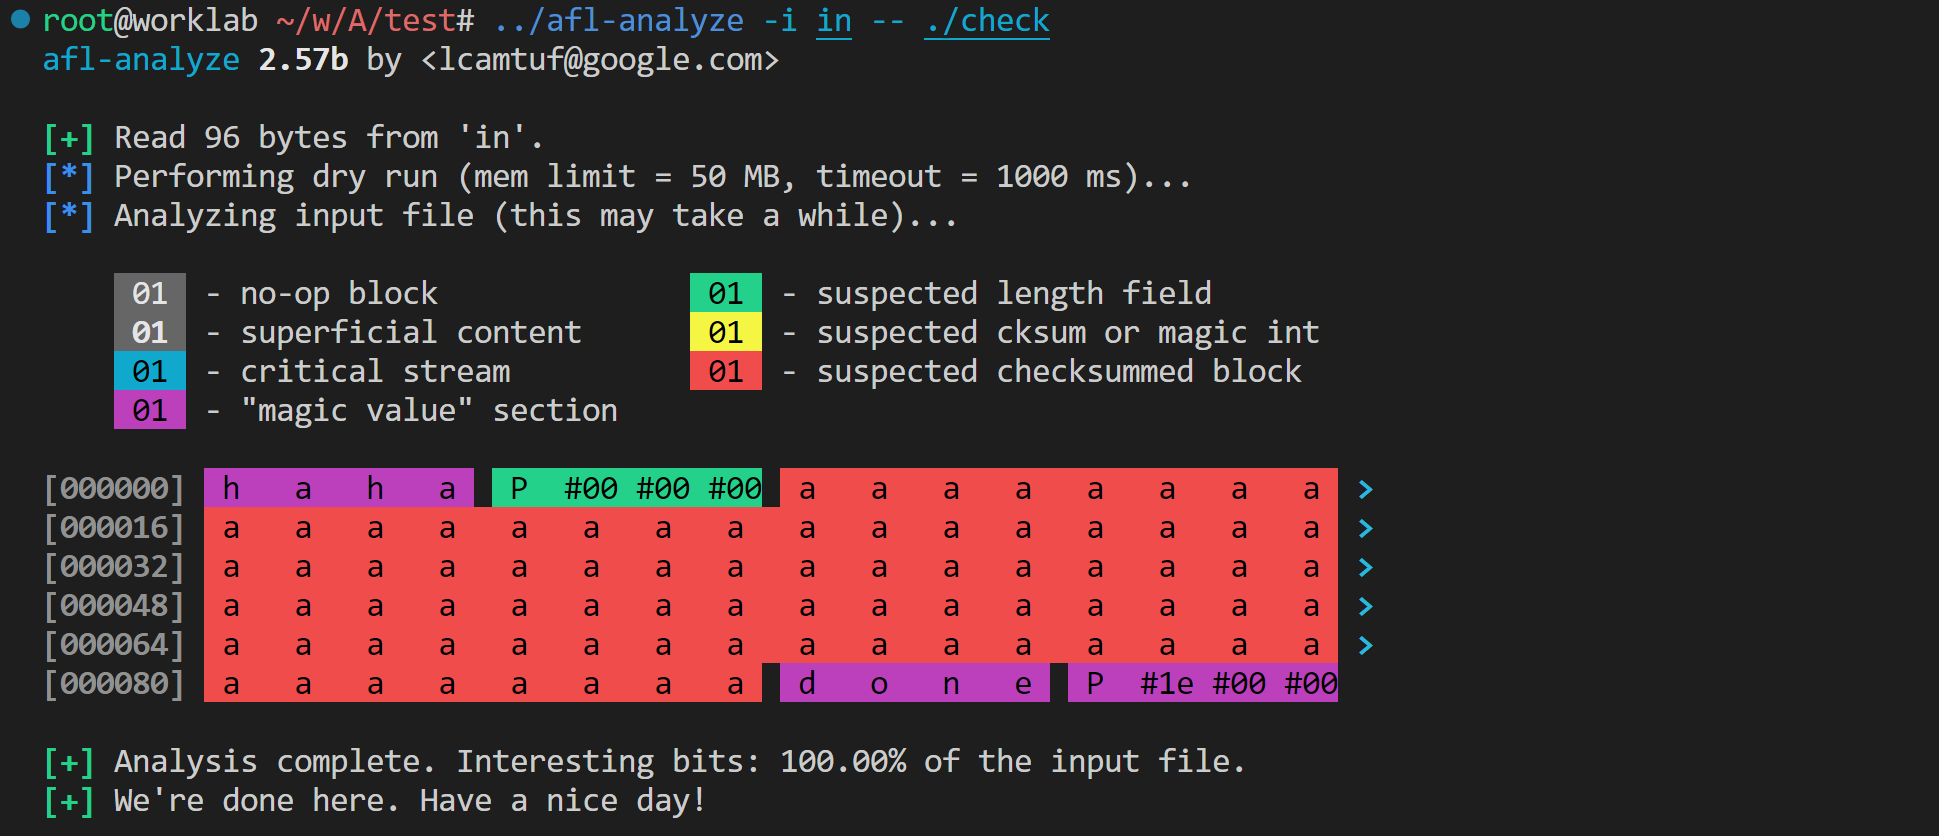
可见 afl-analyze 顺利找出了两个 magic、一个 length,并发现了被计算 checksum 的用户数据字段。然而,afl-analyze 认为文件末尾不是 checksum 值,而是 magic。不过这样的结果已经足够好了。下面开始分析源码。
main 函数
afl-analyze 工具的 main 函数如下:
/* Main entry point */

int main(int argc, char** argv) {

  s32 opt;
  u8  mem_limit_given = 0, timeout_given = 0, qemu_mode = 0;
  char** use_argv;

  doc_path = access(DOC_PATH, F_OK) ? "docs" : DOC_PATH;

  SAYF(cCYA "afl-analyze " cBRI VERSION cRST " by <lcamtuf@google.com>\n");

  while ((opt = getopt(argc,argv,"+i:f:m:t:eQV")) > 0)
    switch (opt) {
      // ... argv 处理,略
    }

  if (optind == argc || !in_file) usage(argv[0]);

  use_hex_offsets = !!getenv("AFL_ANALYZE_HEX");

  // 与 afl-tmin 相同的初始化流程
  setup_shm();
  setup_signal_handlers();

  set_up_environment();

  find_binary(argv[optind]);
  detect_file_args(argv + optind);

  if (qemu_mode)
    use_argv = get_qemu_argv(argv[0], argv + optind, argc - optind);
  else
    use_argv = argv + optind;

  SAYF("\n");

  read_initial_file();

  ACTF("Performing dry run (mem limit = %llu MB, timeout = %u ms%s)...",
       mem_limit, exec_tmout, edges_only ? ", edges only" : "");

  // dry run 一遍
  run_target(use_argv, in_data, in_len, 1);

  if (child_timed_out)
    FATAL("Target binary times out (adjusting -t may help).");

  if (!anything_set()) FATAL("No instrumentation detected.");

  // 分析
  analyze(use_argv);

  OKF("We're done here. Have a nice day!\n");

  exit(0);

}
可见,它的流程与 afl-tmin 相似——先初始化,然后 dry run 一遍,最后开始干活。它的 run_target 函数也和 afl-tmin 几乎一致,负责以特定的 input 执行程序,并返回运行路径 hash。因此主要关注 analyze 函数。
analyze 函数
这是真正干活的函数,很短:
/* Actually analyze! */

static void analyze(char** argv) {

  u32 i;
  u32 boring_len = 0, prev_xff = 0, prev_x01 = 0, prev_s10 = 0, prev_a10 = 0;

  u8* b_data = ck_alloc(in_len + 1);
  u8  seq_byte = 0;

  b_data[in_len] = 0xff; /* Intentional terminator. */

  ACTF("Analyzing input file (this may take a while)...\n");

#ifdef USE_COLOR
  show_legend();
#endif /* USE_COLOR */

  for (i = 0; i < in_len; i++) {

    u32 xor_ff, xor_01, sub_10, add_10;
    u8  xff_orig, x01_orig, s10_orig, a10_orig;

    /* Perform walking byte adjustments across the file. We perform four
       operations designed to elicit some response from the underlying
       code. */

    // a^0xff
    in_data[i] ^= 0xff;
    xor_ff = run_target(argv, in_data, in_len, 0);

    // a^0x01
    in_data[i] ^= 0xfe;
    xor_01 = run_target(argv, in_data, in_len, 0);

    // a-0x10
    in_data[i] = (in_data[i] ^ 0x01) - 0x10;
    sub_10 = run_target(argv, in_data, in_len, 0);

    // a+0x10
    in_data[i] += 0x20;
    add_10 = run_target(argv, in_data, in_len, 0);
    in_data[i] -= 0x10;

    // 观察 4 次运行路径与原始路径是否相同
    /* Classify current behavior. */
    xff_orig = (xor_ff == orig_cksum);
    x01_orig = (xor_01 == orig_cksum);
    s10_orig = (sub_10 == orig_cksum);
    a10_orig = (add_10 == orig_cksum);

    if (xff_orig && x01_orig && s10_orig && a10_orig) {
      // 4 次变异都不改变路径,则这个位置不重要
      b_data[i] = RESP_NONE;
      boring_len++;
    } else if (xff_orig || x01_orig || s10_orig || a10_orig) {
      // 有至少一个不改变路径的变异,说明这个位置不关键,可以变异
      b_data[i] = RESP_MINOR;
      boring_len++;
    } else if (xor_ff == xor_01 && xor_ff == sub_10 && xor_ff == add_10) {
      // 4 次实验都与原路径不同,且这 4 次实验的路径一致,说明这个地方不能改
      // 典型场景是 magic 检查,magic 不对就退出程序
      b_data[i] = RESP_FIXED;
    } else b_data[i] = RESP_VARIABLE;
    // 4 次实验都与原路径不同,且各次实验的执行路径也不一致,说明这位置对控制流很重要

    // 看这个位置与前一个位置的行为是否完全不一样,给 field 划定边界
    /* When all checksums change, flip most significant bit of b_data. */
    if (prev_xff != xor_ff && prev_x01 != xor_01 &&
        prev_s10 != sub_10 && prev_a10 != add_10) seq_byte ^= 0x80;

    b_data[i] |= seq_byte;

    prev_xff = xor_ff;
    prev_x01 = xor_01;
    prev_s10 = sub_10;
    prev_a10 = add_10;

  }

  dump_hex(in_data, in_len, b_data);

  SAYF("\n");

  OKF("Analysis complete. Interesting bits: %0.02f%% of the input file.",
      100.0 - ((double)boring_len * 100) / in_len);

  if (exec_hangs)
    WARNF(cLRD "Encountered %u timeouts - results may be skewed." cRST,
          exec_hangs);

  ck_free(b_data);

}
上述代码做的事情是:对于 input 文件中的每一个位置,将 a 改为a^0xff、a^0x01、a+0x10、a-0x10 这四个数,分别运行实验。分类讨论实验结果:
- 四次实验的运行路径全部与原始路径相同。说明这个位置对程序没什么影响。(典型例子是,一个负责输出图片 exif 信息的程序不会管每个像素是什么颜色)
- 有至少一次实验的运行路径与原始路径相同。说明这个位置不太重要,可以改。(例如,这个位置是什么不太重要,但唯独不能是
\x00,因为会造成截断) - 四次实验的运行路径与原始路径不同,且这四次实验的路径一致。说明这个位置不能改。(典型例子是 magic number 检查,只要 magic 不对,程序就结束)
- 四次实验都与原始路径不同,且各自路径不一致。说明这个地方严重影响控制流,应该狠狠地改。(典型例子是 type 字段,决定程序接下来如何处理数据)
另外,对于每个位置,如果对它的修改造成的影响,与修改前一个字节完全不一样,则认为它与前一个字节分别属于不同的 field。这是有道理的,例如 uint32 magic number 的第二、第三个字节被修改后的行为,肯定是完全一样的。而当前后两个字节分属不同的 field 时,对它们的修改大概率会产生完全不同的效果。
上面的代码把文件划分成了若干个 field,并给每个字节标注了「不重要 / 不太重要 / 不能改 / 敏感」四种标签。那么,afl-analyzer 是如何进一步标记 length、magic、checksum 等字段的呢?来继续看 dump_hex 函数。
dump_hex 函数
dump_hex 函数不仅负责输出十六进制数据,还给各个 field 打上了细化的标签。这种将算法与细碎的业务逻辑混合起来的行为不值得提倡。代码如下:
/* Interpret and report a pattern in the input file. */

static void dump_hex(u8* buf, u32 len, u8* b_data) {

  u32 i;

  for (i = 0; i < len; i++) {
    u32 rlen = 1, off;

    u8  rtype = b_data[i] & 0x0f;

    // 划定块、确定块标签

    while (i + rlen < len && (b_data[i] >> 7) == (b_data[i + rlen] >> 7)) {
      if (rtype < (b_data[i + rlen] & 0x0f)) rtype = b_data[i + rlen] & 0x0f;
      rlen++;
    }

    // 整个块的标签,是取块内优先级最高的那个标签
    // 优先级:RESP_FIXED=3, RESP_VARIABLE=2, RESP_MINOR=1, RESP_NONE=0

    /* Try to do some further classification based on length & value. */

    if (rtype == RESP_FIXED) {

      switch (rlen) {

        case 2: {

            u16 val = *(u16*)(in_data + i);

            // 2 字节的 fixed 块,值比输入长度小,猜测是 length
            /* Small integers may be length fields. */
            if (val && (val <= in_len || SWAP16(val) <= in_len)) {
              rtype = RESP_LEN;
              break;
            }

            // 2 字节的 fixed 块,两个字节差距大于 32,猜 checksum
            /* Uniform integers may be checksums. */
            if (val && abs(in_data[i] - in_data[i + 1]) > 32) {
              rtype = RESP_CKSUM;
              break;
            }

            break;

          }

        case 4: {

            u32 val = *(u32*)(in_data + i);

            // 4 字节的 fixed 块,值比输入长度小,猜测是 length
            /* Small integers may be length fields. */
            if (val && (val <= in_len || SWAP32(val) <= in_len)) {
              rtype = RESP_LEN;
              break;
            }

            // 4 字节的 fixed 块,第一个字节的 MSB 与其他字节不同,猜 checksum
            /* Uniform integers may be checksums. */
            if (val && (in_data[i] >> 7 != in_data[i + 1] >> 7 ||
                in_data[i] >> 7 != in_data[i + 2] >> 7 ||
                in_data[i] >> 7 != in_data[i + 3] >> 7)) {
              rtype = RESP_CKSUM;
              break;
            }

            break;

          }

        // 长度小于 32 的奇数长度 fixed 块,不细化标签
        case 1: case 3: case 5 ... MAX_AUTO_EXTRA - 1: break;

        // 其他 fixed 块,怀疑它是被计算 checksum 的字段
        default: rtype = RESP_SUSPECT;

      }

    }

    /* Print out the entire run. */

    for (off = 0; off < rlen; off++) {

      /* Every 16 digits, display offset. */

      if (!((i + off) % 16)) {

        if (off) SAYF(cRST cLCY ">");

        if (use_hex_offsets)
          SAYF(cRST cGRA "%s[%06x] " cRST, (i + off) ? "\n" : "", i + off);
        else
          SAYF(cRST cGRA "%s[%06u] " cRST, (i + off) ? "\n" : "", i + off);

      }

      switch (rtype) {

        case RESP_NONE:     SAYF(cLGR bgGRA); break;
        case RESP_MINOR:    SAYF(cBRI bgGRA); break;
        case RESP_VARIABLE: SAYF(cBLK bgCYA); break;
        case RESP_FIXED:    SAYF(cBLK bgMGN); break;
        case RESP_LEN:      SAYF(cBLK bgLGN); break;
        case RESP_CKSUM:    SAYF(cBLK bgYEL); break;
        case RESP_SUSPECT:  SAYF(cBLK bgLRD); break;

      }

      show_char(in_data[i + off]);

      if (off != rlen - 1 && (i + off + 1) % 16) SAYF(" "); else SAYF(cRST " ");

    }
    i += rlen - 1;

  }

  SAYF(cRST "\n");
}
可见,被标为「不能改」的块会被细分,其他块(不重要、不太重要、敏感)则保持原标签。具体而言,对于一个被标为「不能改」的块,其处理逻辑如下:
- 若长度为 2 字节,且值比输入数据总长度小,则认为是 length 字段
- 若长度为 2 字节,且两个字节之差大于 32,则认为是 checksum 字段
- 若长度为 4 字节,且值比输入数据总长度小,则认为是 length 字段
- 若长度为 4 字节,且第一个字节的 MSB 与其他三个字节不同,则认为是 checksum 字段
- 若长度为小于 32 的奇数,则继续认为是 magic ,不改标签
- 如果以上情况都不是,则认为是被计算 checksum 的字段
显然,我们前文的实验中,输入数据里的那一大批「a」首先被标记为了「不能改」,然后由于长度大于 32,故细化标记为「被 checksum 的字段」。而 length 字段,也是先被标记为「不能改」,又发现其值比输入总长度小,故细化为「length 字段」。至于 haha 和 done,由于它们的值很大,而且四个字节 MSB 相同,故没有被标为 checksum。而真实的 checksum,由于四个字节的 MSB 恰巧相同,故未被标为 checksum。
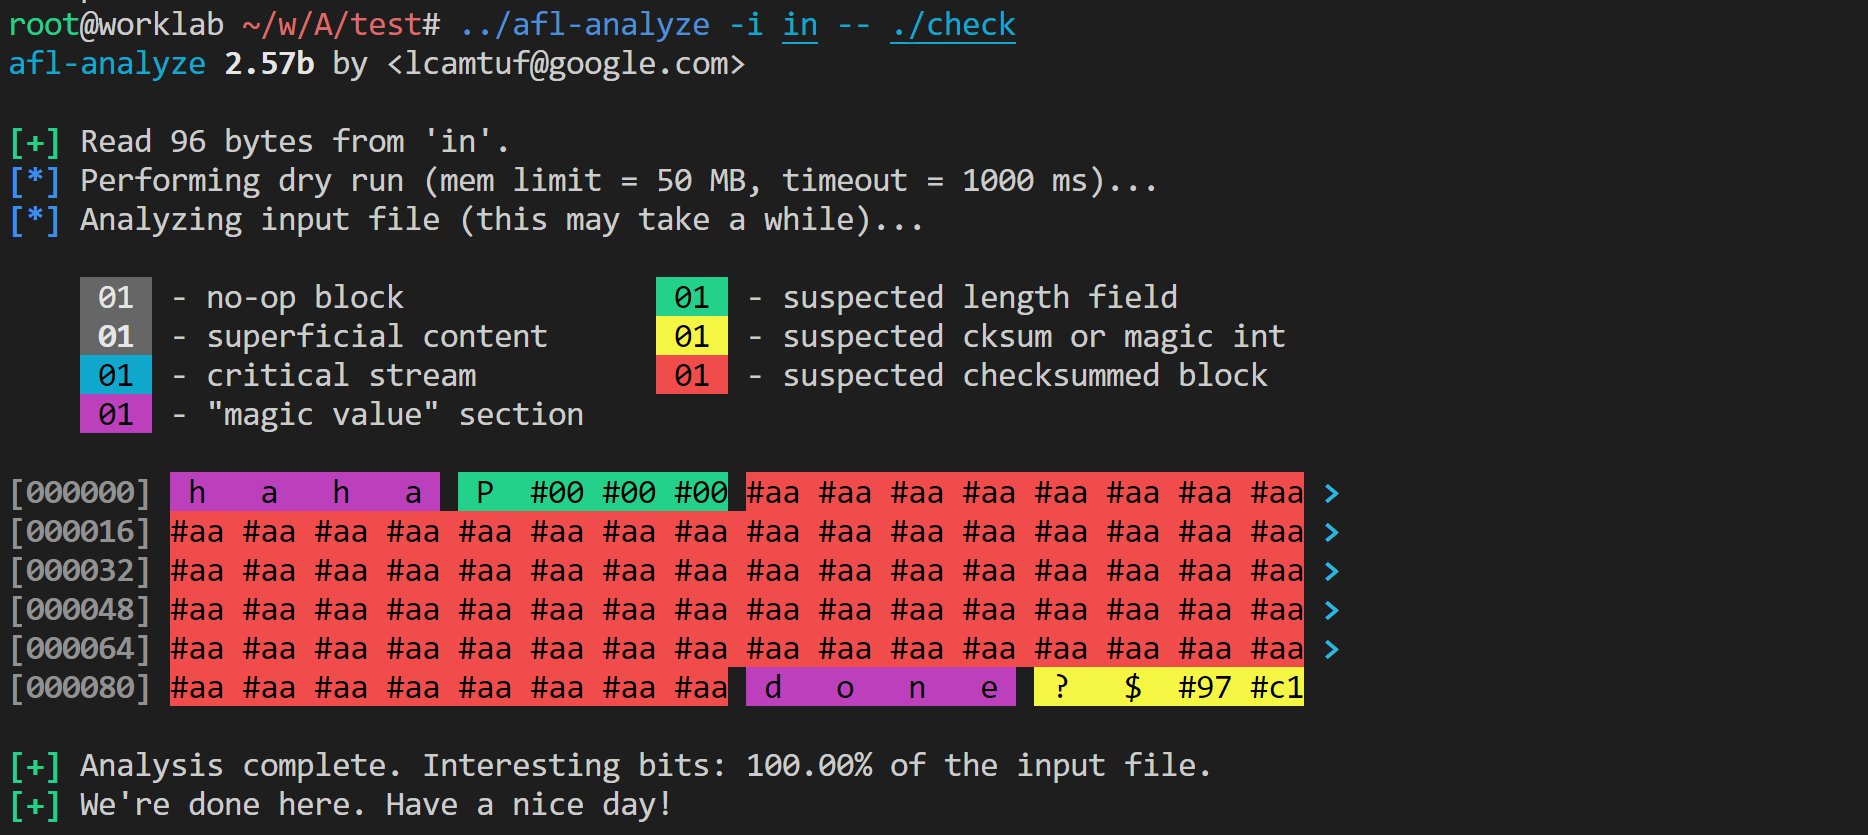
说到这里,很容易想到,这个 checksum 的实现不太好。如果我们把 checksum 算法写好一点,各个字节的分布互相独立、均匀随机,则 afl-analyzer 应该有 87.5% 的概率能发现 checksum 字段。现在修改 checksum 算法:
unsigned int sum=0xdeadbeaf;
for(int i=0; i<len; i++) {
    sum = (sum ^ (unsigned char)s[8 + i]) * 1664525 + 1013904223;
}
afl-analyze 果然发现了这个 checksum。
一点讨论
值得注意,afl-analyze 只做了 $4 n$ 次实验,其中 $n$ 为输入长度。而且它只尝试原地修改每个字节,而不尝试插入、删除。因此,它能做到的效果比较受限。
afl-analyze 采用非常简单的策略来细分 fixed 块,这导致它给出的结果可信度存疑。它有 12.5% 的概率将 4 字节的 checksum 误认为 magic number,且会把一些 magic number 误认为 checksum(这个概率比较低,按照 wikipedia 上的一张表,似乎大部分文件的 header 都不会被误判)。它很容易把 fixed 字段错误地细分为「被计算 checksum 的字段」。
不过,afl-analyze 以很小的运行代价,就能提示输入文件中的很多细节。它给出的「不重要」和「敏感」标签是尤其可信的,至于其他标签,也能很好地节省人工分析的时间。
以上,我们完成了对 afl-showmap 和 afl-analyze 的源码阅读。下篇文章将开始阅读 AFL 的核心代码 afl-fuzz.c。